CSS3新增动画、过渡效果
transform变形
-
translate 沿着两个方向位移
transform: translate(第一个值,第二个值);
-
translateX 单独沿着x轴位移
transform: translateX(值);
-
transLateY 单独沿着y轴位移
transform: translateY(值);
        <style>
            .box{
                width: 100px;
                height: 100px;
                background-color: green;
                /* 第一个值是x轴 第二个值是y轴 */
                transform: translate(200px,200px);
                /* 沿着x轴运动 */
                /* transform: translateX(200px); */
                /* 沿着y轴运动 */
                /* transform: translateY(200px); */
            }
        </style>
    <body>
        <div class="box"></div>
    </body>
scale变形
-
scale沿着两个方向缩放
-
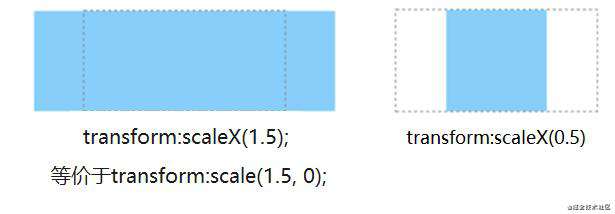
scaleX将宽度缩放

-
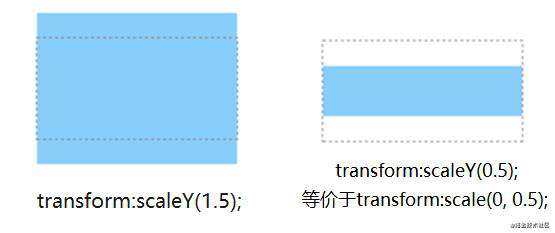
scaleY将高度缩放

        <style>
            .box2{
                width: 300px;
                height: 300px;
                position: absolute;
                top: 50%;
                left: 50%;
                overflow: hidden;
                border: 2px solid red;
            }
            .box2 img{
                width: 300px;
                height: 300px;
            }
            .box2:hover img{
                transform: scale(1.5);
            }
        </style>
    <body>
        <div class="box2">
            <img src="加个图片" >
        </div>
    </body>
rotate绕轴旋转
-
rotateX绕x轴旋转
- 如果是一个正方形,绕x轴旋转360度扫过的面积形成的物体看起来是一个放倒的圆柱体,侧视图是一个圆形
-
rotateY绕y轴旋转
- 如果是一个正方形,绕y轴旋转360度扫过的面积形成的物体看起来是一个立起来的圆柱体,俯视图是一个圆形
-
rotateZ绕Z轴旋转
- 如果不修改作用点,那么看起来就是图形围绕着0坐标点旋转
        <style>
            .box{
                width: 100px;
                height: 100px;
                background-color: green;
                /* 为了能看出效果加了过渡 */
                transition:  all 1s linear;
            }
            .box:hover{
                /* 绕x轴旋转360度 */
                transform: rotateX(360deg);
                /* 绕y轴旋转360度 */
                /* transform: rotateY(360deg); */
                /* 绕z轴旋转360度 */
                /* transform: rotateZ(360deg); */
            }
        </style>
        <div class="box"></div>
skew倾斜
-
skewX延x轴倾斜
- 图形在一二象限的观感为倒向第二象限,在三四象限的观感为倒向第四象限【值都为正的情况下】
-
skewY延y轴倾斜
- 图形在二三象限的观感为“被吸向第二象限”,在一四象限的观感为“向第四象限沉下去”【值都为正的情况下】
-
skew延两个方向倾斜
        <style>
            .box{
                width: 100px;
                height: 100px;
                background-color: green;
                /* 为了能看出效果加了过渡 */
                transition:  all 1s linear;
            }
            .box:hover{
                /* 水平方向倾斜36度 */
                transform: skewX(36deg);
                /* 垂直方向倾斜36度 */
                /* transform: skewY(36deg); */
                /* 水平垂直方向倾斜36度 */
                /* transform: skew(36deg 36deg); */
            }
        </style>
            <div class="box"></div>
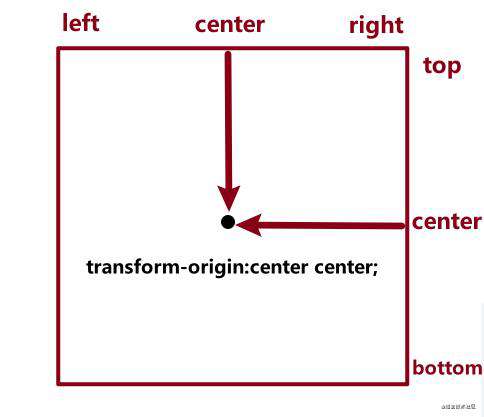
transform-origin改变作用点(默认在中心)

-
第一个值代表水平方向(left center right)
-
第二个值代表垂直方向(top center bottom)
        <style>
            .box{
                width: 100px;
                height: 100px;
                background-color: green;
                transition:  all 1s linear;
            }
            .box:hover{
                /* 绕x轴旋转360度 */
                transform: rotateX(360deg);
                /* 改变作用点为右下角 */
                transform-origin:right bottom;
            }
        </style>
            <div class="box"></div>
perspective景深
        <style>
            .box{
                perspective:1000px;
            }
            .box2{
                width: 100px;
                height: 100px;
                background-color: green;
                transition:  all 1s linear;
            }
        </style>
            <div class="box">
                <div class="box2"></div>
            </div>
transition过渡动画
-
transition-property 动画的属性
-
transition-duration 动画执行的时间
-
transition-timing-function 动画运动的曲线
linear 匀速ease 【默认】 动画以低速开始,然后加快,在结束前变慢ease-in 动画以低速开始ease-out 动画以低速结束ease-in-out 动画以低速开始、低速结束cubic-bezier(n,n,n,n) 在 cubic-bezier 函数中自己的值。可能的值是从 0 到 1 的数值
-
transition-delay 延迟的时间
-
【复合属性】 transition 过渡
-
第一个值 动画的属性
all 代表所有变幻的属性- 或者单独写要变幻的属性
-
第一个值 动画执行的时间
-
第一个值 动画运动的曲线
-
第一个值 延迟的时间
        <style>
            *{
                margin:0;
                padding:0;
            }
            .box{
                width: 100px;
                height: 100px;
                background:green;
                /* 过渡的属性 */
                transition-property: all;
                /* 动画执行的时间 */
                transition-duration: 1s;
                /* 动画运动的曲线 */
                transition-timing-function: ease;
                /* 延迟的时间  */
                transition-delay: 0s;
                /* 复合属性
                第一个值:过渡的属性
                第二个值:动画执行的时间
                第三个值:动画运动的曲线
                第四个值:延迟的时间
                */
                /* transition:height 1s linear 1s,width 1s linear 1s; */
                /*
                all 代表所有变换的属性
                */
                transition:all 1s linear 1s;

            }
            .box:hover{
                height: 500px;
                width:500px;
            }
        </style>
            <div class="box">
                <div class="box2"></div>
            </div>
animation过渡动画【能精细控制每帧,流程】
    <style>
        body{
            background-color: black;
        }
        .outer{
            width: 300px;
            height: 285px;
            /* border: 1px solid red; */
            position: absolute;
            left: 50%;
            top: 50%;
            /* margin-top: -142px; */
            /* margin-left: -150px; */
            /* 写在这里会被后面的动画覆盖,直接写到后面的动画里,或者直接使用margin */
            transform: translate(-50%,-50%);

        }
        .outer img{
            position: absolute;
            top: 0;
            left: 0;
            opacity: 0;
        }
        .outer img:nth-child(1){
            animation: love 1s infinite linear;
        }
        .outer img:nth-child(2){
            animation: love 1s infinite 0.25s linear;
        }
        .outer img:nth-child(3){
            animation: love 1s infinite 0.5s linear;
        }
        .outer img:nth-child(4){
            animation: love 1s infinite 0.75s linear;
        }
        @keyframes love{
            0%{
                opacity: 0;
                transform: scale(0);
            }
            25%{
                opacity: 0.5;
                transform: scale(1);
            }
            50%{
                opacity: 1;
                transform: scale(2);
            }
            75%{
                opacity: 0.5;
                transform: scale(3);
            }
            100%{
                opacity: 0;
                transform: scale(4);
            }
        }
    </style>
    <body>
        <div class="outer">
            <img src="图片路径" >
            <img src="图片路径" >
            <img src="图片路径" >
            <img src="图片路径" >
        </div>
    </body>
Css3新增的样式
boder-radius 边框弧度
    <style>
        .outer{
            width: 300px;
            height: 300px;
            border: 1px solid red;
            -webkit-border-radius:50%;
            -webkit-transform: translate(-50%,-50%);
        }
    </style>
    <body>
        <div class="outer"></div>
    </body>
box-shadow阴影
- 第一个值 水平偏移量
- 第二个值 垂直偏移量
- 第三个值 模糊程度
- 第四个值 阴影大小
- 第五个值 阴影颜色
- 第六个值
inset 内阴影【不写默认外阴影 outset 】
            div{
                box-shadow:10px 10px 10px 10px yellow inset;
            }
-
可以用来做容器的边框,不占位置;【border是占据实际位置的】
            div{
                width:100px;
                height:100px;
                background-color:yellow;
                /* 没有偏移 模糊程度为0 剩余的值按需调整 */
                /* 使用阴影来制作边框线不占位置 */
                box-shadow:0 0 0 10px green;
            }
-
多圈边框,不占位置;【border是占据实际位置的】
            div{
                width:100px;
                height:100px;
                background-color:yellow;
                /* 没有偏移 模糊程度为0 剩余的值按需调整 */
                /* 使用阴影来制作边框线不占位置 */
                box-shadow:0 0 0 10px green
                            0 0 0 30px red
                            0 0 0 60px blue
                            0 0 0 90px orange
                            0 0 0 120px black;
            }
box-sizing盒模型转换
渐变
-
线性渐变 (Linear Gradients)- 向下/向上/向左/向右/对角方向
- 可加多种颜色,最少两种
- 方向默认从上往下,可以修改,写起点或方向或角度就是起始位置;若组合方向,那就是起点和终点
- 也可以写角度,则按照角度渐变
- 颜色的占比也可以用百分数控制
            div{
                height:5000px;
                background:-webkit-linear-gradient(left top,lightcoral 20%,lightseagreen 80%,lightsalmon 20%);
                }
-
径向渐变 (Radial Gradients)- 由它们的中心定义
- 可加多种颜色,最少两种
- 可以设置渐变中心、形状、大小
    div {
        background-image: radial-gradient(center,circle,red, yellow, green);
        }
媒体查询【多用于移动端适配】
@media 针对不同媒体类型可以定制不同的样式规则。- 在不同的条件下设定不同的样式
-
语法
@media 设备 and 条件 and... 条件可加多个
    <style>
        .box{
            width:200px;
            height:200px;
            background:black;
        }
        /* 当视口宽度小于等于我们设定的最大宽度时 */
        @media screen and (max-width:768px){
            .box{
                width:100px;
                height:100px;
                background:yellow;
            }
        }
        /* 当视口宽度大于等于我们设定的最小宽度时 */
        /* @media screen and (min-width:991px){
            .box{
                width:100px;
                height:100px;
                background:red;
            }
        } */
        /* 当视口宽度【大于等于我们设定的最小宽度】且【小于等于我们设定的最大宽度】时 */
        /* @media screen and (min-width:768px) and (max-width:992px){
            .box{
                width:100px;
                height:100px;
                background:red;
            }
        } */
    </style>
    <div class="box">
    </div>
兼容处理【为了使样式兼容不同浏览器】
- 若要使样式兼容不同的浏览器,可以给样式加上特定的前缀。
-webkit- 谷歌【移动端】-moz- 火狐【不常用】-ms- ie-o- 欧朋【不常用】


发表评论
还没有评论,快来抢沙发吧!