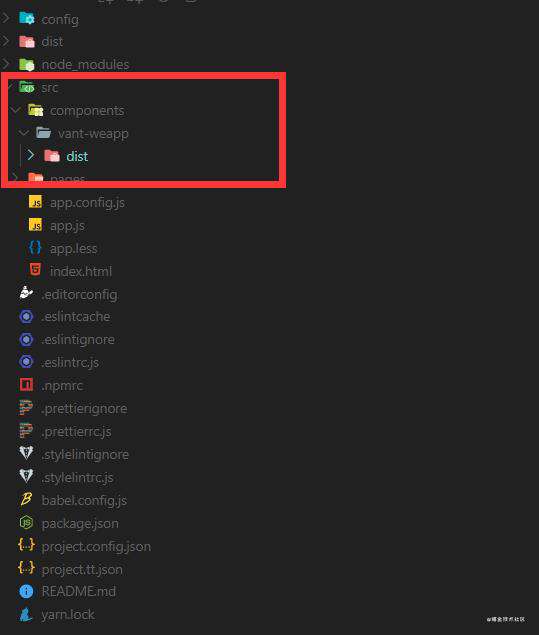
一:克隆vant-weapp源码到本地
git clone https://github.com/youzan/vant-weapp.git
二、将其中的dist文件夹整个拷入taro项目中

三、配置全局打包映射
在项目的config>index.js文件中更改如下代码:
//需要改动的地方在于config.copy.patterns
//原因是Taro在打包的并没有对Vant依赖进行分析,只能手动将依赖文件拷贝到打包后的目录中,copy配置项所起到的也就是这个作用。

const config = {
  ...
  copy: {
    patterns: [
      /**此处为公共组件,必需--start */
      {
        from: 'src/components/vant-weapp/dist/wxs',
        to: 'dist/components/vant-weapp/dist/wxs',
      },
      {
        from: 'src/components/vant-weapp/dist/common/style',
        to: 'dist/components/vant-weapp/dist/common/style',
      },
      {
        from: 'src/components/vant-weapp/dist/common/index.wxss',
        to: 'dist/components/vant-weapp/dist/common/index.wxss',
      },
      /**此处为公共组件,必需--end */
      /**此处为按需组件,可选--start */
      {
        from: 'src/components/vant-weapp/dist/icon/index.wxml',
        to: 'dist/components/vant-weapp/dist/button/index.wxml',
      },
      {
        from: 'src/components/vant-weapp/dist/button/index.wxs',
        to: 'dist/components/vant-weapp/dist/button/index.wxs',
      },
      {
        from: 'src/components/vant-weapp/dist/button/index.wxss',
        to: 'dist/components/vant-weapp/dist/button/index.wxss',
      }
      /**此处为按需组件,可选--end */
    ],
    options: {},
  },
  ...
};
/**
 * @description: 根据vant组件名,生成相应的映射地址
 * @param {*} componentName:组件名
 * @return {*} 组件映射地址
 */
const createVantPatterns = (componentName) => {
  const fileTypes = ['wxml', 'wxs', 'wxss'];
  return fileTypes.map((item) => {
    return {
      from: `src/components/vant-weapp/dist/${componentName}/index.${item}`,
      to: `dist/components/vant-weapp/dist/${componentName}/index.${item}`,
    };
  });
};
const config = {
  // ...
  copy: {
    patterns: [
      {
        from: 'src/components/vant-weapp/dist/wxs',
        to: 'dist/components/vant-weapp/dist/wxs',
      },
      {
        from: 'src/components/vant-weapp/dist/common/style',
        to: 'dist/components/vant-weapp/dist/common/style',
      },
      {
        from: 'src/components/vant-weapp/dist/common/index.wxss',
        to: 'dist/components/vant-weapp/dist/common/index.wxss',
      },
      ...createVantPatterns('icon'),
    ],
    options: {},
  },
  // ...
};
四、配置全局样式转换
在项目的config>index.js文件中更改如下代码:
//需要改动的地方在于config.mini.postcss.pxtransform.config
//Taro会默认将px转换为rpx,直接使用vant组件样式会有偏小的情况,故此处做禁止转换处理。

const config = {
  // ...
  mini: {
    postcss: {
      pxtransform: {
        enable: true,
        config: {
          selectorBlackList: [/van-/],
        },
      },
    },
  },
  // ...
};
四、引用Vant组件
在页面的pages>index>index.config.js文件中更改如下代码:
//需要改动的地方在于usingComponents

export default {
  navigationBarTitleText: '首页',
  usingComponents: {
    'van-icon': '../../components/vant-weapp/dist/icon/index',
  },
};
五、使用Vant组件
//vue
<template>
  <view class="index">
    <text>{{ msg }}</text>
    <van-icon name="chat" color="red" />
  </view>
</template>
<script>
import './index.less';

export default {
  data() {
    return {
      msg: 'Hello world!23',
    };
  },
};
</script>
//react
import React, { Component } from 'react'
import { View } from '@tarojs/components'

export default class Index extends Component {
  render () {
    return (
      <View>
        <van-button type='primary' loading loading-text='ing'>Button</van-button>
      </View>
    )
  }
}
参考地址: (1)Taro官方文档 (2)Vant-weapp官方文档
常见问题FAQ
- 免费下载或者VIP会员专享资源能否直接商用?
- 本站所有资源版权均属于原作者所有,这里所提供资源均只能用于参考学习用,请勿直接商用。若由于商用引起版权纠纷,一切责任均由使用者承担。更多说明请参考 VIP介绍。
- 提示下载完但解压或打开不了?
- 找不到素材资源介绍文章里的示例图片?
- 模板不会安装或需要功能定制以及二次开发?


发表评论
还没有评论,快来抢沙发吧!