其他常用api
省略的其他代码在上一篇博客里
1.ipcMain和ipcRenderer进程间通讯属性
官方文档中两个模块进行通信的例子:
// In main process.
  const {ipcMain} = require('electron')
  ipcMain.on('asynchronous-message', (event, arg) => {
    console.log(arg) // prints "ping"
    event.sender.send('asynchronous-reply', 'pong') // 异步返回通信的方式
  })

  ipcMain.on('synchronous-message', (event, arg) => {
    console.log(arg) // prints "ping"
    event.returnValue = 'pong' // 同步返回通信的方式
  })
// In renderer process.
  const {ipcRenderer} = require('electron')
  console.log(ipcRenderer.sendSync('synchronous-message', 'ping')) // prints "pong"

  ipcRenderer.on('asynchronous-reply', (event, arg) => {
    console.log(arg) // prints "pong"
  })
  ipcRenderer.send('asynchronous-message', 'ping')
渲染进程可以通过 ipcRenderer 模块的 send 方法向主进程发送消息。在主进程中,通过 ipcMain 模块设置监听 asynchronous-message 和 synchronous-message 两个事件,当渲染进程发送时就可以针对不同的事件进行处理。
主进程监听事件的回调函数中,会传递 event 对象及 arg 对象。arg 对象中保存渲染进程传递过来的参数。通过 event.sender 对象,主进程可以向渲染进程发送消息。如果主进程执行的是同步方法,还可以通过设置 event.returnValue 来返回信息。
webContents主进程主动向渲染进程发送消息
在主进程中,我们会创建一个 BrowserWindow 对象,这个对象有 webContents 属性。webContets 提供了 send 方法来实现向渲染进程发送消息。当然 webContents 对象远不止这两个通信方法,具体可以看 webContents
下面是官方文档提供的使用 webContents 实现通信的例子:
// In the main process.
  const {app, BrowserWindow} = require('electron')
  let win = null

  app.on('ready', () => {
    win = new BrowserWindow({width: 800, height: 600})
    win.loadURL(`file://${__dirname}/index.html`)
    win.webContents.on('did-finish-load', () => {
      win.webContents.send('ping', 'whoooooooh!')
    })
  })
<!-- index.html -->
<html>
<body>
  <script>
    require('electron').ipcRenderer.on('ping', (event, message) => {
      console.log(message) // Prints 'whoooooooh!'
    })
  </script>
</body>
</html>
注意,webContents.on 监听的是已经定义好的事件,如上面的 did-finish-load。要监听自定义的事件还是通过 ipcMain 和 ipcRenderer。
渲染进程数据共享
更多情况下,我们使用HTML5 API实现,如localStorage、sessionStorage等,也可以使用electron的IPC机制实现
// 主进程
global.sharedObject = {
    someProperty: 'default value'
}
// 渲染进程
console.log(require('electron').remote.getGlobal('sharedObject').someProperty) // new value
可以发现使用remote模块是最简单的,渲染进程代码中还可以直接使用electron模块
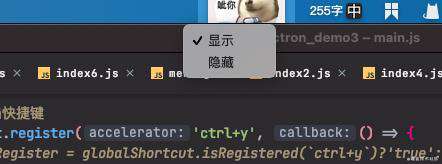
系统托盘
const { Menu, Tray } = require('electron')
/* 省略其他代码 */
let tray;
app.on('ready', () => {
    tray = new Tray(__dirname + '/img.png');//系统托盘图标
    const contextMenu = Menu.buildFromTemplate([ // 菜单项
      {label: '显示', type: 'radio', click: () => {mainWindow.show()}},
      {label: '隐藏', type: 'radio', click: () => {mainWindow.hide()}},
    ])
    // tray.on('click', () => { //  鼠标点击事件最好和菜单只设置一种
    //   mainWindow.isVisible() ? mainWindow.hide() : win.show()
    // })
    tray.setToolTip('This is my application.') // 鼠标放上时候的提示
    tray.setContextMenu(contextMenu) // 应用菜单项
})

notification通知
<!DOCTYPE html>
<html lang="en">
...
<body>
<button id="basic-noti">notification</button>
<script src="./js/index12.js"></script>
</body>
</html>
const {app, mainWindow} = require("electron").remote;
const notification = {
    title: '基本通知',
    title2:'开始程序通知',
    body: '短消息部分',
    icon: '../img.png', // 用于在该通知上显示的图标
    silent: true, // 在显示通知时是否发出系统提示音
}
const notificationButton = document.getElementById('basic-noti')
const myNotification = () => {
    new window.Notification(notification.title2, notification)
}
notificationButton.addEventListener('click', function () {
    const myNotification = new window.Notification(notification.title, notification)
    myNotification.onclick = () => {
        console.log('Notification clicked')
    }
})
app.whenReady().then(mainWindow).then(myNotification) // 动程序时


进度条
mainWindow.setProgressBar(0.3)
mainWindow.setProgressBar(-1) // 删除进度条
常见问题FAQ
- 免费下载或者VIP会员专享资源能否直接商用?
- 本站所有资源版权均属于原作者所有,这里所提供资源均只能用于参考学习用,请勿直接商用。若由于商用引起版权纠纷,一切责任均由使用者承担。更多说明请参考 VIP介绍。
- 提示下载完但解压或打开不了?
- 找不到素材资源介绍文章里的示例图片?
- 模板不会安装或需要功能定制以及二次开发?


发表评论
还没有评论,快来抢沙发吧!