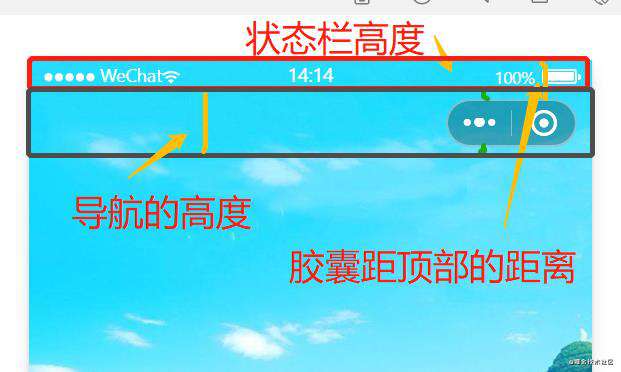
说明:小程序自定义头部导航需计算不同机型导航的高度。
一、计算头部高度
- 1.图示分析

- 2.计算代码
说明:所有单位均是计算的px
// 获取状态栏的高度
const {statusBarHeight} = wx.getSystemInfoSync();
// 胶囊按钮位置信息  高度 & 距顶部的距离
const {height, top} = wx.getMenuButtonBoundingClientRect();
// 导航栏高度 = 状态栏到胶囊的间距(胶囊距上距离-状态栏高度) * 2 + 胶囊高度
const navigateHeight = (top - statusBarHeight)*2+height;
二、自定义导航组件
说明:计算出各个尺寸之后,我们需要搭组件的架子。
- 1.创建自定义组件
- 2.搭建架子
- 3.代码示例
组件 js
...
lifetimes: {
  attached() {
    // 计算头部信息
    this.calcNavigation();
  }
},
...
methods: {
  calcNavigation(){
    // 获取状态栏的高度,单位px
    const {statusBarHeight} = wx.getSystemInfoSync();
    // 胶囊按钮位置信息  高度 & 距顶部的距离
    const {height, top} = wx.getMenuButtonBoundingClientRect();
    // 导航栏高度 = 状态栏到胶囊的间距(胶囊距上距离-状态栏高度) * 2 + 胶囊高度
    const navigateHeight = (top - statusBarHeight)*2+height;
    // 设置头部导航高度
    this.setData({
      statusBarHeight,
      navigateHeight,
      menuHeight: height
    })
  },
}
...
组件 wxml
<cover-view class="na-bar" style="height: {{navigateHeight}}px;padding-top: {{statusBarHeight}}px;">
  <slot></slot>
</cover-view>
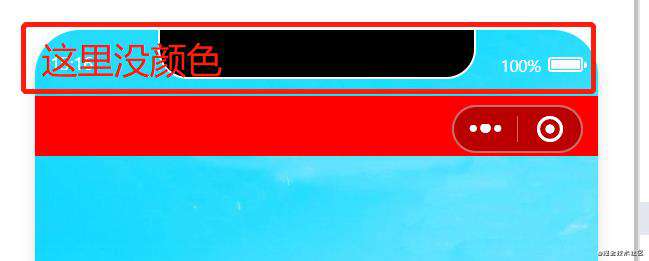
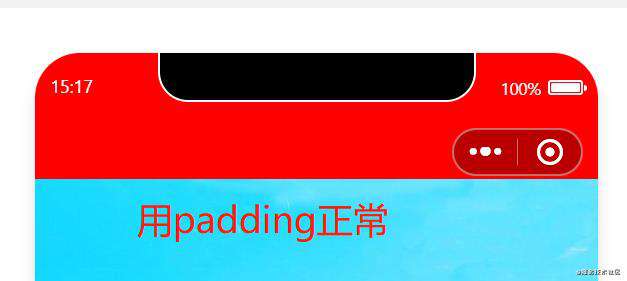
说明:这里padding-top是用于可能需要设计到导航背景颜色的,如果是margin-top的话,设置背景颜色,顶部部分会没有颜色。
补充:margin-top出现情况图例


组件 wxss
.na-bar {
  width: 100vw;
  position: fixed; /* 设置浮动 */
  left: 0;
  top: 0;
  z-index: 10086;
  display: flex;
  background: #f00; /* 背景色可自定义设置或取消 */
}
三、页面使用组件
说明:引入组件之前需要在当前页面配置自定义导航头部
- 1.在
.json中配置自定义
{
  // 设置自定义  PS:这块备注需要去掉的不然报错
  "navigationStyle": "custom",
  "navigationBarTextStyle": "white", // 设置顶部默认手机型号之类颜色 记得去掉注释
  "usingComponents": {
    // 引入组件,记得去掉注释
    "navigationBar": "/components/navigationBar/navigationBar"
  }
}
- 2.在
.wxml中使用&自己定制导航内容
<navigationBar>
  ...
</navigationBar>
PS:下面会有一些简单案例,具体细节需要自己完善。
四、案例一
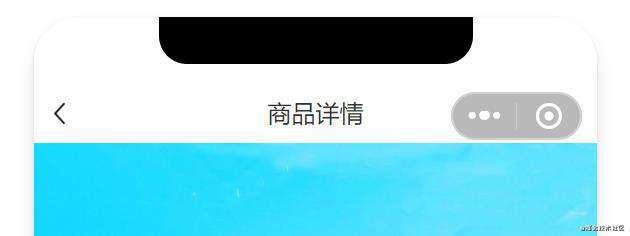
说明:商品详情页自定义

- 1.修改定义的红色背景
说明:我们可通过设置组件传递背景颜色的方式设置背景
页面.wxml中,添加传递的参数
<navigationBar navigate-background="#ffffff">
  ...
</navigationBar>
组件.js中,接收传递的参数
...
properties: {
  navigateBackground: {
    type: String,
    value: 'transparent'   // 默认值是透明
  }
},
...
组件.wxml中使用
<cover-view class="na-bar" style="height: {{navigateHeight}}px;padding-top: {{statusBarHeight}}px;background:{{navigateBackground}};">
  <slot></slot>
</cover-view>
PS:不要忘了去掉组件中原先设置的背景颜色
- 2.开始写布局
页面.wxml 中
<navigationBar navigate-background="#ffffff">
  <cover-view class="bar">
    <cover-view class="bar-left">
      <cover-image src="/images/back.png" mode="aspectFill"></cover-image>
    </cover-view>
    <cover-view class="bar-center">商品详情</cover-view>
    <cover-view class="bar-right"></cover-view>
  </cover-view>
</navigationBar>
页面.wxss 中
.bar {
  display: flex;
  flex-direction: row;
  align-items: center;
  justify-content: space-between;
  width: 100vw;
  height: 100%;
}
.bar-left {
  width: 80rpx;
  /* background: #00f; */
  height: 100%;
  display: flex;
  flex-direction: row;
  /* justify-content: center; */
  align-items: center;
}
.bar-left cover-image {
  width: 28rpx;
  height: 28rpx;
  margin-left: 20rpx;
}
.bar-center {
  color: #333;
}
.bar-right {
  width: 80rpx;
  height: 100%;
}
思路说明:使用的flex布局,然后创建三块bar-left bar-center bar-right,其中bar-center是中间内容,bar-right是结合flex布局用来占坑位的,bar-left是用来放返回按钮的。利用flex布局的justify-content: space-between;固定住bar-left&bar-right宽度值可以根据实际情况定义。
五、案例二
说明:头部放搜索栏,这比较简单,直接写样式就行 PS:背景图换了

页面.wxml中
<navigationBar>
  <cover-view class="bar">
    <cover-view class="searchBar">
      <cover-image class="search-icon" src="/images/search.png"></cover-image>
      <cover-view class="search-words">请输入需要搜索的商品</cover-view>
    </cover-view>
  </cover-view>
</navigationBar>
页面.wxss中
.bar {
  display: flex;
  flex-direction: row;
  align-items: center;
  width: 100vw;
  height: 100%;
}
.searchBar {
  display: flex;
  flex-direction: row;
  align-items: center;
  background:rgba(255, 255, 255, 0.2);
  padding:10rpx 30rpx 10rpx 10rpx;
  border-radius: 60rpx;
  margin-left: 30rpx;
}
.search-icon {
  width: 40rpx;
  height: 40rpx;
  margin-right: 10rpx;
}
.search-words {
  font-size: 26rpx;
  color: #fff;
}
常见问题FAQ
- 免费下载或者VIP会员专享资源能否直接商用?
- 本站所有资源版权均属于原作者所有,这里所提供资源均只能用于参考学习用,请勿直接商用。若由于商用引起版权纠纷,一切责任均由使用者承担。更多说明请参考 VIP介绍。
- 提示下载完但解压或打开不了?
- 找不到素材资源介绍文章里的示例图片?
- 模板不会安装或需要功能定制以及二次开发?


发表评论
还没有评论,快来抢沙发吧!