源码地址
有新项目的??,并且想尝试 Vue + TypeScript 开发的可用这套模板
基础功能列表
- 目录结构的划分
- 环境的区分(开发、测试、生产)
- 路由自动化管理、按需加载
- 页面加载进度提示
- api 管理
- Vuex / 自定义的状态管理
- axios 的封装(重复请求取消,多个请求发送时只出现一个loading,token 失效重新刷新)
- 通用的工具函数(防抖、截流等)
- 常见指令的封装(动画指令、图片懒加载、复制指令等)
- Web Workers 的引入(开启一个线程、分担主线程的计算压力、在处理特别耗时的任务中特别有用)
- WebSocket 的嵌入(双向通讯)
- 多页面配置
- Element-ui(表格、搜索、分页组件的封装、主题、国际化等)
- git commit 提交记录的优化
- 移动、pc端的适配
- 权限的处理(按钮权限,
根据权限动态添加路由) 自动化测试埋点
【红色部分还未完成】
创建项目
选择 [Vue Cli](https://cli.vuejs.org/zh/guide/) 脚手架 快速创建

`vue create xxx`
目录结构
mac 下安装 brew
/bin/zsh -c "$(curl -fsSL https://gitee.com/cunkai/HomebrewCN/raw/master/Homebrew.sh)"
安装 tree
brew install tree
tree 列出目录结构
├── README.md			说明文件
├── babel.config.js		bable 配置文件
├── jest.config.js		单元测试配置文件
├── package.json		项目信息文件
├── public
│   ├── favicon.ico
│   ├── index.html
│   ├── other.html
│   └── static			静态资源文件
│       ├── css
│       │   └── reset.css
│       └── worker		Web Workers 文件夹(根据 Web Workers 的特殊性、需要放在在服务器)
│           └── test.worker.js
├── src
│   ├── api				api 管理,按多页面分文件夹
│   │   ├── default-page
│   │   │   ├── index.ts			导出 api
│   │   │   └── testModule.api.ts	页面下的小模块 api
│   │   └── other-page
│   │       ├── index.ts
│   │       └── newsModule.api.ts
│   ├── assets			静态资源文件,但会经过 webpack 进行编译,不需要编译的可以放到 public 目录下
│   │   └── styles		公共样式(基础样式、其它公用样式)
│   │       ├── common.scss
│   │       └── pageAnimate.scss
│   ├── components
│   │   ├── business	业务组件
│   │   │   └── xw-list
│   │   │       ├── index.ts
│   │   │       ├── index.type.ts
│   │   │       └── index.vue
│   │   ├── common		基础组件
│   │   │   ├── xw-pagination
│   │   │   │   ├── index.type.ts
│   │   │   │   └── index.vue
│   │   │   ├── xw-search
│   │   │   │   ├── generateEl.vue
│   │   │   │   ├── index.type.ts
│   │   │   │   └── index.vue
│   │   │   └── xw-table
│   │   │       ├── coustomColumn.vue
│   │   │       ├── generateElTable.ts
│   │   │       ├── generateElTableColumn.ts
│   │   │       ├── index.type.ts
│   │   │       └── index.vue
│   │   └── example		例子文件
│   │       ├── langExample.vue
│   │       ├── requestExample.vue
│   │       ├── vuexExample.vue
│   │       ├── workerExample.vue
│   │       └── wsExample.vue
│   ├── directive		指令
│   │   ├── animate.directive.ts
│   │   ├── copy.directive.ts
│   │   ├── debounce.directive.ts
│   │   ├── draggable.directive.ts
│   │   ├── emoji.directive.ts
│   │   ├── index.ts
│   │   ├── longpress.directive.ts
│   │   └── permissions.directive.ts
│   ├── i18n			国际化
│   │   ├── index.ts
│   │   └── lang
│   │       ├── en.ts
│   │       └── zh.ts
│   ├── layout			项目布局
│   │   ├── base.layout.vue
│   │   └── other.layout.vue
│   ├── mock			mock 数据
│   │   └── index.js
│   ├── plugins			项目插件
│   │   ├── config.ts
│   │   ├── index.ts
│   │   └── lazyLoad.plugin.ts
│   ├── router			路由管理,按多页面分文件夹
│   │   ├── config.ts
│   │   ├── default
│   │   │   └── module1.router.ts	页面下的小模块 api
│   │   ├── globalHook.ts			全局路由钩子
│   │   ├── index.ts				导出所有路由
│   │   └── other
│   │       └── module1.router.ts
│   ├── shims-tsx.d.ts
│   ├── shims-vue.d.ts
│   ├── store			Vuex管理,按多页面分文件夹
│   │   ├── common					基础的 Vuex 模块
│   │   │   ├── permissions.vuex.ts
│   │   │   └── user.vuex.ts
│   │   ├── default
│   │   │   └── home.vuex.ts
│   │   └── index.ts				导出基础的 Vuex 模块
│   ├── theme			主题
│   │   ├── fonts
│   │   │   ├── element-icons.ttf
│   │   │   └── element-icons.woff
│   │   └── index.css
│   ├── types			类型控制文件(提供语法提示)
│   │   └── vue.d.ts
│   ├── utils			工具函数文件夹
│   │   ├── common.ts				通用的 js 函数
│   │   ├── dom.ts					dom 操作相关的
│   │   ├── eventCenter.ts			发布订阅者模式(事件管理中心)
│   │   ├── progressBar.ts			页面进度条
│   │   ├── readyLocalStorage.ts	读取本地存储数据(用户信息、token、权限等)并存到 Vuex 中
│   │   ├── request					Ajax 请求封装
│   │   │   ├── index.ts
│   │   │   ├── index.type.ts
│   │   │   └── request.ts
│   │   ├── requestInstance.ts		Ajax 实例
│   │   ├── useElement.ts			按需使用 Element-ui
│   │   └── ws.ts					WebSocket 通讯
│   └── views			按多页面分文件夹
│       ├── 404.vue
│       ├── default-page
│       │   ├── App.vue
│       │   ├── main.ts
│       │   └── test-module			小模块
│       │       ├── home			具体页面
│       │       │   └── index.vue
│       │       └── home2
│       │           └── index.vue
│       ├── login.vue
│       └── other-page
│           ├── App.vue
│           ├── main.ts
│           └── news-module			小模块
│               ├── news1			具体页面
│               │   ├── components	页面内组件
│               │   │   └── coustomColumnHeader.vue
│               │   └── index.vue
│               └── news2
│                   ├── components
│                   │   └── coustomColumnHeader.vue
│                   └── index.vue
├── tests
│   └── unit
│       └── example.spec.ts
├── tsconfig.json
├── vue.config.js		webpack 配置文件
├── yarn-error.log
└── yarn.lock
└── .env.development 	本地环境配置
└── .env.production		生产环境配置
└── .env.staging		测试环境配置
环境区分
根目录下分别新建一下三个文件
.env.development
# 指定模式
NODE_ENV = "development"
# Ajax 地址
VUE_APP_REQUEST_URL = 'http://localhost:8080'
.env.production
NODE_ENV = "production"
VUE_APP_REQUEST_URL = 'http://prod.com'
.env.staging
NODE_ENV = "production"
VUE_APP_REQUEST_URL = 'http://staging.com'
- 添加编译命令
package.json
"scripts": {
  "serve": "vue-cli-service serve --mode development",		// 开发
  "build:stage": "vue-cli-service build --mode staging",	// 测试
  "build": "vue-cli-service build"							// 生产
}
路由自动化管理、按需加载
按需加载
import() 方式 【推荐】
const App = () => import(/* webpackChunkName: app */ './app.vue')
/* webpackChunkName: app */ 组件分块
异步组件的方式
异步组件
const App = resolve => require(["./app.vue"], resolve)
路由懒加载官方文档
自动化路由
require.context(
  directory: String,
  includeSubdirs: Boolean /* 可选的,默认值是 true */,
  filter: RegExp /* 可选的,默认值是 /^\.\/.*$/,所有文件 */,
  mode: String  /* 可选的, 'sync' | 'eager' | 'weak' | 'lazy' | 'lazy-once',默认值是 'sync' */
)
require.context 的参数不能接收变量
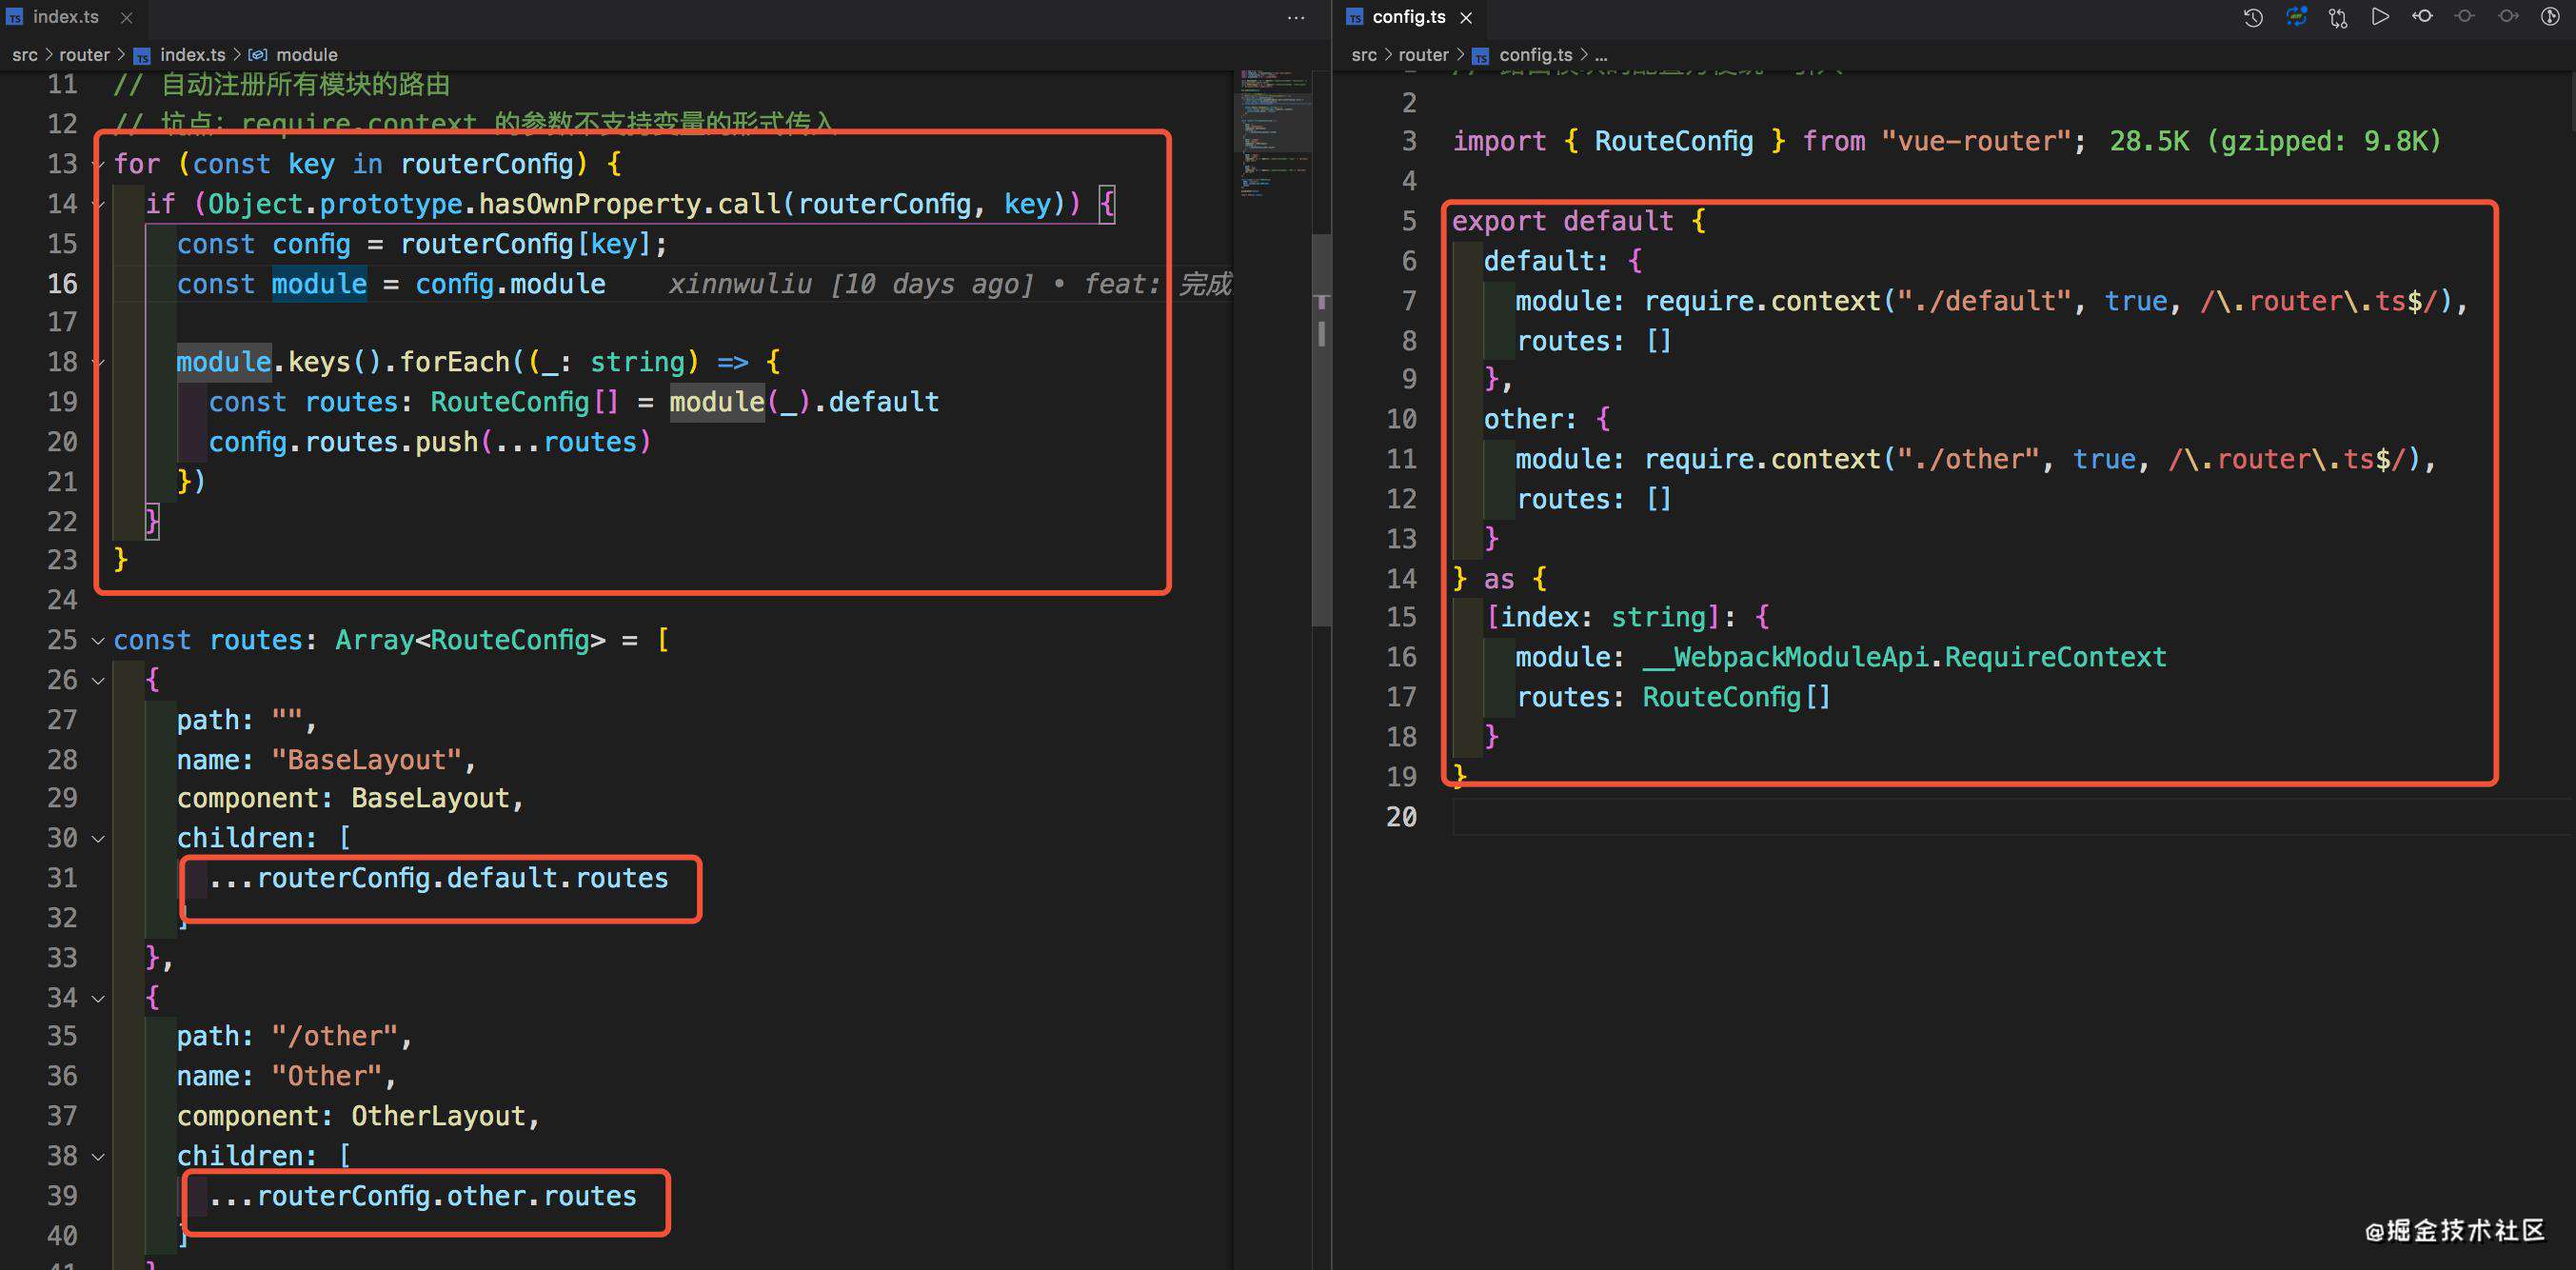
【好处:减少多人开发的冲突、新模块忘记引入】
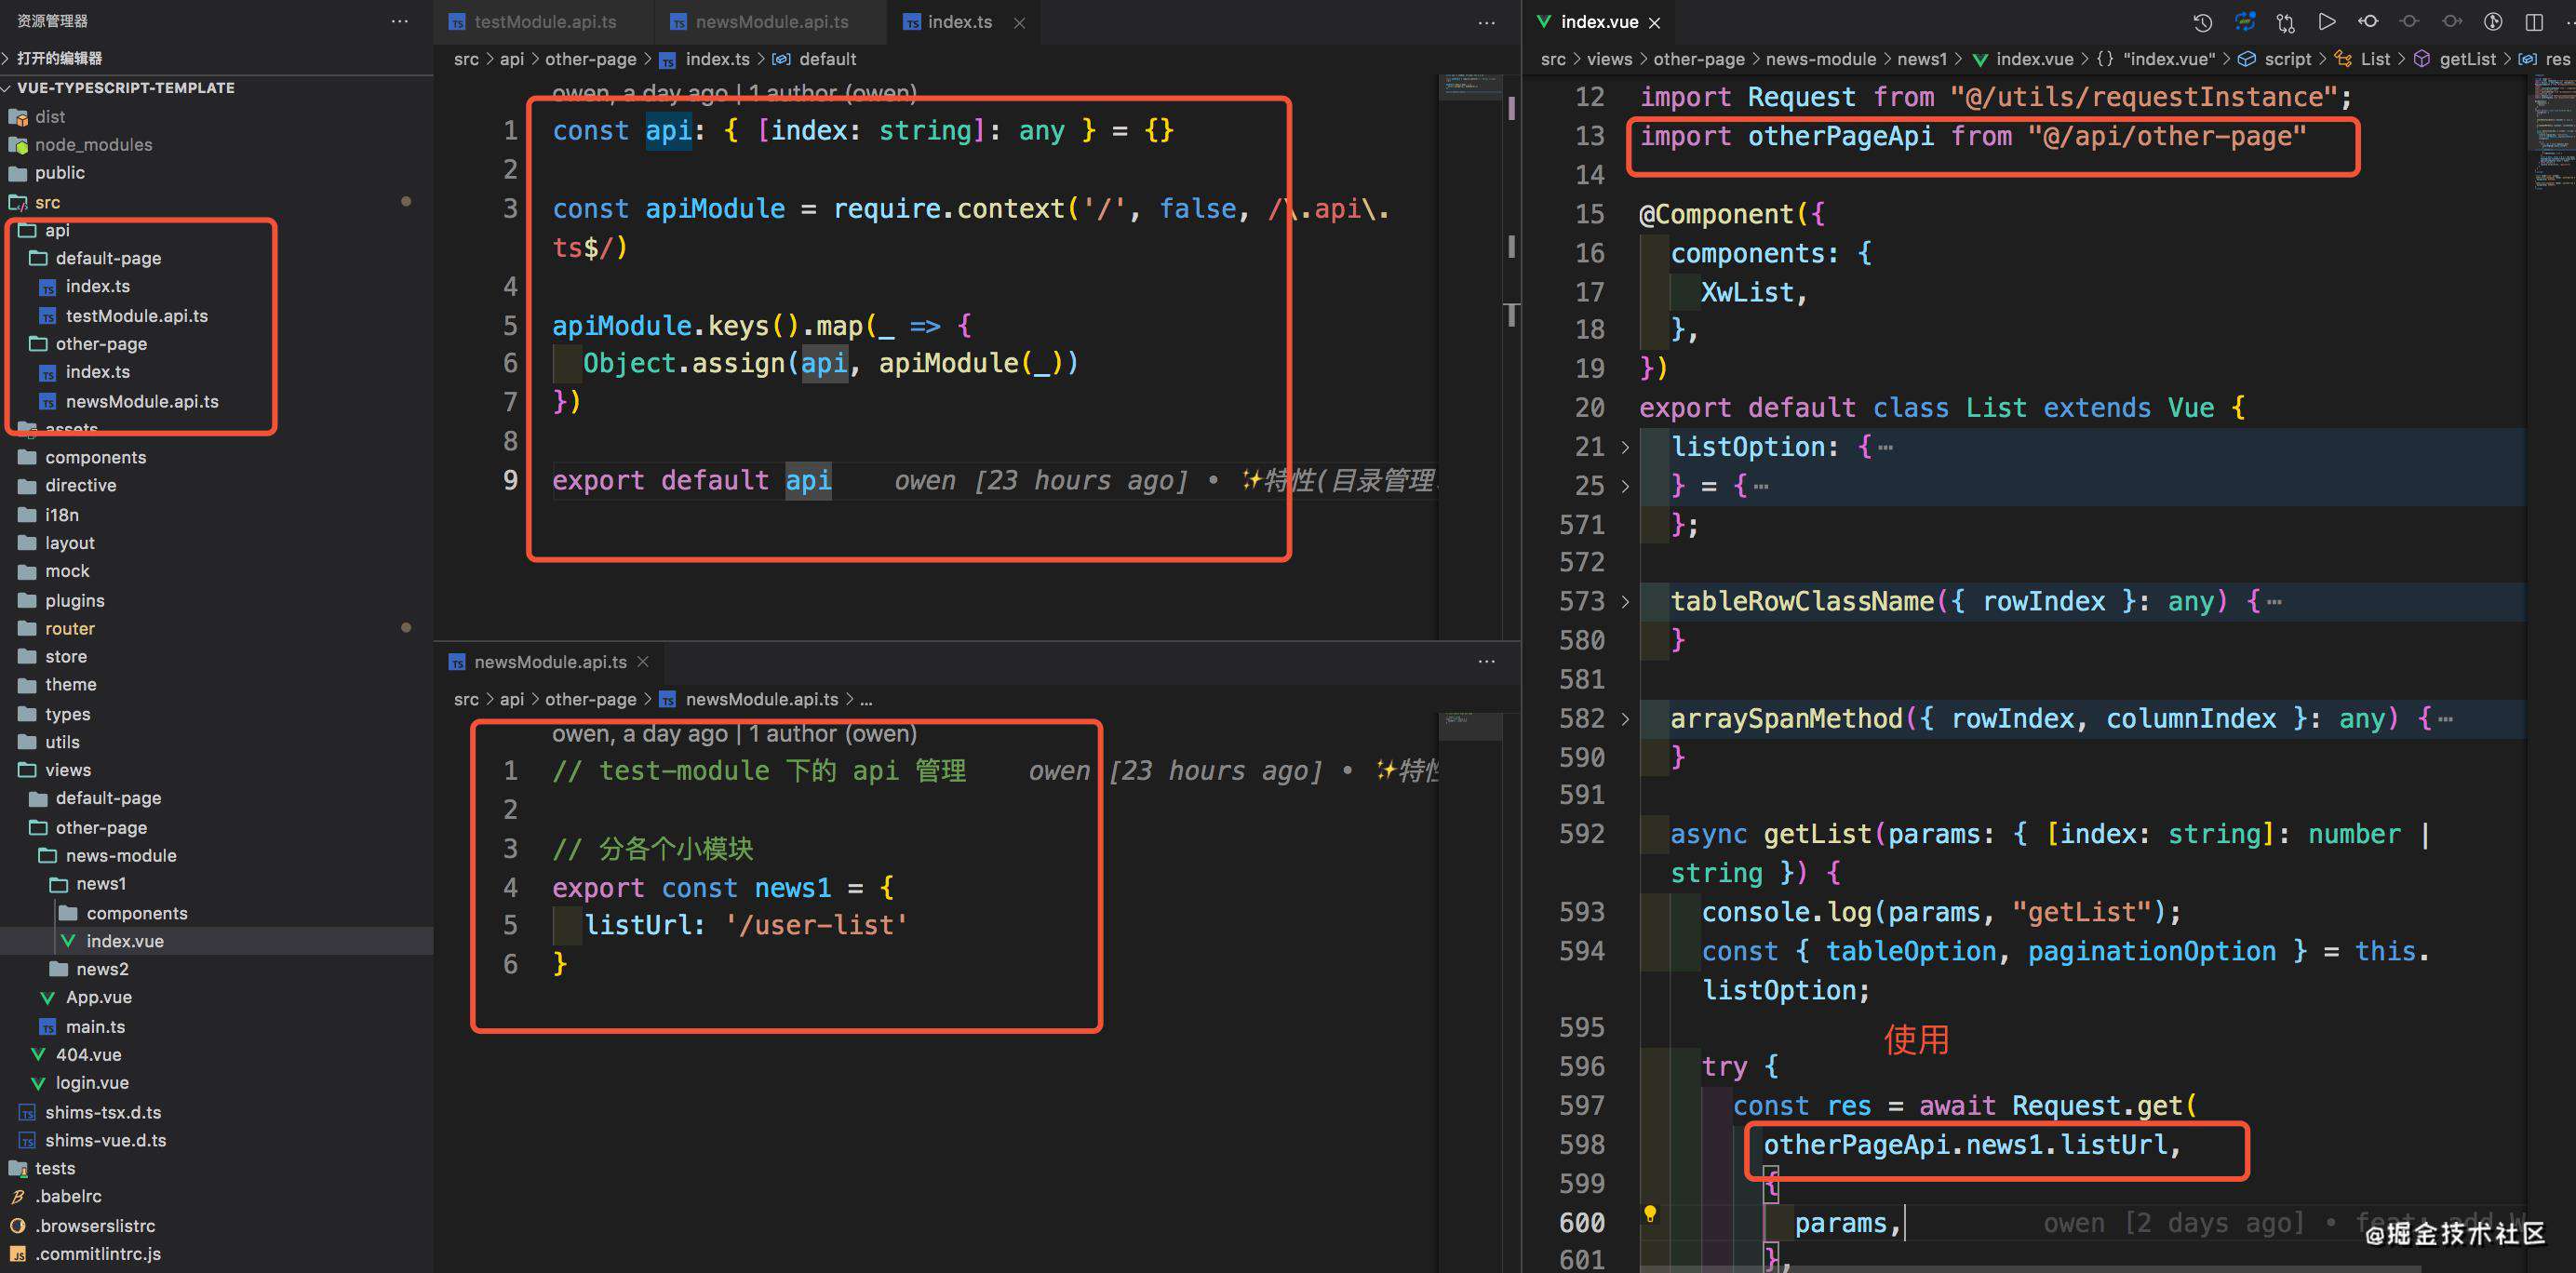
api 管理
Vuex / 自定义的状态管理
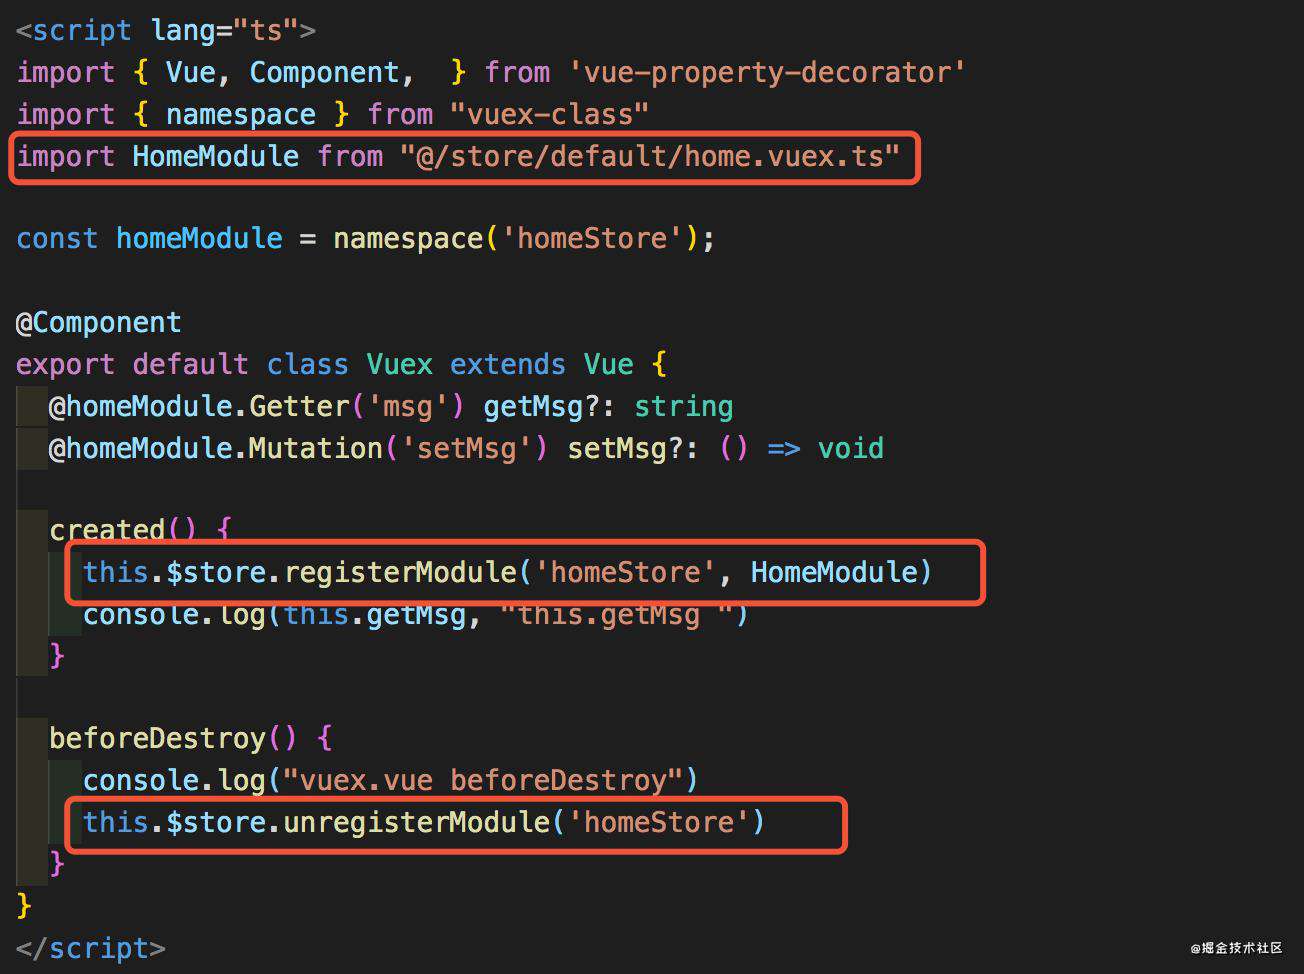
Vuex
-
命名空间
解决不同模块之间
actionsmutions之间的命名冲突 -
动态注册模块 除基础模块之外、其它模块动态注册及卸载
自定义的状态管理(发布订阅者模式)
【思路:】 一个集合中存储了不同类型的事件函数,并功过监听、取消、派发等方法来处理这个集合
其中处理单次监听用到了闭包,来存贮是否已经执行过
once(eventName: string, cb: CbType) {
    const { eventStack } = this
    const eventValue = eventStack[eventName]
    const tempCb = () => {
      let isOutOfDate = false

      return (data: object) => {
        if (isOutOfDate) return
        cb(data)
        isOutOfDate = true
      }
    }

    eventValue ? eventValue.push(tempCb()) : eventStack[eventName] = [tempCb()]
  }
axios 的封装
【功能列表】
-
请求地址的处理
主要处理路由的规范性
/** * 处理路径 * @param url 路径 * @param isBaseURL 是否是根路径 */ private transformUrl(url = "", isBaseURL = false) { if (!url) return url; if (isBaseURL) { if (!/\/$/.test(url)) { return `${url}/`; } return url; } if (/^\//.test(url)) { return `${url.substr(1)}`; } return url; } -
是否需要
loading,多个请求串行时只出现一个loading用一个变量记录请求的个数,有新的请求的时候数量 +1, 当数量为 0 并且需要
loading的时候开启loading,当请求完成之后 -1,并关闭loading/** * Loading 的开启关闭 * @param customConfig 自定义配置项 * @param isOpen 是否开启 */ private handleLoading(customConfig: CustomConfigType, isOpen: boolean) { if (!customConfig.isNeedLoading) return; // 不重复开启 Loading if (this.requestCount !== 0) return; if (isOpen) { console.log("开启 Loading"); return } console.log("关闭 Loading"); }/** * 发起请求 * @param config 配置项 * @param customConfig 自定义配置 */ private async transfromRquest( config: AxiosRequestConfig, customConfig: CustomConfigType = {} ): Promise<AxiosResponse> { customConfig = { ...this.defaultCustomConfig, ...customConfig }; this.transformUrl(config.url); this.handleLoading(customConfig, true); this.addToken(config, customConfig); this.requestCount++ try { const result = await this.axios.request(config); return result; } catch (error) { // ... } finally { this.requestCount-- this.handleLoading(customConfig, false); } } -
是否需要
token
  /**
   * token 处理
   * @param config 配置项
   * @param customConfig 自定义配置项
   */
  private addToken(config: AxiosRequestConfig, customConfig: CustomConfigType) {
    if (customConfig.isNeedToken) {
      config.headers = {
        token: store.getters['userStore/getToken'] || ''
      };
    } else {
      config.headers = {};
    }
  }
- 请求错误的处理,当出现
token失效的时候,重新刷新token再发送失败的请求
  /**
   * 发起请求
   * @param config 配置项
   * @param customConfig 自定义配置
   */
  private async transfromRquest(
    config: AxiosRequestConfig,
    customConfig: CustomConfigType = {}
  ): Promise<AxiosResponse> {
    customConfig = { ...this.defaultCustomConfig, ...customConfig };

    this.transformUrl(config.url);
    this.handleLoading(customConfig, true);
    this.addToken(config, customConfig);
		this.requestCount++

    try {
      const result = await this.axios.request(config);
      return result;
    } catch (error) {
      const { code, config } = error

      if (code === 401) {
        // 解决 token 失效的

        // 方案一 跳转至登录页
        // store.commit('userStore/setToken', '')
        // store.commit('permissionsStore/setPermissions', {})
        // router.replace({ path: '/login', query: {
        //   redirectUrl: router.currentRoute.fullPath
        // } })

        // 方式二 自动刷新 token 并重新发起失败的请求
        const res = await this.transfromRquest({
          method: 'post',
          url: '/refresh-token'
        })
        console.log(res, '/refresh-token')
        store.commit('userStore/setToken', res.data.token)
        return this.transfromRquest(config)

        // 方式三 在请求拦截里面先校验 token 是否过期 再发起请求
      }

      this.handleError(customConfig, error);
      return Promise.reject(error);
    } finally {
			this.requestCount--
      this.handleLoading(customConfig, false);
		}
  }
-
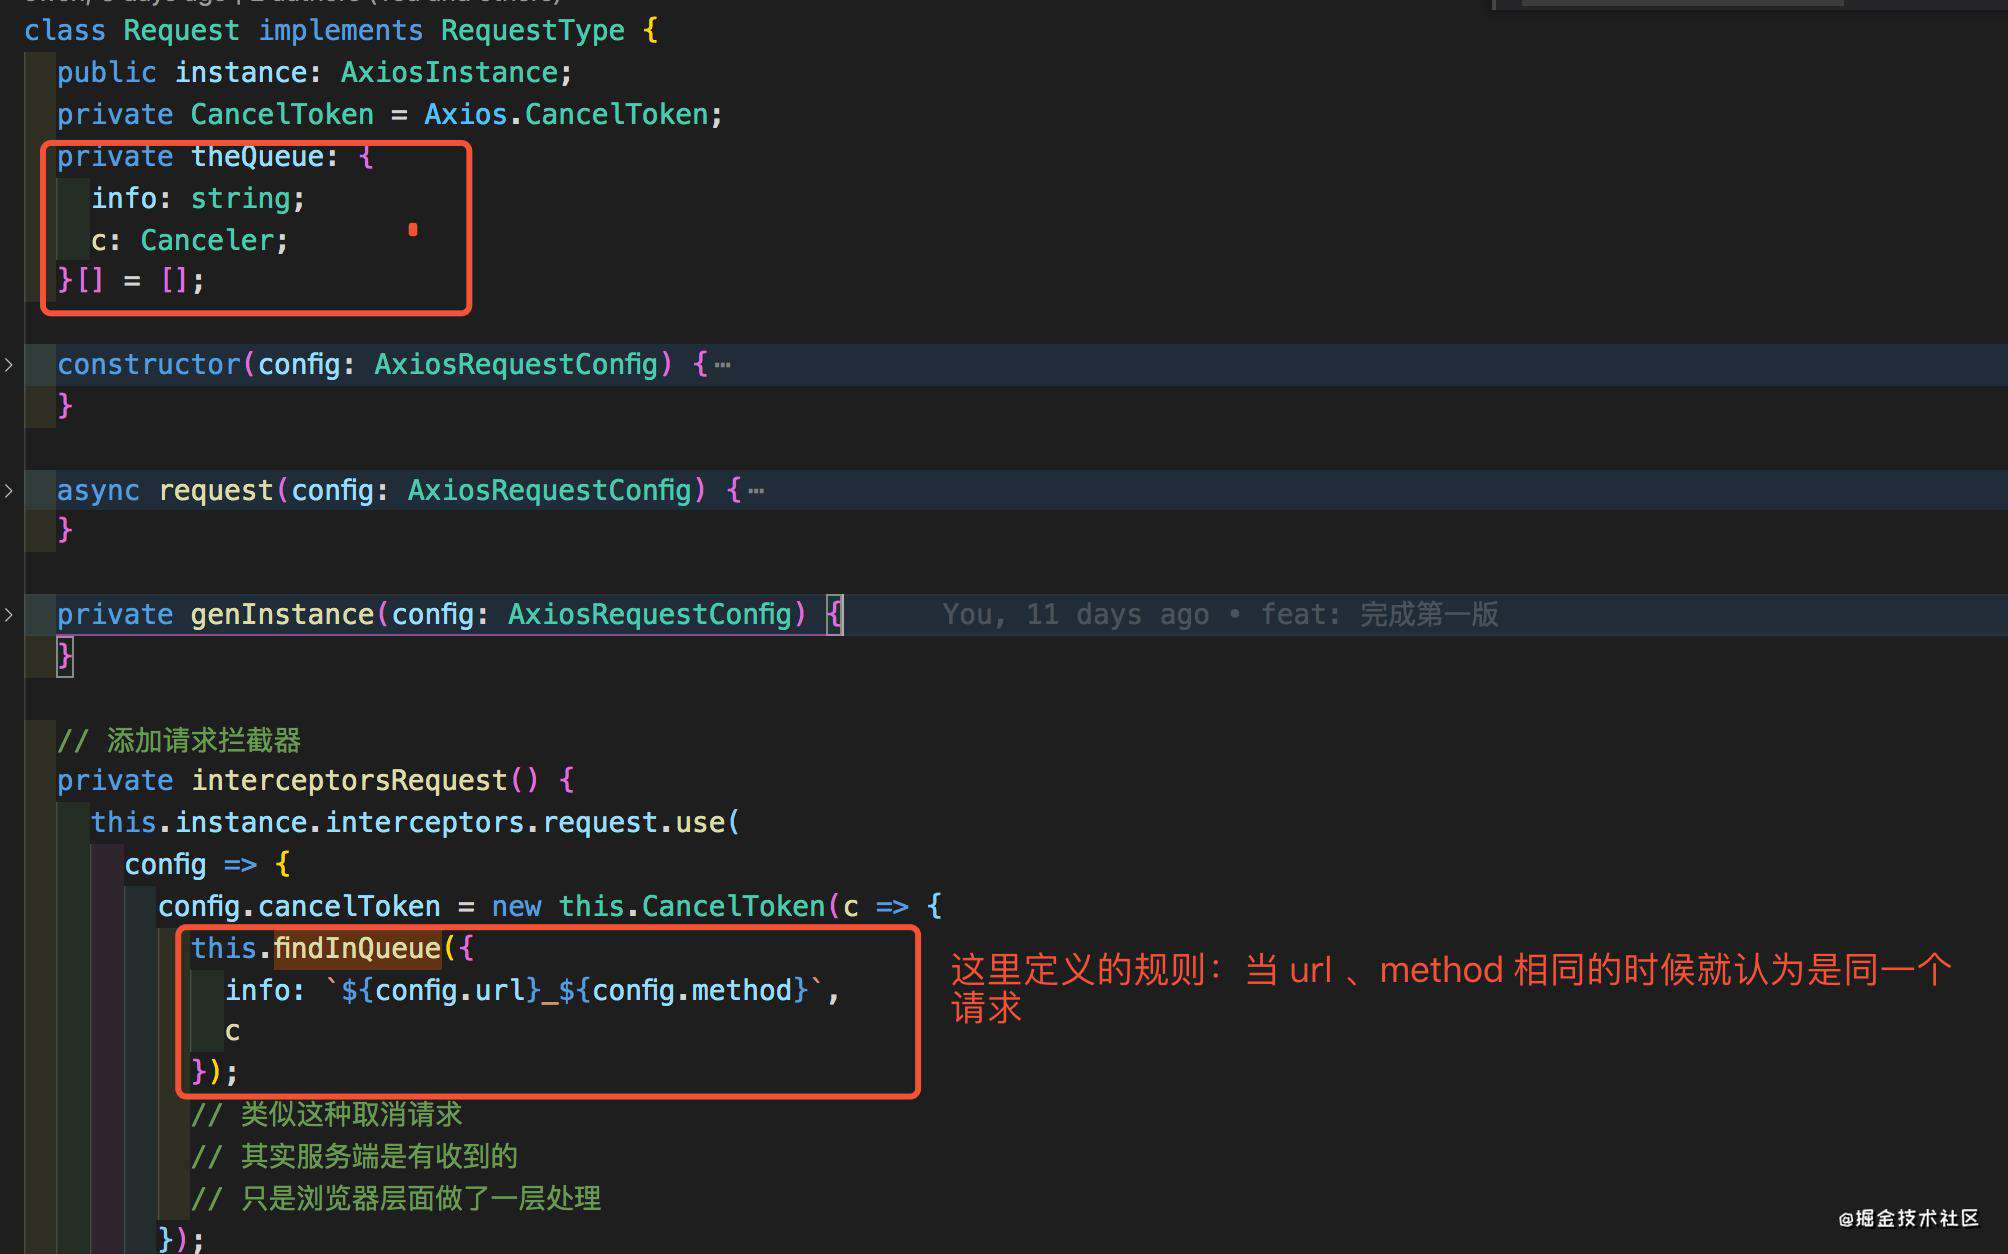
取消请求
利用 Axios 提供的 CancelToken 结合队列来实现。(队列中存放的是当前请求的信息(自定义的一些规则,来判断是否是同一个请求)和取消函数)
[缺点:]
类似这种取消请求,其实服务端是有收到的,只是浏览器层面做了一层处理等不到响应而已。
当需要做防止数据的重复提交的时,这种方式的实现是不准确的,可以考虑防抖、变量控制函数的执行、变量控制按钮的点击状态等
Web Workers 的引入
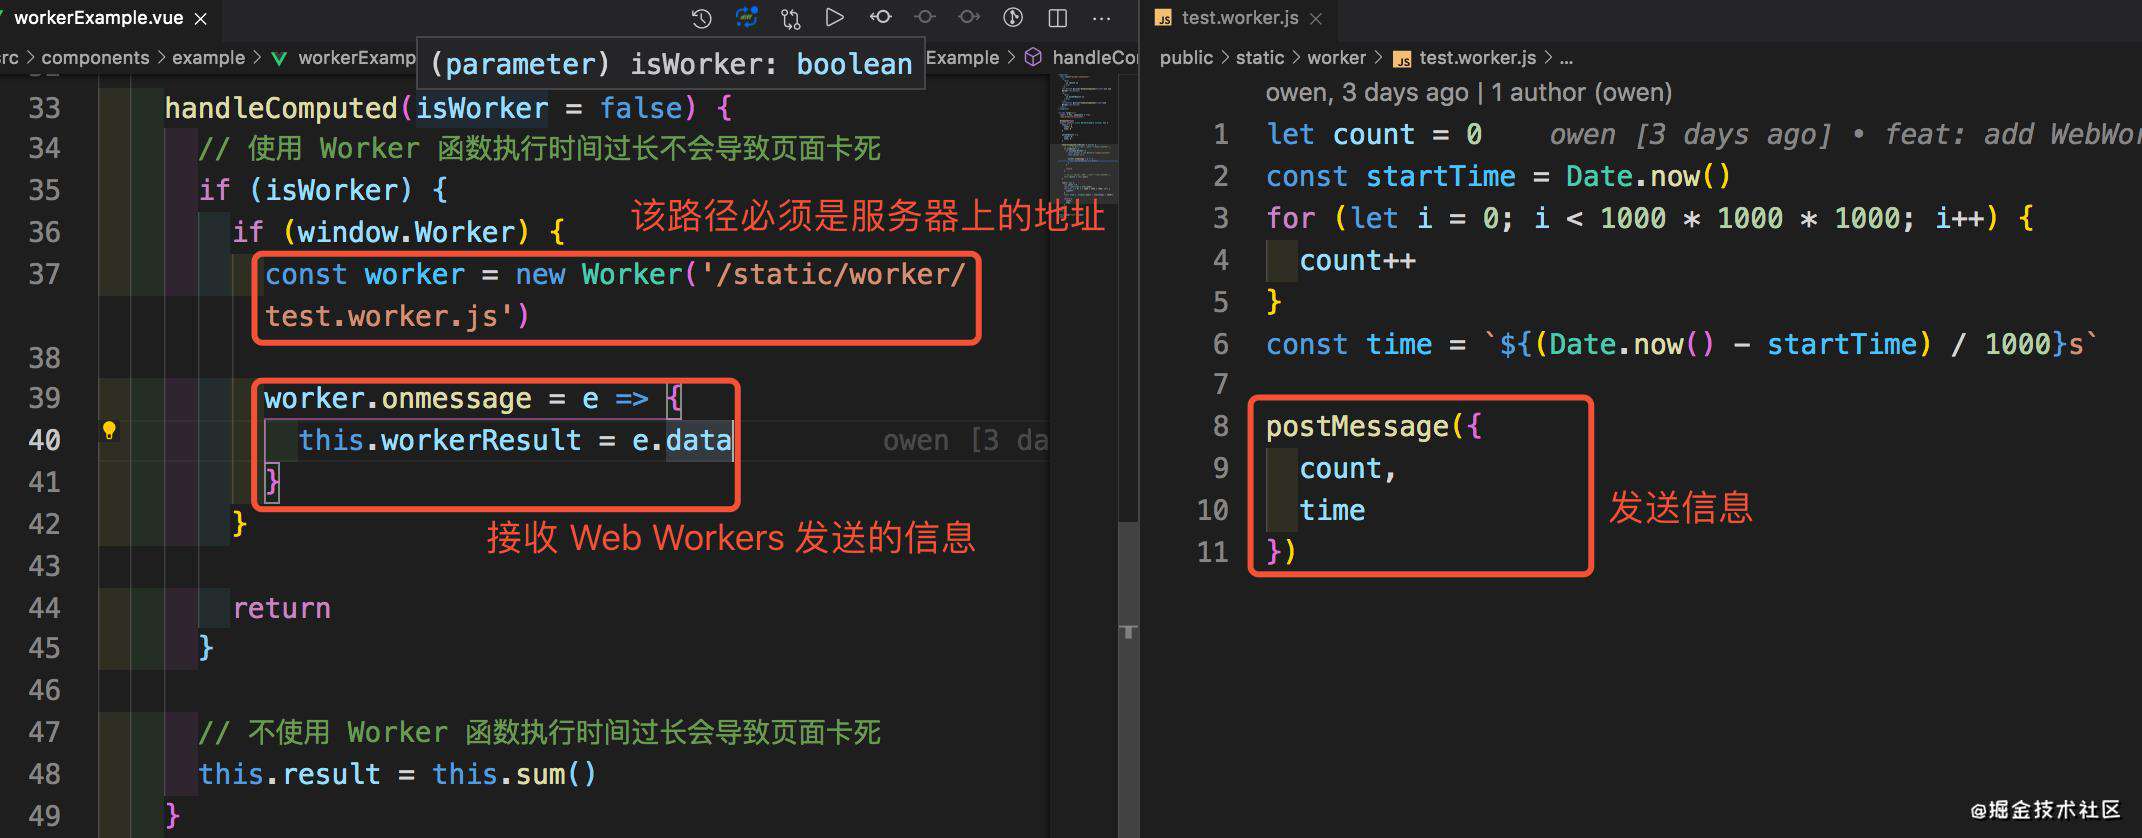
postMessage 不能发送函数
WebSocket 的嵌入
见 封装一个简单的 WebSocket 库
Element-ui 列表组件的封装
[思路:]
- 划分组件,头部、内容、底部
    <header class="list-header animate__animated animate__fadeIn">
      <slot name="head" />
      <xw-search
        v-if="searchOption"
        :searchOption="searchOption"
        :searchParams="searchParams"
        @onSearch="getList"
      >
        <slot name="search" />
      </xw-search>
    </header>

    <main class="list-main">
      <slot name="main" />
      <xw-table :tableOption="tableOption" />
    </main>

    <footer class="list-footer">
      <slot name="footer" />
      <xw-pagination
        v-if="paginationOption"
        :paginationOption.sync="paginationOption"
        @onPagination="getList"
      />
    </footer>
- 搜索结果由列表组件保管
searchParams: SearchParams = {};
-
表格数据的组装
为了方便开发过程中减少
模版的编写,将表格的所有相关操作都封装成配置项的形式。
import { Component } from 'vue'

export interface TableOption {
  // element-ui 表格的配置属性
  tableAttribute: TableAttribute
  // 列的配置属性
  tableColumn: TableColumn[]
}

export interface TableAttribute {
  // 属性
  props: {
    data: object[]
    [index: string]: any
  }
  // 事件
  on: { [key: string]: Function | Function[] }
}

export interface TableColumn {
  // 属性
  props: {
    label?: string
    prop?: string
    [index: string]: any
  },
  // 插槽
  slots?: {
    [index: string]: {
      // 属性
      options?: object
      // 自定义组件
      component: Component
    }
  }
  // 多级表头
  columnChild?: TableColumn[]
}
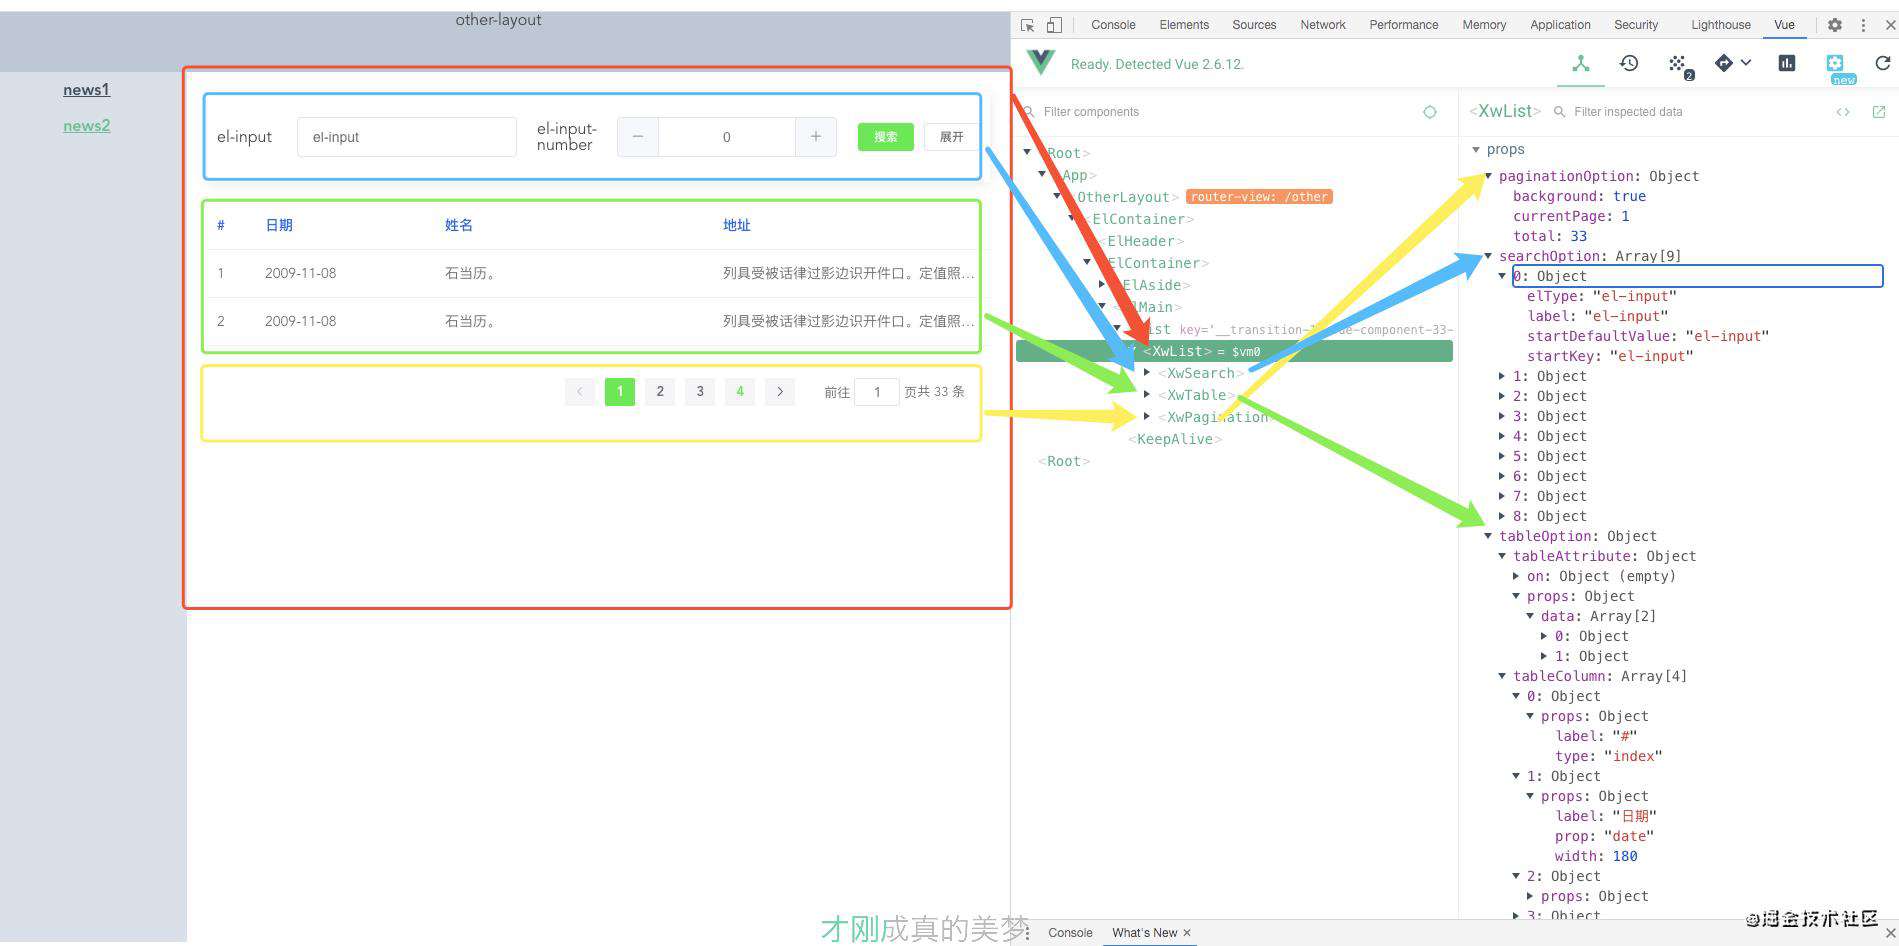
复杂例子
当前行的编辑、根据权限展示不同的按钮、按钮的加载跟禁用状态


git commit 提交记录的优化
- 安装
npm install -D commitizen cz-conventional-changelog
- 配置
package.json中配置:
"scripts": {
    "commit": "git-cz"
  },
"config": {
    "commitizen": {
      "path": "node_modules/cz-conventional-changelog"
    }
  }
- 使用
npm run commit
-
自定义适配器
-
- 安装
npm i -D cz-customizable @commitlint/config-conventional @commitlint/cli
- 安装
-
- 配置
"config": {
    "commitizen": {
      "path": "node_modules/cz-customizable"
    }
  }
同时在项目目录下创建 .cz-config.js .commitlintrc.js 文件
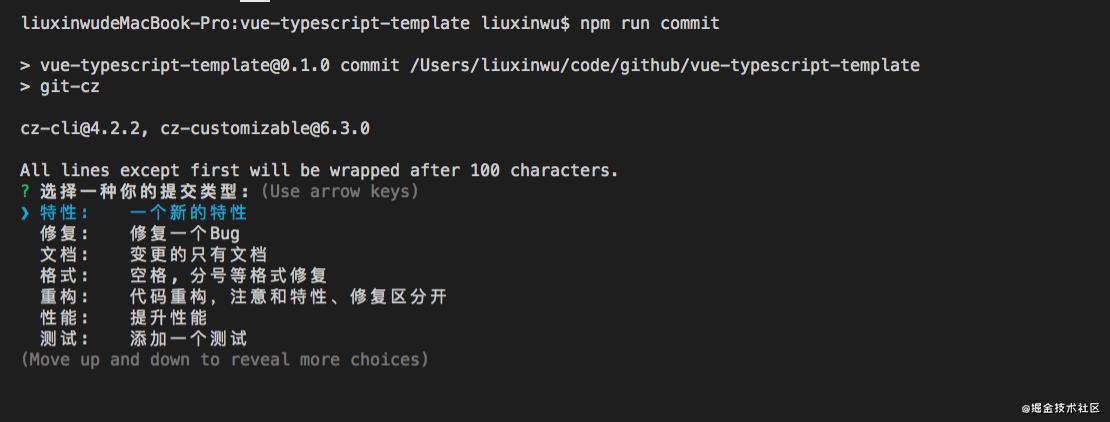
效果如下:
指令的封装
- 结合 animate.css 的自定义动画指令
- 复制粘贴指令
- 防抖指令
- 拖拽指令
- 禁止表情及特殊字符指令
- 长按指令
- 权限控制指令
源码地址
博文推荐
- 基于 node 实现项目下载、自动化路由、项目发布脚手架
- 封装一个简单的 WebSocket 库
- 笔记:Vue 常见面试题汇总及解析
- Vue3.0 中 Object.defineProperty 的代替方案 Proxy
- vue 3.0 —— 之初体验一
- 一张图搞懂原型、原型对象、原型链
- Promise 原理篇 = 从 0 到 1 构建一个 Promise
【笔记不易,如对您有帮助,请点赞,谢谢】
常见问题FAQ
- 免费下载或者VIP会员专享资源能否直接商用?
- 本站所有资源版权均属于原作者所有,这里所提供资源均只能用于参考学习用,请勿直接商用。若由于商用引起版权纠纷,一切责任均由使用者承担。更多说明请参考 VIP介绍。
- 提示下载完但解压或打开不了?
- 找不到素材资源介绍文章里的示例图片?
- 模板不会安装或需要功能定制以及二次开发?


发表评论
还没有评论,快来抢沙发吧!