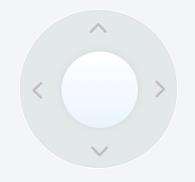
2020年5月份的时候在做一个小程序,当时有一个需求是实时视频,即不仅要求可以看视频,还要求实时操控监控,包括八个方向的移动,要求做一个虚拟摇杆出来。
当然第一次遇到这种需求,肯定是先去网上找找有没有轮子可以用,然鹅逛了两天后,发现大部分的摇杆都是为了用 js 写游戏而有的,而且基本上都是PC版本,比较复杂和看不懂的名词。何况它们使用的有 window 对象,并不适用于小程序!!!
为了实现这个功能,天啦噜!又是得自己造轮子???!!!
行8,既然如此也没得办法,先写着可能以后也用得上吧!
下面简述一下实现过程:
一、确定基本布局和配置属性
最终实现效果:
首先是可以看到两个圆圈,和四个箭头,那么为了满足不同的需求,可能大小也应该可配置。
因此组件的属性就有了外半径 outerRadius 和内半径innerRadius 来进行基本大小的配置,颜色什么的就先不要了,以后想加再加吧。
有了内外半径之后,就可以写出基本布局了。
由于之后内圈要移动,为了方便计算,这里内圈布局使用 top 和 left 来定位
<template>
  <view
    class="rj-joystick-container"
    id="rj-joystick"
    :style="{ width: outerRadius * 2 + 'px', height: outerRadius * 2 + 'px'}"
  >
    <view
      class="outer-view"
      :style="{ width: outerRadius * 2 + 'px', height: outerRadius * 2 + 'px'}"
    >
      <-- 四个方向的小箭头 -->
      <text v-for="n in 4" :key="n" class="control-direction cuIcon-right lg text-gray"></text>
      <view
        class="inner-view"
        :class="{ 'un-move': !isMoving }"  /* 为了实现摇杆结束后平滑回归原位而不是瞬移添加的过渡类 */
        :style="{ width: innerRadius * 2 + 'px', height: innerRadius * 2 + 'px', left: innerLeft + 'px', top: innerTop + 'px'}"
      >
      </view>
    </view>
  </view>
</template>

<script>
  export default {
    props: {
      // 操纵杆外圈半径
      outerRadius: {
        type: Number,
        default: 75
      },
      // 操纵杆内圈半径
      innerRadius: {
        type: Number,
        default: 37
      }
    },
    data() {
      return {}
    }
  }
</script>

<style lang="less" scoped>
  .rj-joystick-container {
    display: flex;
    justify-content: center;
    align-items: center;
    position: relative;

    /* 外圈css */
    .outer-view {
      background: rgb(227, 232, 233);
      position: relative;
      border-radius: 50%;
      box-sizing: border-box;
      box-shadow: 0 0 5rpx rgb(213, 218, 219) inset;
      border: 1px solid #fff;

      /* 內圈css */
      .inner-view {
        background: linear-gradient(to bottom, rgb(255, 255, 255), rgb(234, 244, 254));
        position: absolute;
        border-radius: 50%;
        box-shadow: 0 0 16rpx rgb(213, 218, 219);
        border: 1px solid rgb(217, 221, 228);
        box-sizing: border-box;
      }

      /* 过渡效果 */
      .un-move {
        transition: all .4s;
      }

      .control-direction {
        position: absolute;
        font-size: 43rpx;
        color: #bbb;
        width: 50%;
        height: 70rpx;
        top: calc(50% - 35rpx);
        left: 50%;
        text-align: right;
        line-height: 70rpx;
        padding-right: 13rpx;
        display: block;
        box-sizing: border-box;
        transform-origin: 0 50%;
      }

      text {
        &:nth-child(0) {
          transform: rotate(0deg);
        }

        &:nth-child(1) {
          transform: rotate(90deg);
        }

        &:nth-child(2) {
          transform: rotate(180deg);
        }

        &:nth-child(3) {
          transform: rotate(270deg);
        }
      }
    }
  }
</style>
现在只是实现了基本的布局,我们还要了解一下,这个摇杆需要干些什么,首先当你按住摇杆移动过程中需要触发 @touchmove 表示正在移动中,移动结束时触发 @touchend 函数,并使得摇杆回归中心圆点。
二、组件内部数据的确定
- 由于为了方便,外部只需要传入内外径,但是由于内圈我们是用
left和top来定位的,所以内圈的top值和left值也是需要根据传入的内外径来计算的,如果想要居中,那么top和left显然就是外径-内径 - 既然是摇杆怎么可以没有旋转角度
angle和旋转方向direction呢? - 为了实现移动结束摇杆回归中心圆点时平滑过渡,需要添加一个布尔值
isMoving来表示摇杆是否移动中,以便在没有移动的时候添加过度类使摇杆平滑回归。
因此完善一下组件的内部数据:
<script>
  export default {
    data() {
      return {
        angle: 0, // 旋转角度
        direction: '', // 旋转方向
        innerLeft: this.outerRadius - this.innerRadius, // 操纵杆内圈的原始left值
        innerTop: this.outerRadius - this.innerRadius, // 操纵杆内圈的原始top值
        isMoving: false, // 是否正在移动
      }
    }
  }
</script>
此时我们仅仅知道的是内圈相对于外圈的 left 和 top 值,但是之后的移动操作事件对象的 x 、 y 坐标都是相对于整个页面的,为了方便计算,我们在组件挂载的时候再获取一下:
- 外圈相对于页面左边界的
outerLeft值 - 外圈相对于页面上边界的
outerTop值 - 内圈的中心点相对于页面的坐标
(centerX, centerY),由于是同心圆也是外圈的中心点
为了实现数据的初始化,此时添加一个挂载函数如下:
<script>
  export default {
    mounted: function() {
      const query = uni.createSelectorQuery().in(this);
      // 小程序的 API 通过 id 获取位置
      query.select('#rj-joystick').boundingClientRect(data => {
        this.outerLeft = data.left; // 获取操作杆距离页面左边界的距离
        this.outerTop = data.top; // 获取操作杆距离页面上边界的距离
        this.centerX = data.left + this.outerRadius; // 中心点的X坐标
        this.centerY = data.top + this.outerRadius; // 中心点的Y左边
      }).exec();
    }
  }
</script>
事到如今,组件的内部属性已经可以说完整了。接下来完善它的触发事件
三、组件事件的完善
1. 摇杆移动事件
内圈中添加事件: @touchmove="onJoystickMove"
在移动的时候首先要获取移动事件中的坐标,根据手指的位置去移动内圈,也就是摇杆。
此时需要分两种情况:
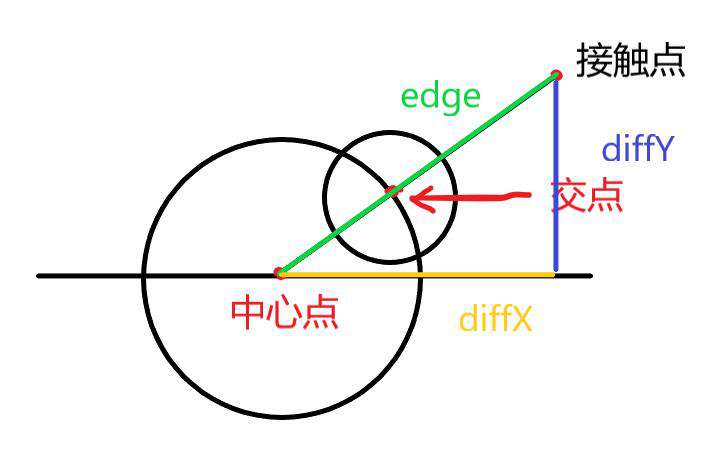
①当接触点在外圈范围内,此时只需要跟着接触点坐标计算内圈的 innerLeft 和 innerTop 就行了
②当接触点在外圈范围外,需要用到数学的知识,让内圈的中心点跟随接触点移动停留在接触点到中心点 (centerX, centerY) 的连线与外圈的交点处,如图所示
完善事件如下:
<script>
  export default {
    methods:{
      // 摇杆移动事件
      onJoystickMove: function(e) {
        const { clientX, clientY } = e.touches[0]; // 触碰点坐标
        let diffX = clientX - this.centerX; // 触碰点到中心的X距离
        let diffY = clientY - this.centerY; // 触碰点到中心的Y距离
        let edge = Math.sqrt(diffX * diffX + diffY * diffY); // 触碰点到中心的距离

        this.isMoving = true;  // 更新移动状态

        // 如果触碰点在范围内
        if (edge <= this.outerRadius) {
          this.innerLeft = Math.round(clientX - this.outerLeft - this.innerRadius);
          this.innerTop = Math.round(clientY - this.outerTop - this.innerRadius);
        } else {
          // 接触点在范围外,需要通过比例计算
          let ratio = this.outerRadius / edge;
          this.innerLeft = Math.round(diffX * ratio + this.innerRadius);
          this.innerTop = Math.round(diffY * ratio + this.innerRadius);
        }
        this.getAngle(diffX, diffY); // 移动时一直更新角度
        this.$emit("JoystickTouchMove", this.direction);  // 此处可以自定义触发外部事件
      }
    }
</script>
2. 摇杆结束事件
内圈中添加事件: @touchend="joystickRestore"
摇杆结束需要重置一系列的数据
<script>
  export default {
    methods:{
      // 离开摇杆后摇杆返回中心点
      joystickRestore: function(e) {
        this.isMoving = false;  // 移动结束
        this.innerLeft = this.outerRadius - this.innerRadius;  // 回归原点
        this.innerTop = this.outerRadius - this.innerRadius;
        this.direction = ''; // 没有方向
        this.angle = 0;     // 角度为0
        this.$emit("joystickTouchEnd");  // 停止时自定义触发外部事件
      }
    }
</script>
3. 角度计算函数
通过 cos 计算角度值,范围是 0° - 359°
具体实现如下:
<script>
  export default {
    methods:{
      // 计算角度
      getAngle: function(diffX, diffY) {
        let edge = Math.sqrt(diffX * diffX + diffY * diffY);  // 斜边长度
        if (edge !== 0) {
          let cos = diffX / edge;  // cos值
          let angle = Math.acos(cos); // 通过反三角函数获取弧度值
          this.angle = diffY > 0 ? 360 - angle * 180 / Math.PI : angle * 180 / Math.PI;
          angle = this.angle;
          let oldDirection = this.direction; // 获取旧的方向
          let newDirection = '';
          if (angle < 22.5 && angle >= 0 || angle < 360 && angle >= 337.5) {
            newDirection = '右';
          } else if (angle < 22.5 * 3 && angle >= 22.5 * 1) {
            newDirection = '右上';
          } else if (angle < 22.5 * 5 && angle >= 22.5 * 3) {
            newDirection = '上';
          } else if (angle < 22.5 * 7 && angle >= 22.5 * 5) {
            newDirection = '左上';
          } else if (angle < 22.5 * 9 && angle >= 22.5 * 7) {
            newDirection = '左';
          } else if (angle < 22.5 * 11 && angle >= 22.5 * 9) {
            newDirection = '左下';
          } else if (angle < 22.5 * 13 && angle >= 22.5 * 11) {
            newDirection = '下';
          } else if (angle < 22.5 * 15 && angle >= 22.5 * 13) {
            newDirection = '右下';
          }
          // 方向改变时才触发
          if(newDirection !== oldDirection) {
            this.direction = newDirection;
            this.$emit("joystickAngleChange", this.direction);  // 触发外部事件并返回方向
          }
        }
      }
    }
</script>
到此该组件的功能已经基本实现,能实现八个方向的判断,并且在移动过程中、方向改变时、停止移动时触发外部函数,能基本实现基本的需求。
四、关于拓展
如果想要在按住摇杆移动的时候 节流触发 外部函数,可以添加 @movestart 事件如下
内圈中添加事件: @touchstart="onMoveStart"
<script>
  export default {
    data() {
      return {
        timer: null // 计时器
      }
    },
    methods:{
      // 按住摇杆的时候定时触发
      onMoveStart: function(e) {
        let that = this;
        that.timer = setInterval(function() {
          that.$emit("joystickTouchStart", that.direction);
        }, 500);  // 如果时间想要自定义再自己改改好了
      },

      // 离开摇杆后摇杆返回中心点
      joystickRestore: function(e) {
        this.isMoving = false;  // 移动结束
        this.innerLeft = this.outerRadius - this.innerRadius;  // 回归原点
        this.innerTop = this.outerRadius - this.innerRadius;
        this.direction = ''; // 没有方向
        this.angle = 0;     // 角度为0
        this.$emit("joystickTouchEnd");  // 停止时自定义触发外部事件
+++++++ clearInterval(this.timer);  // 清除定时器
      }
    }
</script>
五、组件代码
<template>
  <view class="rj-joystick-container" id="rj-joystick" :style="{ width: outerRadius * 2 + 'px', height: outerRadius * 2 + 'px'}">
    <view class="outer-view" :style="{ width: outerRadius * 2 + 'px', height: outerRadius * 2 + 'px'}">
      <text v-for="n in 4" :key="n" class="control-direction cuIcon-right lg text-gray"></text>
      <view class="inner-view" :class="{ 'un-move': !isMoving }" :style="{ width: innerRadius * 2 + 'px', height: innerRadius * 2 + 'px', left: innerLeft + 'px', top: innerTop + 'px'}"
       @touchmove="onJoystickMove" @touchend="joystickRestore" @touchstart="onMoveStart">
      </view>
    </view>
  </view>
</template>

<script>
  export default {
    props: {
      // 操纵杆外圈半径
      outerRadius: {
        type: Number,
        default: 75
      },
      // 操纵杆内圈半径
      innerRadius: {
        type: Number,
        default: 37
      }
    },

    data() {
      return {
        angle: 0, // 旋转角度
        direction: '', // 旋转方向
        innerLeft: this.outerRadius - this.innerRadius, // 操纵杆内圈的原始left值
        innerTop: this.outerRadius - this.innerRadius, // 操纵杆内圈的原始top值
        isMoving: false, // 是否正在移动
        timer: null // 计时器
      };
    },

    mounted: function() {
      const query = uni.createSelectorQuery().in(this);
      query.select('#rj-joystick').boundingClientRect(data => {
        this.outerLeft = data.left; // 获取操作杆距离页面左边界的距离
        this.outerTop = data.top; // 获取操作杆距离页面上边界的距离
        this.centerX = data.left + this.outerRadius; // 中心点的X坐标
        this.centerY = data.top + this.outerRadius; // 中心点的Y左边
      }).exec();
    },

    methods: {
      // 按住摇杆的时候定时触发
      onMoveStart: function(e) {
        let that = this;
        that.timer = setInterval(function() {
          that.$emit("joystickTouchStart", that.direction);
        }, 500);  // 如果时间想要自定义再自己改改好了
      },

      // 摇杆移动事件
      onJoystickMove: function(e) {
        const {
          clientX,
          clientY
        } = e.touches[0];
        let diffX = clientX - this.centerX; // 触碰点到中心的X距离
        let diffY = clientY - this.centerY; // 触碰点到中心的Y距离
        let edge = Math.sqrt(diffX * diffX + diffY * diffY); // 触碰点到中心的距离
        this.isMoving = true;

        // 如果触碰点在范围内
        if (edge <= this.outerRadius) {
          this.innerLeft = Math.round(clientX - this.outerLeft - this.innerRadius);
          this.innerTop = Math.round(clientY - this.outerTop - this.innerRadius);
        } else {
          // 接触点在范围外
          let ratio = this.outerRadius / edge;
          this.innerLeft = Math.round(diffX * ratio + this.innerRadius);
          this.innerTop = Math.round(diffY * ratio + this.innerRadius);
        }
        this.getAngle(diffX, diffY); // 计算角度
        this.$emit("JoystickTouchMove", this.direction);
      },

      // 计算角度
      getAngle: function(diffX, diffY) {
        let edge = Math.sqrt(diffX * diffX + diffY * diffY);
        // console.log(edge);
        if (edge !== 0) {
          let cos = diffX / edge;
          let angle = Math.acos(cos);
          let oldDirection = this.direction; // 获取旧的方向
          this.angle = diffY > 0 ? 360 - angle * 180 / Math.PI : angle * 180 / Math.PI;
          angle = this.angle;
          let newDirection = '';
          if (angle < 22.5 && angle >= 0 || angle < 360 && angle >= 337.5) {
            newDirection = '右';
          } else if (angle < 22.5 * 3 && angle >= 22.5 * 1) {
            newDirection = '右上';
          } else if (angle < 22.5 * 5 && angle >= 22.5 * 3) {
            newDirection = '上';
          } else if (angle < 22.5 * 7 && angle >= 22.5 * 5) {
            newDirection = '左上';
          } else if (angle < 22.5 * 9 && angle >= 22.5 * 7) {
            newDirection = '左';
          } else if (angle < 22.5 * 11 && angle >= 22.5 * 9) {
            newDirection = '左下';
          } else if (angle < 22.5 * 13 && angle >= 22.5 * 11) {
            newDirection = '下';
          } else if (angle < 22.5 * 15 && angle >= 22.5 * 13) {
            newDirection = '右下';
          }
          // 方向改变时才触发
          if(newDirection !== oldDirection) {
            this.direction = newDirection;
            this.$emit("joystickAngleChange", {
              direction: this.direction,
              angle
            });  // 触发外部事件并返回返回方向和角度
          }
        }
      },


      // 离开摇杆后摇杆返回中心点
      joystickRestore: function(e) {
        this.isMoving = false;
        this.innerLeft = this.outerRadius - this.innerRadius;
        this.innerTop = this.outerRadius - this.innerRadius;
        this.direction = '';
        this.angle = 0;
        this.$emit("joystickTouchEnd");  // 触发停止事件
        clearInterval(this.timer);
      }
    }
  }
</script>

<style lang="less" scoped>
  .rj-joystick-container {
    display: flex;
    justify-content: center;
    align-items: center;
    position: relative;

    .outer-view {
      background: rgb(227, 232, 233);
      position: relative;
      border-radius: 50%;
      box-sizing: border-box;
      box-shadow: 0 0 5rpx rgb(213, 218, 219) inset;
      border: 1px solid #fff;

      .inner-view {
        background: linear-gradient(to bottom, rgb(255, 255, 255), rgb(234, 244, 254));
        position: absolute;
        border-radius: 50%;
        box-shadow: 0 0 16rpx rgb(213, 218, 219);
        border: 1px solid rgb(217, 221, 228);
        box-sizing: border-box;
      }

      .un-move {
        transition: all .4s;
      }

      .control-direction {
        position: absolute;
        font-size: 43rpx;
        color: #bbb;
        width: 50%;
        height: 70rpx;
        top: calc(50% - 35rpx);
        left: 50%;
        text-align: right;
        line-height: 70rpx;
        padding-right: 13rpx;
        display: block;
        box-sizing: border-box;
        transform-origin: 0 50%;
      }

      text {
        &:nth-child(0) {
          transform: rotate(0deg);
        }

        &:nth-child(1) {
          transform: rotate(90deg);
        }

        &:nth-child(2) {
          transform: rotate(180deg);
        }

        &:nth-child(3) {
          transform: rotate(270deg);
        }
      }
    }
  }
</style>
六、外部引用
page.vue
<template>
  <-- 必须在最外层view中禁止ios小程序页面上下拉回弹效果 -->
  <view @touchmove.stop.prevent="onBanScroll">
    <rj-joystick
      outerRadius="200"
      innerRadius="100"
      @joystickTouchStart="myFun1"
      @joystickControl="myFun2"
      @joystickTouchEnd="myFun3"
      @joystickAngleChange="myFun4"
    >
    </rj-joystick>
  </view>
</template>

<script>
  export default {
    methods:{
      /**
       * 由于在IOS中页面上下滑具有弹簧回弹效果,会影响摇杆的灵敏性,所以要禁止默认事件
       */
      onBanScroll: function(e) {
        return;
      },
    }
</script>
常见问题FAQ
- 免费下载或者VIP会员专享资源能否直接商用?
- 本站所有资源版权均属于原作者所有,这里所提供资源均只能用于参考学习用,请勿直接商用。若由于商用引起版权纠纷,一切责任均由使用者承担。更多说明请参考 VIP介绍。
- 提示下载完但解压或打开不了?
- 找不到素材资源介绍文章里的示例图片?
- 模板不会安装或需要功能定制以及二次开发?


发表评论
还没有评论,快来抢沙发吧!