前言
好久没有更新博客了,前段时间一直在准备春招,幸运的是能入职一家不错的公司,公司的技术栈是react,所以得转react,希望以后学习的过程中能多更新文章,学会知识最好的办法就是给别人讲懂。
一、Redux介绍
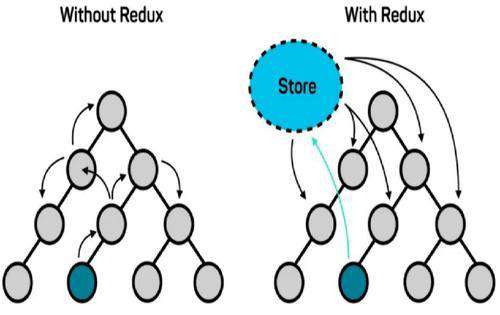
以上是官网的解释,其实就和Vuex是一个状态管理器,用来在构建大型应用的时候组件之间可以共享全局数据。因为如果业务过于复杂组件之间数据传递可能会很麻烦。就像这样,左边是没有 redux,右边是有 redux。

二、Redux工作流程
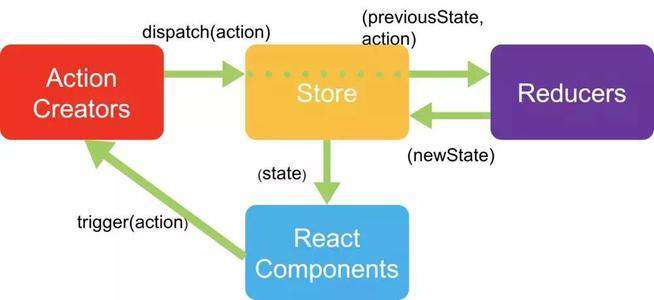
首先放张图片感受一下

2.1 redux 安装
npm安装
npm install --save redux
2.2 redux基本使用
我们可以看到 React Components 是从 Store 里面拿数据的,那么我们可以初步得出结论,Store 就是数据管理中心,所有的全局数据就是存在这里面的,下面我们来使用一下。
我们在 react 项目中 src 文件中新建 store 文件夹下面新建两个文件分别为 index.js reducer.js
大致目录如下
--src
----store
------index.js
------reducer.js
----index.js
----TodoList.js
// store/reducer.js
const defaultState = {
    inputValue: '',
    data: [
        { id: 1, title: '吃饭', compeled: false },
        { id: 2, title: '睡觉', compeled: false },
        { id: 3, title: '打豆豆', compeled: false }
    ]
}

//eslint-disable-next-line
export default (state = defaultState, action) => {

    // console.log(action)
    // Reducer里面只能接收state 不能改变state
    if(action.type === 'CHANGE_INPUT'){
        let newValue = JSON.parse(JSON.stringify(state))
        newValue.inputValue = action.value
        return newValue
    }

    if(action.type === 'ADD_ITEM'){
        let newValue = JSON.parse(JSON.stringify(state))
        if(newValue.inputValue === '') return newValue
        let item = {
            id:new Date().getTime(),
            title:newValue.inputValue,
            compeled:false
        }
        newValue.data.push(item)
        newValue.inputValue = ''
        return newValue
    }

    if(action.type === 'DELETE_ITEM'){
        let newValue = JSON.parse(JSON.stringify(state))
        let index = newValue.data.findIndex(item => item.id === action.id)
        newValue.data.splice(index,1)
        return newValue
    }

    return state
}
// store/index.js
import {createStore} from 'redux'
import reducer from './reducer'
// reducer (state,action) => {}
const store = createStore(reducer)
export default store
这里我们看到创建 store 对象其实调用了 redux 中的 createStore 方法,它的参数就是一个函数,就是我们的 reducer ,reducer 它里面有 state 和 action 两个参数。state 我们初始化了值。而我们的 action 这里是什么呢?
我们看看 TodoList.js 的代码,我们通过引入创建的 store 通过 store.getState() 获取数据。
import React, { Component } from 'react';
import 'antd/dist/antd.css'
import { Button, Input, List } from 'antd'

import store from './store'

class TodoList extends Component {
    constructor(props) {
        super(props);
      	//获取数据
        this.state = store.getState()
      	// 监听数据改变 更新state
        store.subscribe(this.storeChange)
    }

    deleteItem = (id) => {
        // console.log(id)
        const action = {
            type:'DELETE_ITEM',
            id
        }
        // 删除item
        store.dispatch(action)
    }

    handleInputValue = (e) => {
        const action = {
            type:'CHANGE_INPUT',
            value:e.target.value
        }
        //改变inputvalue
        store.dispatch(action)
    }

    clickBtn = () => {
        const action = {
            type:'ADD_ITEM'
        }
        // 添加item
        store.dispatch(action)
    }

    storeChange = () => {
        this.setState(store.getState())
    }

    render() {
        return (
            <div style={{margin:'15px'}}>
                <div>
                    <Input
                        placeholder='Write Something'
                        style={{width:'250px',marginRight:'15px'}}
                        onChange={this.handleInputValue}
                        value={this.state.inputValue}
                    />
                    <Button
                        type='primary'
                        onClick={this.clickBtn}
                    >Add</Button>
                </div>
                <div style={{marginTop:'15px',width:'250px'}}>
                    <List
                        bordered
                        dataSource={this.state.data}
                        renderItem={item => (<List.Item onClick={this.deleteItem.bind(this,item.id)}>{item.title}</List.Item>)}
                        />
                </div>
            </div>
        );
    }
}

export default TodoList;
这里的 action 就是我们通过 store.dispatch(action) 方法派发的一个个事件,这里 action 对象必须有一个 type 属性, 用来告诉 redux 你要做哪一类操作,也就是我们 case 到那个 type 就做执行相应的逻辑。然后我们通过 reducer 回调来更新相应数据。这里注意一下: reducer里面只能接收 state 不能改变state,所以我们可以看到上面是先拷贝数据,更新之后再返回,并不是直接更新 state 的数据
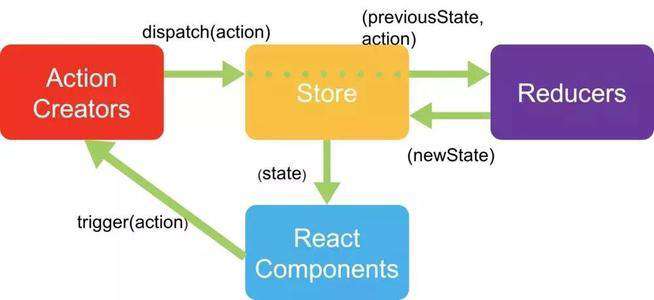
那么我们可以根据上面的流程图初步了解redux的执行流程,首先通过 redux 的 createStore 函数创建一个 store 对象,注意createStore的参数是个函数 reducer 。我们 react components 通过 store.getState() 获取数据,如果需要操作 store,我们需要通过 store.dispatch(action) 来派发事件。 去告知 store 做出相应的改变,怎么做出改变呢?我们看到数据通过 React Components 出发到 Action Creators 再到 Store 最终到 Reducers 才进行理的,也就是 reducer 来处理数据。那么我们上面的代码也可以清楚的展示 reducer 函数里根据不同type处理各种 dispatch(action) 派发的事件。处理之后的 newState 更新到 Store 数据仓库供 React Components 使用
为了阅读方便,再次放送此图。

为了demo完整性,这里将 src/index.js 代码贴上
import React from 'react'
import ReactDom from 'react-dom'
import TodoList from './TodoList'

ReactDom.render(
  <TodoList />,
  document.getElementById('root')
)
这里redux最简单的使用就差不多了介绍完了。后面会持续更新一些高级的用法,喜欢记得点点关注。
常见问题FAQ
- 免费下载或者VIP会员专享资源能否直接商用?
- 本站所有资源版权均属于原作者所有,这里所提供资源均只能用于参考学习用,请勿直接商用。若由于商用引起版权纠纷,一切责任均由使用者承担。更多说明请参考 VIP介绍。
- 提示下载完但解压或打开不了?
- 找不到素材资源介绍文章里的示例图片?
- 模板不会安装或需要功能定制以及二次开发?


发表评论
还没有评论,快来抢沙发吧!