webpack性能优化
- 如何进行性能数据分析
- 编译时间的优化
- 编译体积的优化
- 如何运行的更快
本文起步工程 ,承接上一篇文章 electron主线程和渲染线程的交互总结
如何进行性能数据分析
安装 friendly-errors-webpack-plugin , node-notifier ,speed-measure-webpack5-plugin, webpack-bundle-analyzer
$ yarn add friendly-errors-webpack-plugin speed-measure-webpack5-plugin webpack-bundle-analyzer -D
$ yarn add node-notifier
friendly-errors-webpack-plugin: 可以识别某些类别的webpack错误,提供更好的开发体验
node-notifier: 可以发送弹框通知,支持多平台,因为electron也可以调用node-notifier,所以不安装为开发依赖
speed-measure-webpack5-plugin: 可以分析打包速度,webpack4版本用speed-measure-webpack-plugin
webpack-bundle-analyzer: 监控打包的体积,需要和webpack-cli配合使用
修改webpack配置
render-process/config/webpack.common.js
const webpack = require('webpack')
const path = require('path');
const FriendlyErrorsWebpackPlugin = require('friendly-errors-webpack-plugin')
const notifier = require('node-notifier')
const icon = path.join(__dirname,'Error.png')
module.exports = {
    entry: {
        // 默认是main
        main: './render-process/main/indexx'
    },
    // 上下文目录,根目录 https://webpack.docschina.org/configuration/entry-context/#context
    context: process.cwd(),
    output: {
        filename: "[name].[hash].js",
        path: path.join(__dirname, "../dist-main"),
    },
    target: "electron-renderer",
    resolve: {
        // 引入的默认后缀名,一个个找
        extensions: [".ts", ".tsx", ".js", ".jsx", ".json"],
        alias: {
            //   "@": path.resolve("src"), // 这样配置后 @ 可以指向 src 目录
        },
    },
    module: {
        rules: [{
            test: /\\.tsx?\$/,
            loader: "ts-loader",
            exclude: /node_modules/,
        }],
    },
    plugins: [
        // https://www.npmjs.com/package/friendly-errors-webpack-plugin
        new FriendlyErrorsWebpackPlugin({
            onErrors:(severity, errors)=>{
                console.log(errors,'errorserrorserrorserrorserrors')
                const error = errors[0]
                notifier.notify({
                    title:'webpack编译失败',
                    message:severity+": "+error.name,
                    subtitle:error.file||'',
                    icon,
                })
            }
        })
    ],
}
这里我故意写错入口main: './render-process/main/indexx',执行npm run build:react命令后, 就会出现弹框

打包时间分析,引入SpeedMeasureWebpack5Plugin
render-process/config/webpack.common.js
const SpeedMeasureWebpack5Plugin = require('speed-measure-webpack5-plugin')
const smp = new SpeedMeasureWebpack5Plugin()
module.exports =smp.wrap({
    entry: {
        // 默认是main
        main: './render-process/main/index'
    },
   // ...
})
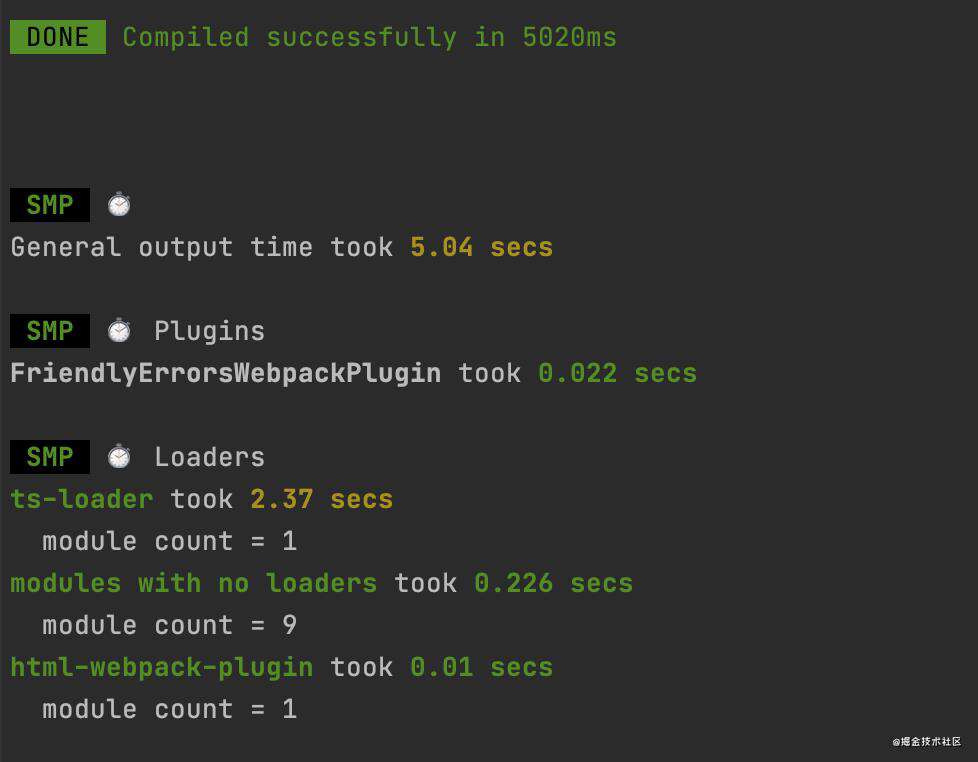
我们来看看SMP提供的信息
>> 打包完成
 DONE  Compiled successfully in 4800ms                                                                                                                                                              12:43:38 PM

 SMP  ⏱
>> 正常输出的模块
General output time took 4.81 secs

 SMP  ⏱  Plugins
>> 每个插件的用时
FriendlyErrorsWebpackPlugin took 0.011 secs

 SMP  ⏱  Loaders
>> loader用时
ts-loader took 2.077 secs
  module count = 1
>> 不经过loader的模块用时
modules with no loaders took 0.23 secs
  module count = 9
>> 特殊的额外工作
html-webpack-plugin took 0.012 secs
  module count = 1
打包文件模块大小分析,引入webpack-bundle-analyzer
render-process/config/webpack.common.js
const SpeedMeasureWebpack5Plugin = require('speed-measure-webpack5-plugin')
const smp = new SpeedMeasureWebpack5Plugin()
const {BundleAnalyzerPlugin} =require('webpack-bundle-analyzer')
module.exports =smp.wrap({
   // ...
    plugins: [
        new FriendlyErrorsWebpackPlugin({
           // ...
        }),
        // https://www.npmjs.com/package/webpack-bundle-analyzer
        new BundleAnalyzerPlugin(),
    ],
})
/package.json 添加一条npm命令,--progress表示监控过程
"build:reactWithProgress": "webpack --progress --config render-process/config/webpack.prod.js"
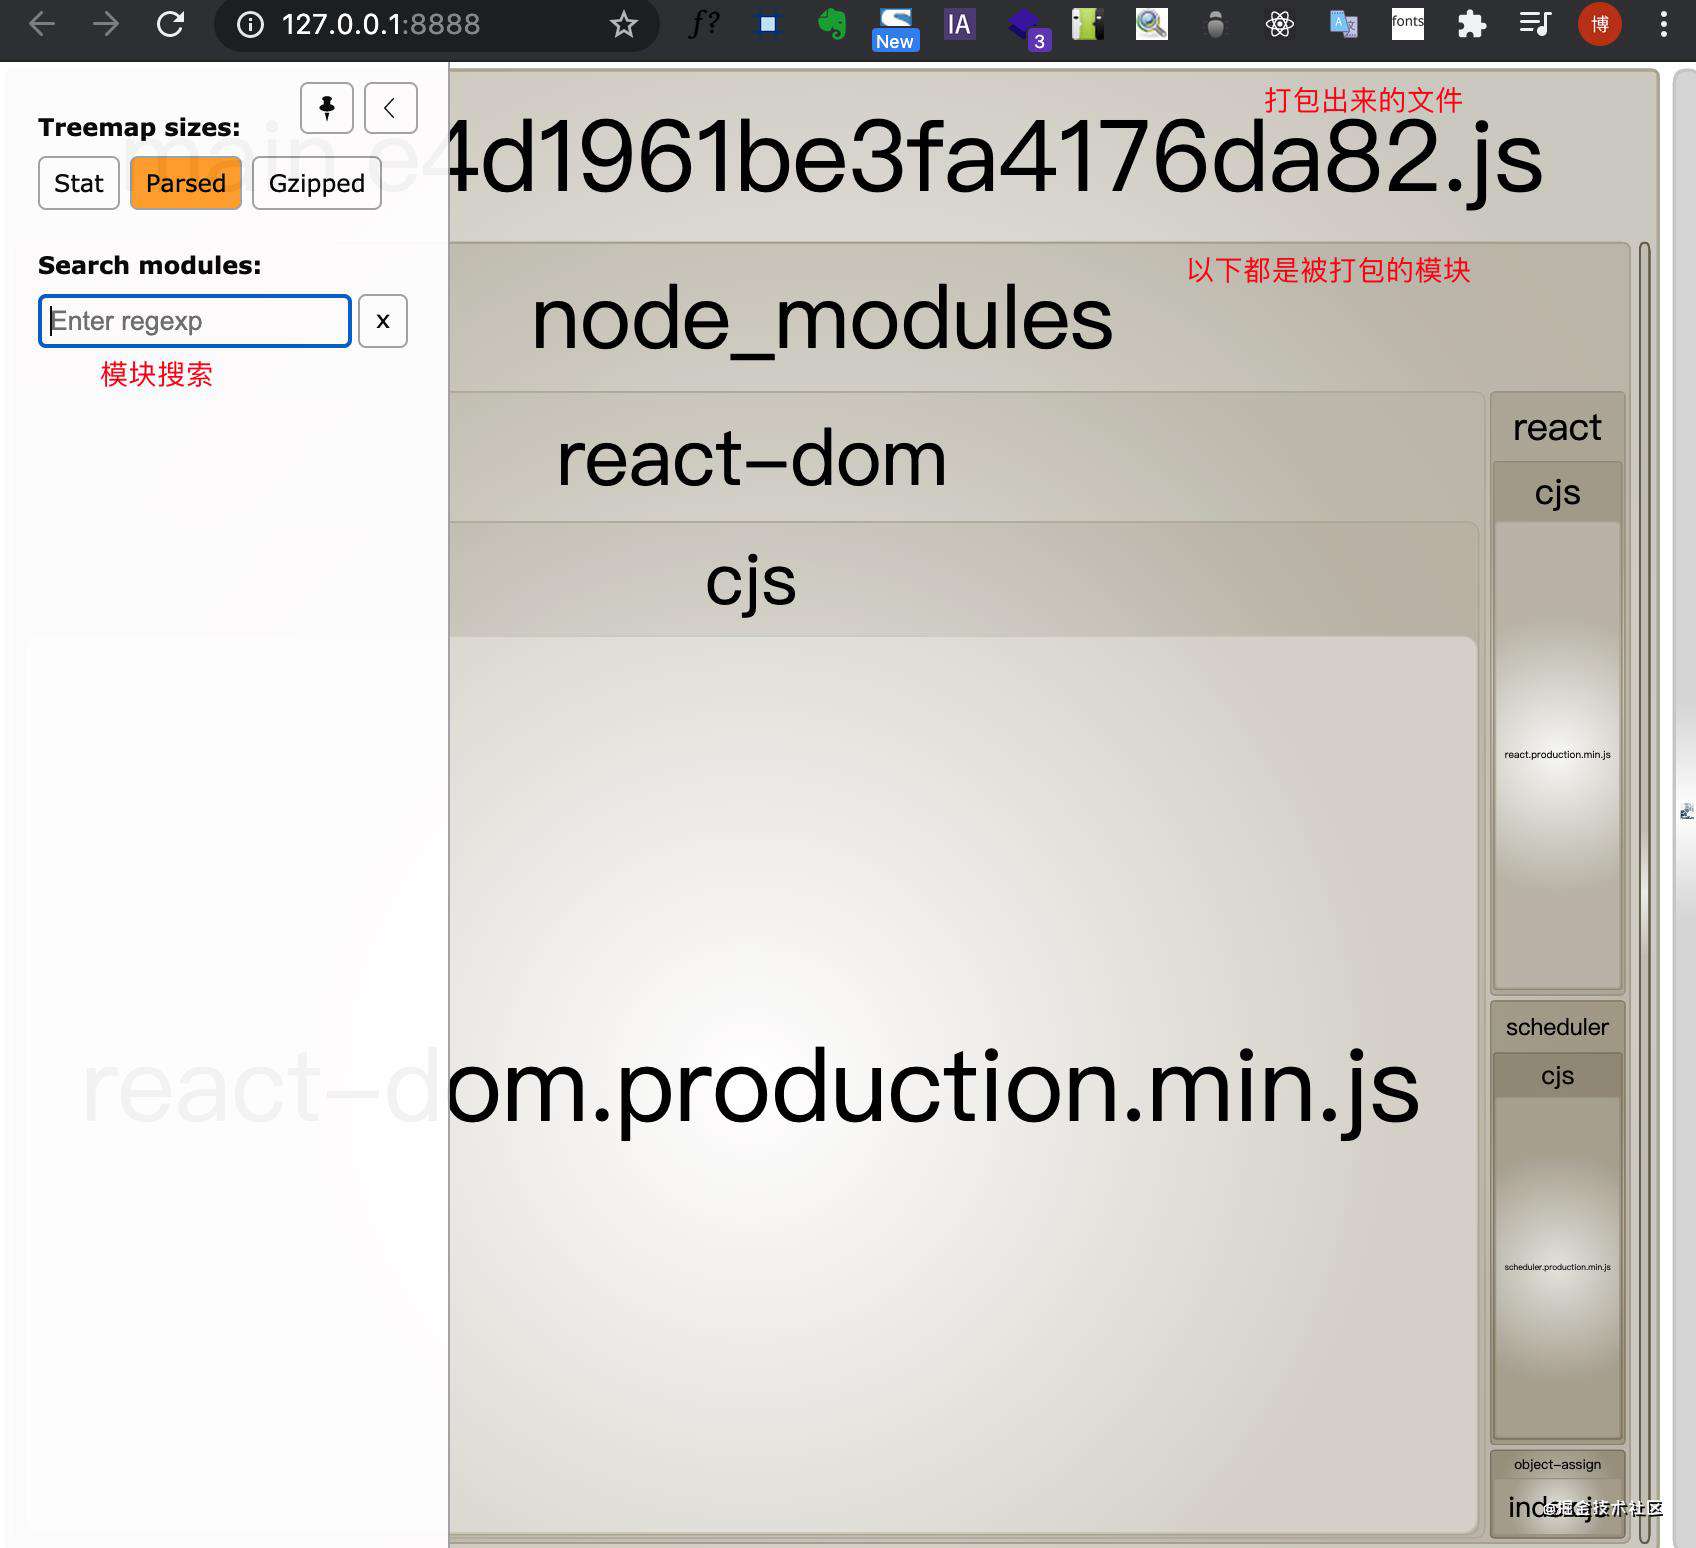
执行这条命令,会在默认浏览器打开http://127.0.0.1:8888/
将打包报告保存在本地
 new BundleAnalyzerPlugin({
            analyzerMode:'disable', // 不启动展示打包报告的web服务器
            generateStatsFile:true // 生成报告文件
        })
再从执行npm run build:reactWithProgress,你会发现打包目录下面多了一个stats.json文件(render-process/dist-main/stats.json)
使用web查看本地json打包报告文件
package.json添加命令,指定json文件的地址
"webpackAnalyzer": "webpack-bundle-analyzer --port 8888 ./render-process/dist-main/stats.json"
编译时间的优化
主要是两个思路:
- 减少要处理的文件
- 缩小要查找的范围
1. resolve
resolve: {
        // 引入的默认后缀名,一个个找,排序策略: 文件多的放前面,比如.ts
        extensions: [".ts", ".tsx", ".js", ".jsx", ".json"],
    },
2. alias
以bootstrap为例,假设我们要引入bootstrap.css,正常来说要import('bootstrap/dist/css/bootstrap.css'), 因为bootstrap包的main是dist/js/bootstrap.js,所以不能使用import('bootstrap')
bootstrap的package.json
  "style": "dist/css/bootstrap.css",
  "sass": "scss/bootstrap.scss",
  "main": "dist/js/bootstrap.js",
通过配置别名解决这个问题,同时加快模块的搜索速度
resolve: {
        alias: {
            bootstrap:path.resolve(__dirname,'node_modules/bootstrap/dist/css/bootstrap.css')
        }
    },
3. mainFields和mainFiles
resolve: {
        // target==web或者target==webworker时,mainFields默认是: ['browser','module','main']
        // target为其他时,mainFields默认是: ['module','main']
        mainFields:['style],
        // 如果package.json都没有那些字段,直接用index文件作为模块
        mainFiles:[index]
    },
4. modules
resolve: {
        modules:[
            'c:/node_modules'
        ]
    },
5.oneOf
    module: {
        rules: [{
            oneOf:[
                {
                    test: /\\.tsx?\$/,
                    loader: "ts-loader",
                    exclude: /node_modules/,
                }
            ]
        }],
    }
6. externals
React例子
 externals: {
    'react': 'React',
    'react-dom': 'ReactDOM'
  }
jQuery例子
 externals: {
    // 前面是包名,后面的是umd的全局名
    jquery:'jQuery'
  }


// 将window.jQuery赋值给\$
import \$ from 'jquery'
html添加CDN
HtmlWebpackPlugin中配置CDN_LIST字段,并且用函数方式控制开发环境和生产环境下使用不同的CDN地址
或者在index.html中使用ejs模板引擎语法
7. resolveLoader
resolveLoader:{
    modules:[path.resolve(__dirname,'xxx'),'node_modules']
}
8. noParse
案例: 配置对title.js匹配的文件将会不进行解析,title.js内无法使用import require 等语法
   module: {
        noParse:/title.js/,
        rules: [{
            oneOf:[
                {
                    test: /\\.tsx?\$/,
                    loader: "ts-loader",
                    exclude: /node_modules/,
                }
            ]
        }],
    }
9.IgnorePlugin
案例: 使用IgnorePlugin忽略本地化内容
安装moment yarn add moment
引用moment
import moment from 'moment'
console.log(moment)
注释掉配置项,打开打包分析web页面
new BundleAnalyzerPlugin({
            // analyzerMode:'disable', // 不启动展示打包报告的web服务器
            // generateStatsFile:true, // 生成报告文件
        }),
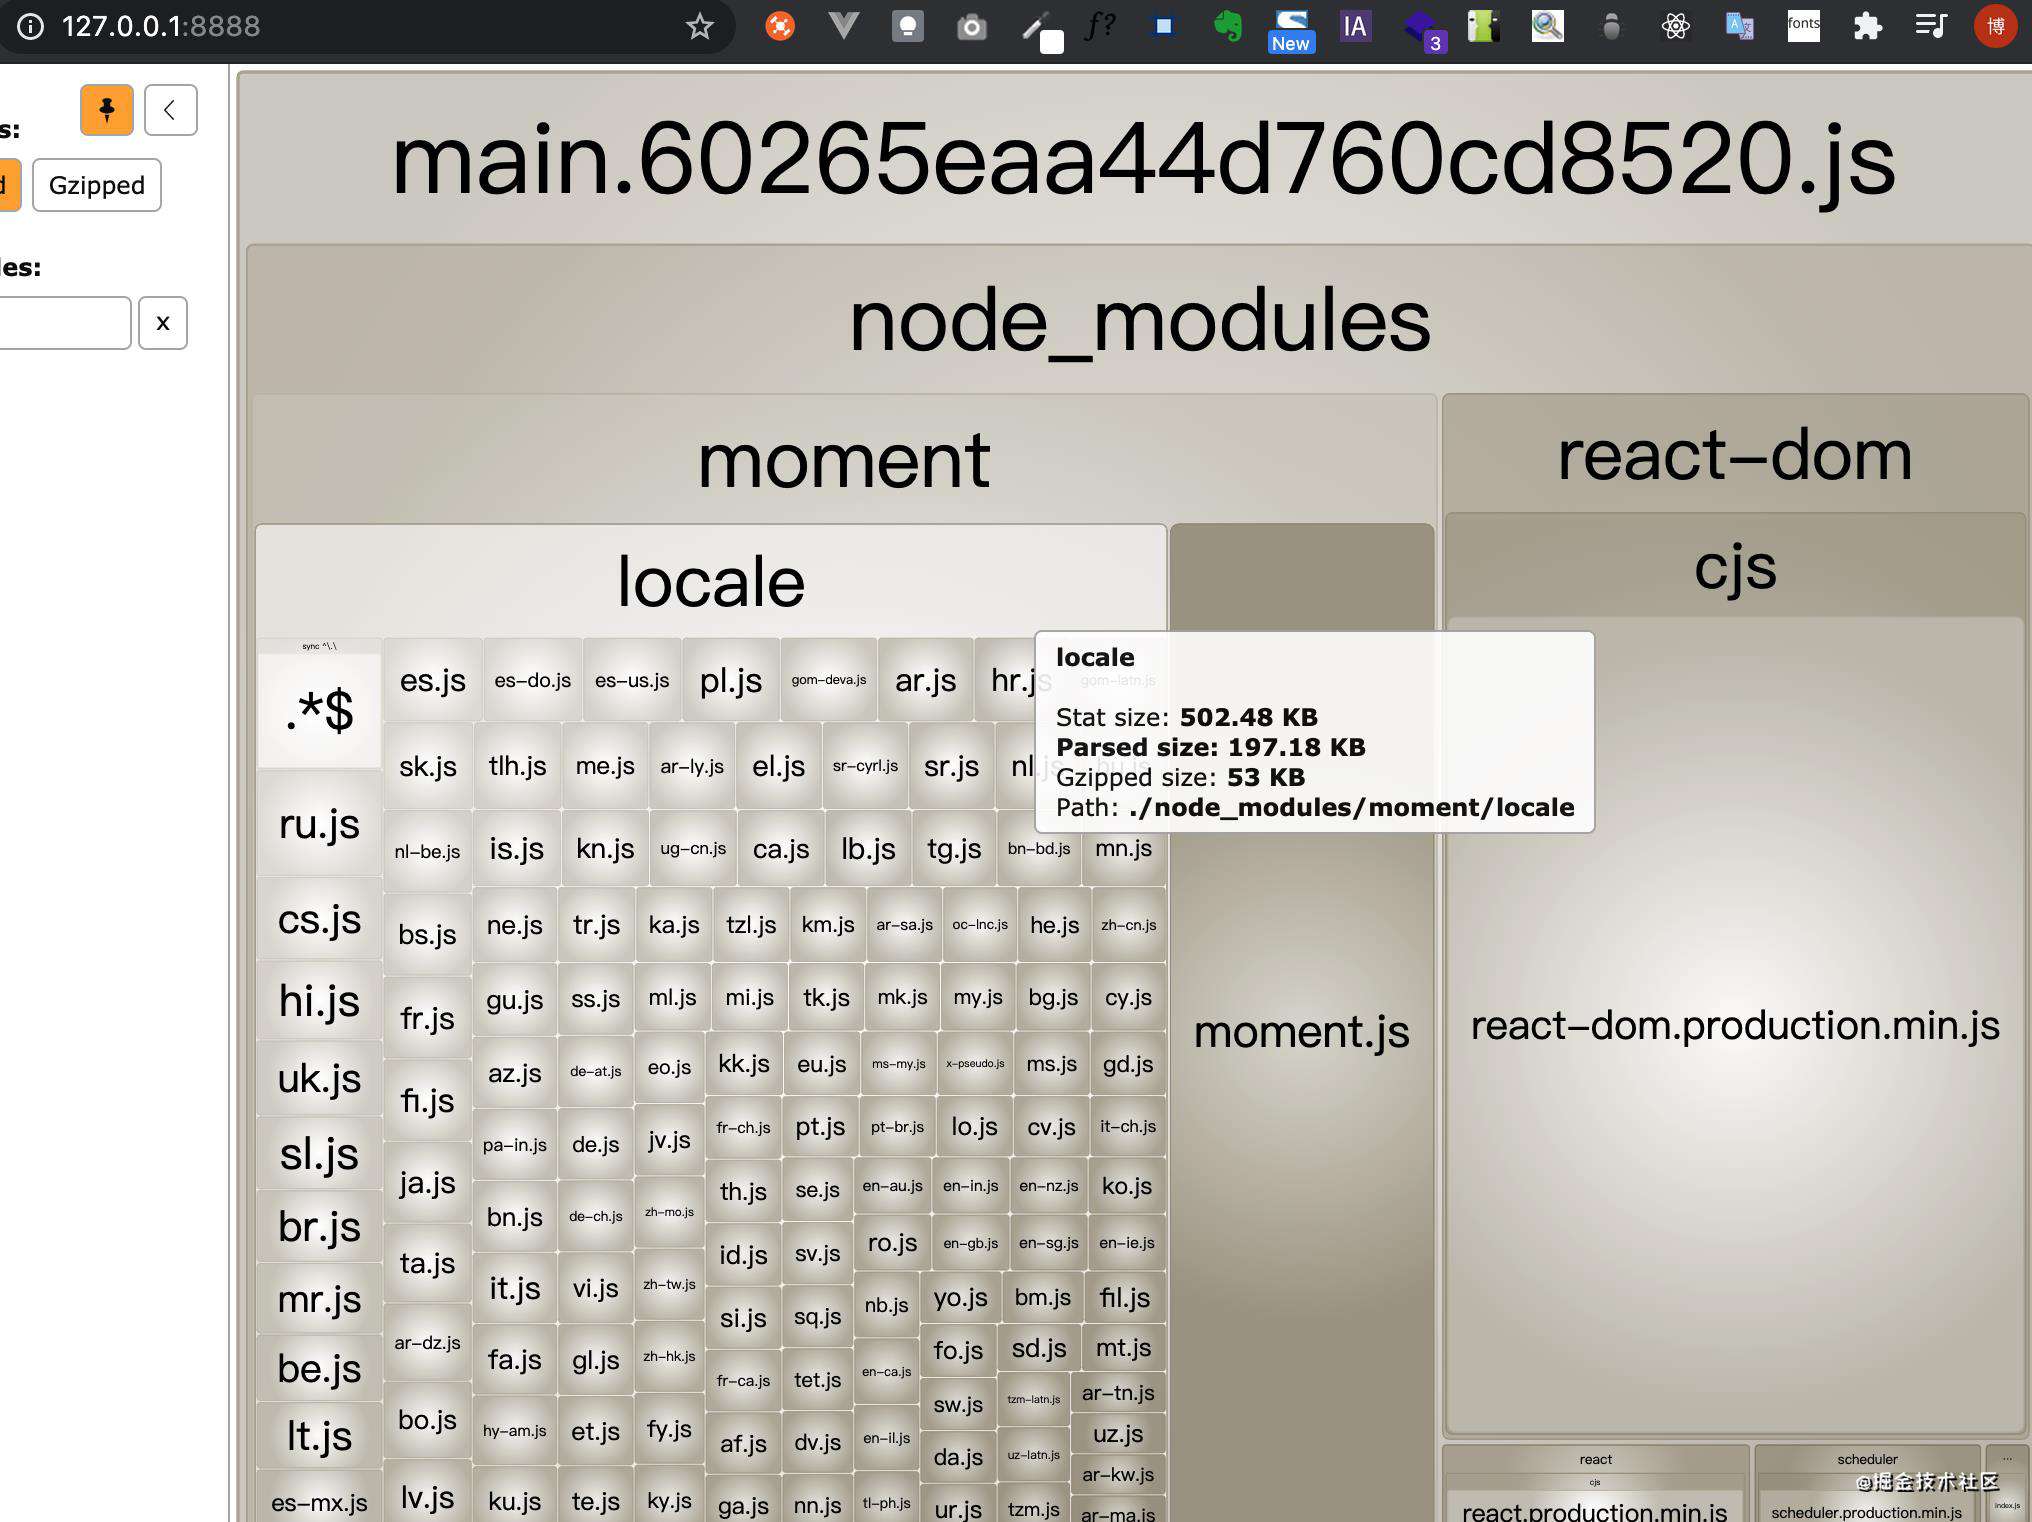
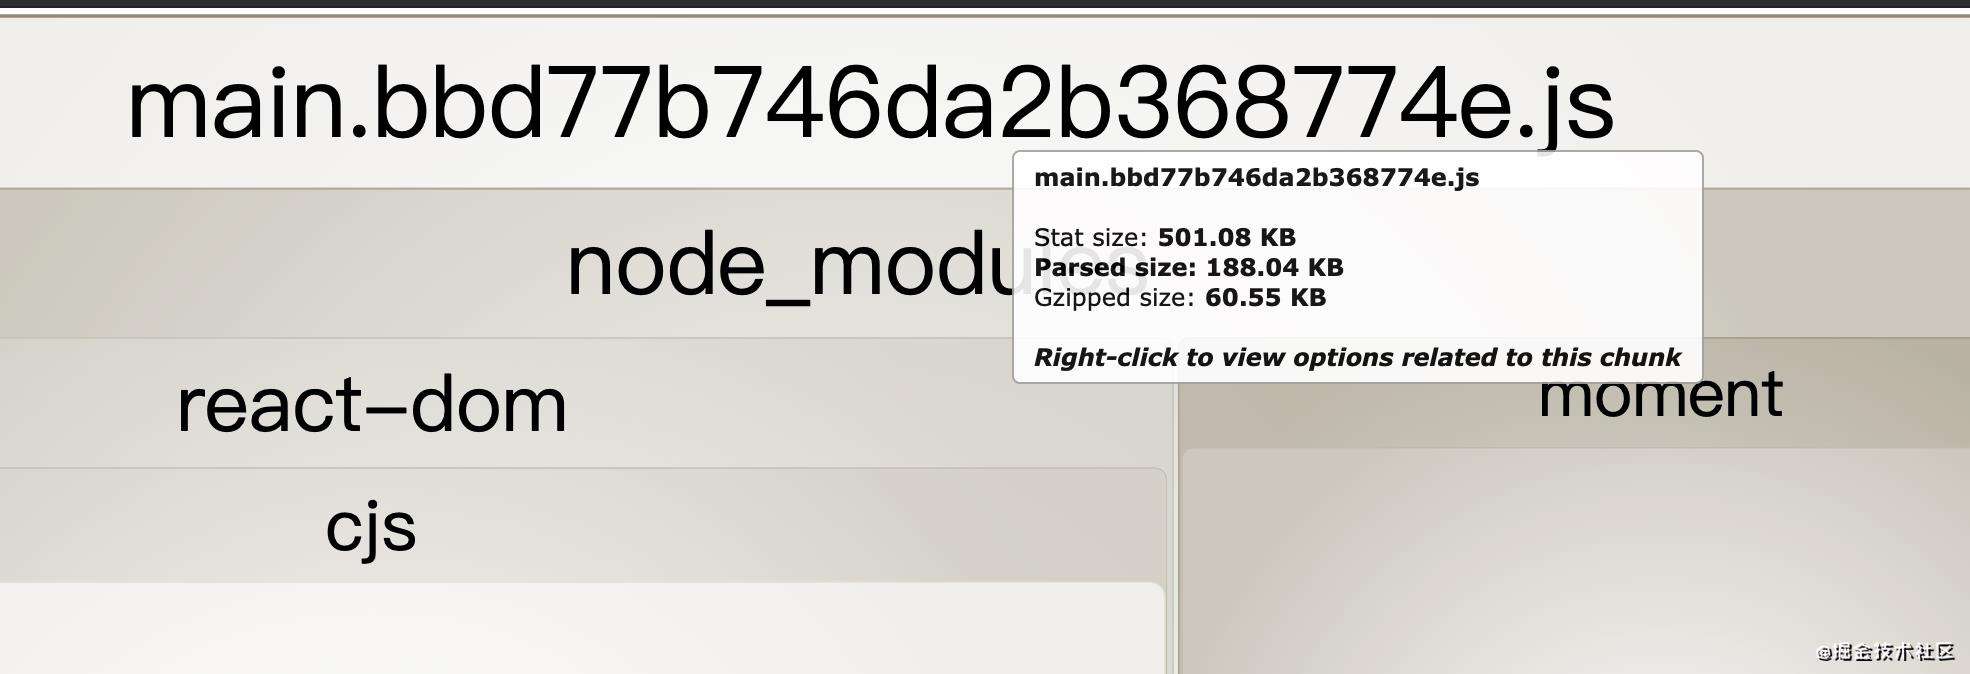
打包分析结果(moment未优化) 我们看下打包报告,发现moment的local占据了moment的大部分体积
使用IgnorePlugin进行优化
    plugins: [
        // https://www.npmjs.com/package/friendly-errors-webpack-plugin
        new FriendlyErrorsWebpackPlugin({
            // ...
        }),
        // https://www.npmjs.com/package/webpack-bundle-analyzer
        new BundleAnalyzerPlugin({
            // ...
        }),
        // https://webpack.docschina.org/plugins/ignore-plugin/
        new webpack.IgnorePlugin({
            resourceRegExp: /^\\.\\/locale\$/,
            contextRegExp: /moment\$/,
        })
    ],
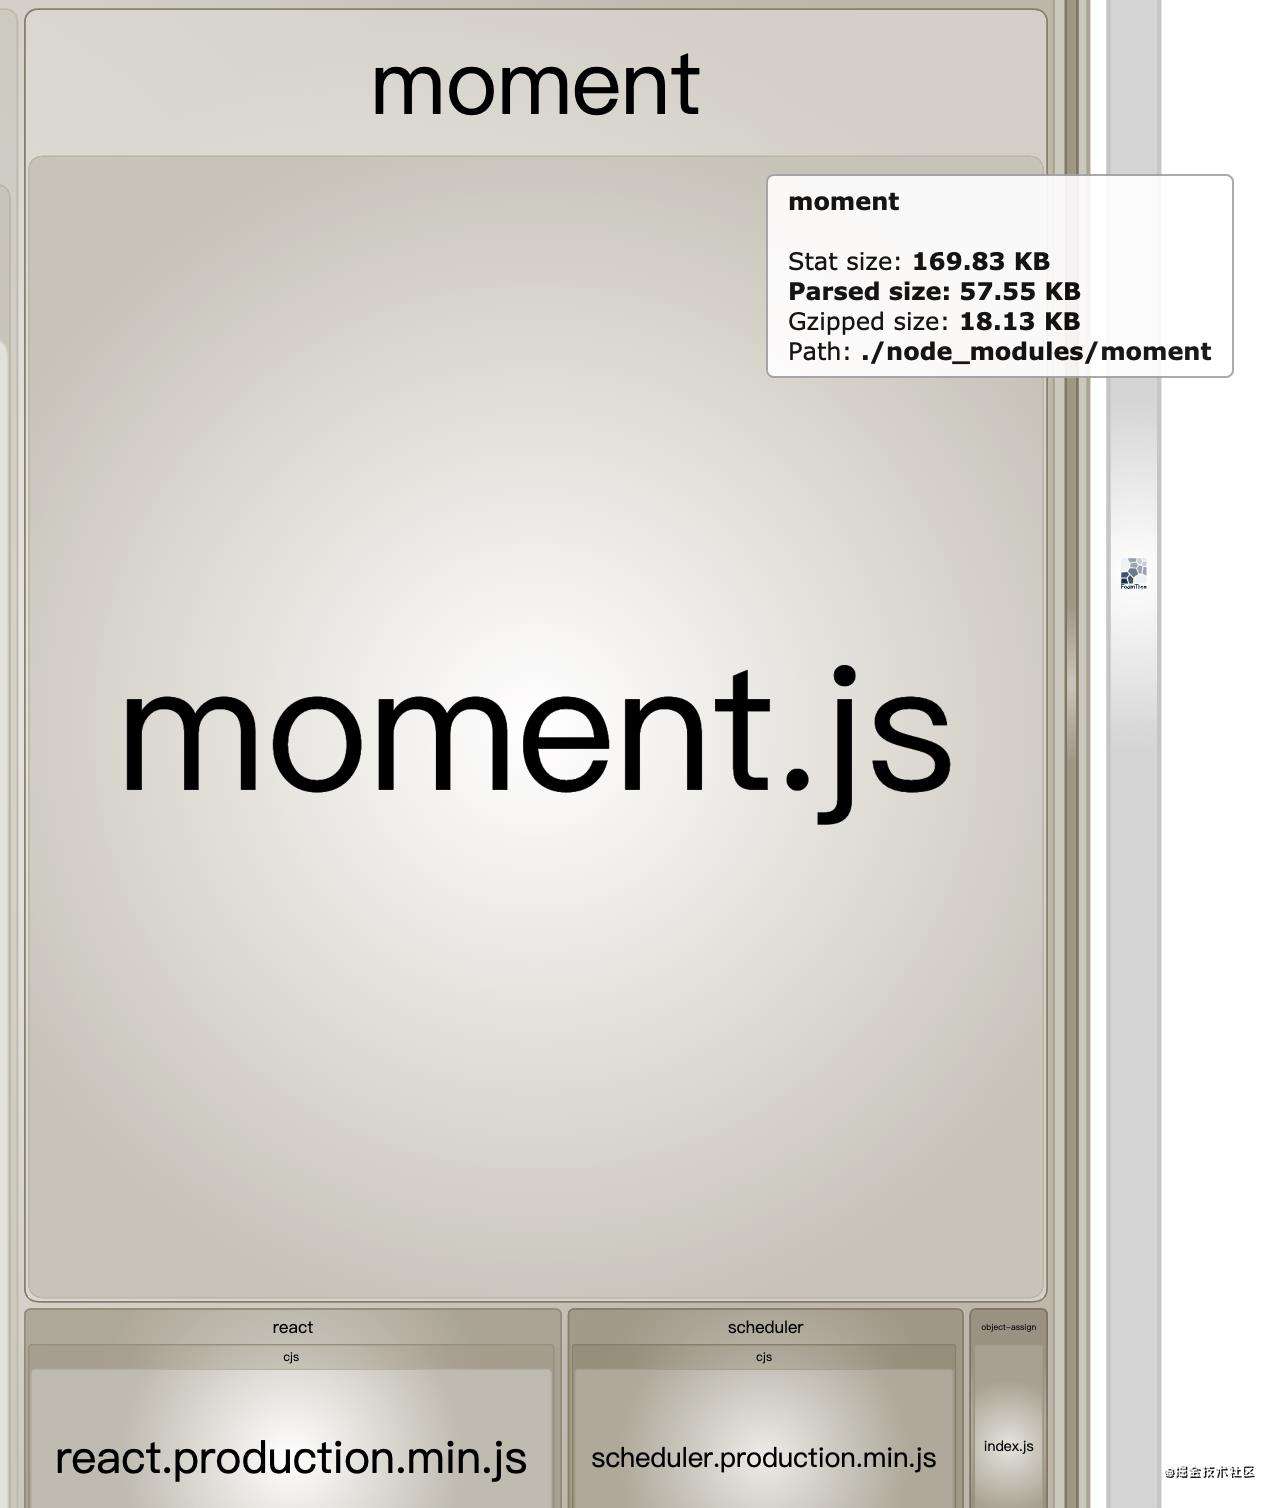
去除语言包后会发现小很多
手动引用语言包
index.tsx
import moment from 'moment'
import 'moment/locale/zh-cn'
console.log(moment)

10. thread-loader
安装 yarn add thread-loader -D
我这边配置上了就打包报错,这个就不详细说明了
11. 利用缓存
babel-loader利用缓存,在重新打包的时候可以尝试利用缓存,提高打包速度, 默认位置在node_modules/.cache/babel-loader
use:[
    {
        loader:'babel-loader',
        options:{
            cacheDirectory:true
        }
    }
]
cache-loader
安装
yarn add cache-loader -D
配置cache-loader,为了看出效果我把bootstrap和lodash引进来
    module: {
        rules: [
            {
                oneOf: [{
                    test: /\\.tsx?\$/,
                    // 排除node_modules,exclude优先级高于include,所以应尽可能使用include
                    // exclude: /node_modules/,
                    include: path.resolve(__dirname, '../'),
                    use: [
                        "cache-loader",
                        "ts-loader"
                    ],
                },
                    {
                        test: /\\.css\$/,
                        use:[
                            'cache-loader',
                            'style-loader',
                            'css-loader'
                        ]
                    }

                ]
            }
        ],
    },
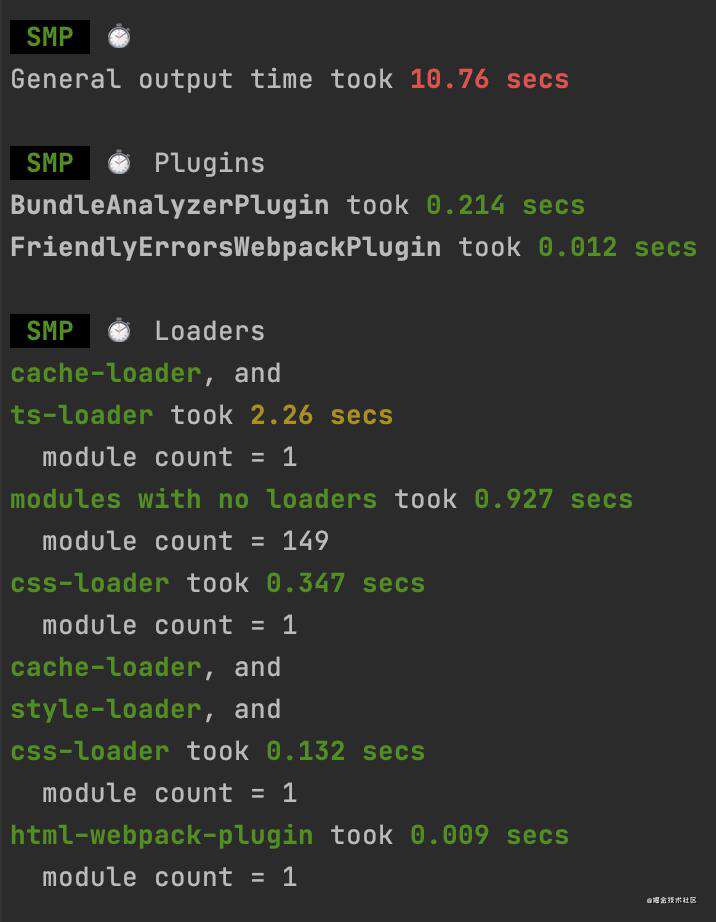
无缓存时候,用了10S
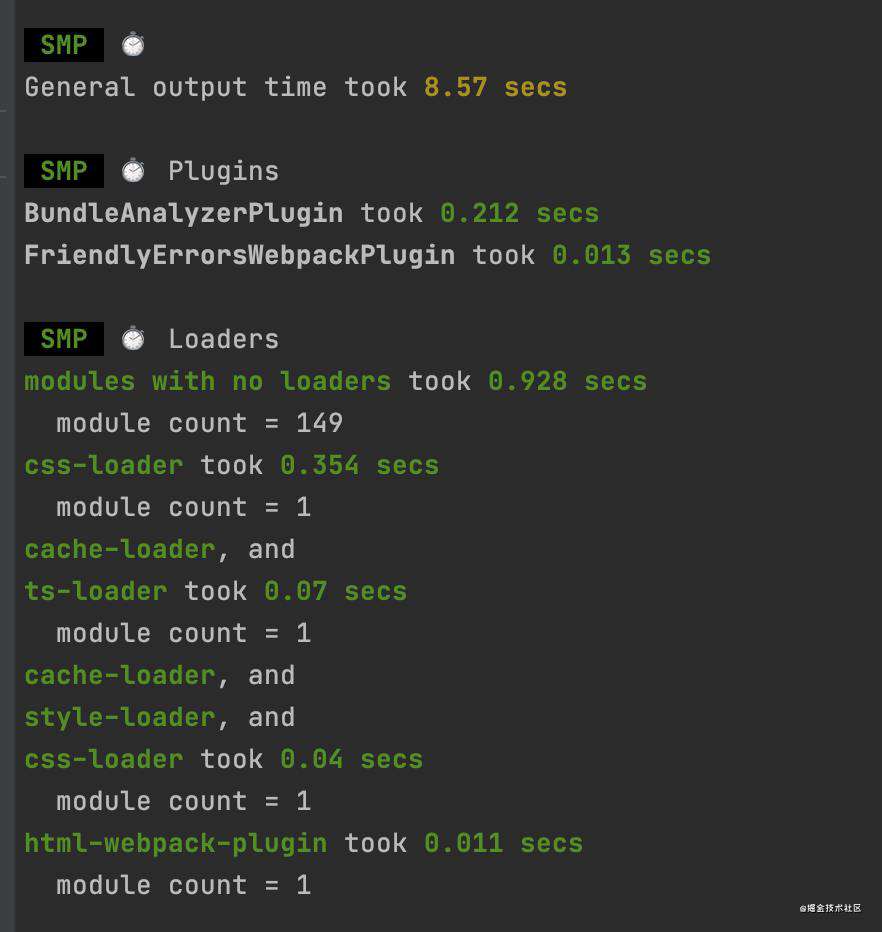
有缓存时候用了8S
时间对比,打包时间从10S变成8S,可以看到变化并不大,可能是我项目太小了
hard-source-webpack-plugin
webpack5内置了模块缓存,不需要再使用这个插件 issues6527
编译体积的优化
optimize-css-assets-webpack-plugin: 优化和压缩css
terser-webpack-plugin: 优化和压缩js
image-webpack-loader: 图片压缩和优化
安装
yarn add optimize-css-assets-webpack-plugin terser-webpack-plugin file-loader image-webpack-loader -D
js压缩
    // 优化选项 https://webpack.docschina.org/configuration/optimization/#root
    optimization: {
        // 开启最小化,默认是true
        minimize: true,
        minimizer: [new TerserPlugin({
            exclude:/nodu_modules/
        })],
    },

关闭optimization,main包体积

开启optimization,main包体积
css压缩
   plugins:[
        new OptimizeCssAssetsWebpackPlugin()
    ]
- 清除无用css
purgecss-webpack-plugin: 清除用不到的css
mini-css-extract-plugin: 配合purgecss-webpack-plugin使用,单独提取css glob: 找文件用的
配置,MiniCssExtractPlugin可能和smp.wrap冲突,我就先把smp去掉了
const MiniCssExtractPlugin = require('mini-css-extract-plugin');
const PurgeCssWebpackPlugin =require('purgecss-webpack-plugin')
const glob = require('glob')

...


    module: {
        rules: [
            {
                oneOf: [
                {
                // ...
                },
                    {
                        test: /\\.css\$/,
                        use: [
                            // 'cache-loader',
                            // MiniCssExtractPlugin.loader 替代 'style-loader',
                            MiniCssExtractPlugin.loader,
                            'css-loader'
                        ]
                    }
                ]
            }
        ],
    },

  plugins: [
        new FriendlyErrorsWebpackPlugin({
            // ...
            }
        }),
        new MiniCssExtractPlugin(
            {
                filename:'[name].css',
            }
        ),
        new PurgeCssWebpackPlugin(
            {
                // 净化这个目录下所有文件
               paths:glob.sync(\`\${path.resolve(__dirname,'../main')}/**/*\`,{nodir:true})
            }
        ),
        // ...
    ]
优化后,css从main包中剔除,main包瞬间小了

同时我们打包出来的css只有3KB,如果是全量打包是接近200KB
HTML压缩
无需配置,html-webpack-plugin会在production是自动开启minify选项 true if mode is 'production', otherwise false
图片压缩(官网复制配置选项)
                    {
                        test: /\\.(gif|png|jpe?g|svg)\$/i,
                        use:[
                            'file-loader',
                            {
                                loader: 'image-webpack-loader',
                                options: {
                                    mozjpeg: {
                                        progressive: true,
                                    },
                                    // optipng.enabled: false will disable optipng
                                    optipng: {
                                        enabled: false,
                                    },
                                    pngquant: {
                                        quality: [0.65, 0.90],
                                        speed: 4
                                    },
                                    gifsicle: {
                                        interlaced: false,
                                    },
                                    // the webp option will enable WEBP
                                    webp: {
                                        quality: 75
                                    }
                                }
                            },
                        ]
                    }
Tree Shaking,只把用到的方法打入bundle(利用es6模块的特点)
production mode下默认开启
代码分割
-
入口点分割
-
如果入口 chunks 之间包含重复的模块(lodash),那些重复模块都会被引入到各个 bundle 中
-
不够灵活,并且不能将核心应用程序逻辑进行动态拆分代码
entry: { index: "./src/index.js", login: "./src/login.js" }
动态导入和懒加载
-
被分割出去的代码需要一个按需加载的时机
-
对于首次打开页面需要的功能直接加载,尽快展示给用户,某些依赖大量代码的功能点可以按需加载
-
对网站功能进行划分,每一类一个chunk,开启splitChunks将会独立文件
-
还可以写魔法注释
document.querySelector('#clickBtn').addEventListener('click',() => { import('./hello').then(result => { console.log(result.default); }); });
按需加载
react项目中实现按需加载: React.lazy
使用
const MyLazy = React.lazy(()=>import('./MyLazy'))
MyLazy必须使用Suspense包裹,fallback是loading组件
<Suspense fallback={<div>loading</div>}>
                <MyLazy />
            </Suspense>
预先加载(preload)
- preload通常用于本页面要用到的关键资源,包括关键js、字体、css文件
- preload将会把资源得下载顺序权重提高,使得关键数据提前下载好,优化页面打开速度
- 在资源上添加预先加载的注释,你指明该模块需要立即被使用
异步/延迟/插入的脚本(无论在什么位置)在网络优先级中是 Low
<link rel="preload" as="script" href="utils.js">
import(
  \`./utils.js\`
  /* webpackPreload: true */
  /* webpackChunkName: "utils" */
)
-
prefetch
- prefetch 跟 preload 不同,它的作用是告诉浏览器未来可能会使用到的某个资源,浏览器就会在闲时去加载对应的资源,若能预测到用户的行为,比如懒加载,点击到其它页面等则相当于提前预加载了需要的资源
<link rel="prefetch" href="utils.js" as="script">
button.addEventListener('click', () => {
  import(
    \`./utils.js\`
    /* webpackPrefetch: true */
    /* webpackChunkName: "utils" */
  ).then(result => {
    result.default.log('hello');
  })
});
splitChunks
配置
    optimization: {
        // 开启最小化,默认是true
        minimize: true,
        minimizer: [new TerserPlugin({
            exclude:/nodu_modules/
        })],
        //
        splitChunks:{
            chunks: "all", //表明将选择哪些 chunk 进行优化,默认作用于异步chunk,值为all/initial/async
            minSize: 0, //默认值是30kb,代码块的最小尺寸
            minChunks: 1, //被多少模块共享,在分割之前模块的被引用次数
            maxAsyncRequests: 3, //限制异步模块内部的并行最大请求数的,说白了你可以理解为是每个import()它里面的最大并行请求数量
            maxInitialRequests: 5, //限制入口的拆分数量
            name: true, //打包后的名称,默认是chunk的名字通过分隔符(默认是~)分隔开,如vendor~
        }
    },
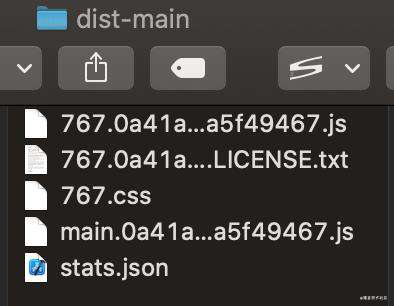
如上图配置splitChunks的打包文件,
未完成的
- javascript兼容性
- 由于我们使用
ts-loader直接编译tsx,不需要使用babel,所以不考虑
- 由于我们使用
常见问题FAQ
- 免费下载或者VIP会员专享资源能否直接商用?
- 本站所有资源版权均属于原作者所有,这里所提供资源均只能用于参考学习用,请勿直接商用。若由于商用引起版权纠纷,一切责任均由使用者承担。更多说明请参考 VIP介绍。
- 提示下载完但解压或打开不了?
- 找不到素材资源介绍文章里的示例图片?
- 模板不会安装或需要功能定制以及二次开发?



发表评论
还没有评论,快来抢沙发吧!