前言
Hello, 很高兴你看见阿隆的第一篇文章。做前端有一段时间了,最近打算整理一下所学的可视化知识,感兴趣的朋友可以看一下。接下来会慢慢更新,从canvas入门到2d、3d框架等都会一一上菜。
做一个类似微信的苦涩表情包
本期将介绍canvas的用法,通过canvas来实现一个表情。以下就是早上摸鱼撸出来的表情了,让我们开始吧。

什么是canvas
canvas是HTML5新增的一个标签元素,通常我们拿来做一些有趣的动画或者合成图像,市面上最常见的应用就是H5活动页,大多数都是用canvas实现的。
canvas
画布
canvas也是一个dom元素, 但要注意画布的宽高由标签上的属性来控制,css的width,height小于标签属性的话会拉伸变形。
<canvas id="canvas" width="800" height="800">
	抱歉,您不配拥有canvas
</canvas>
坐标系统
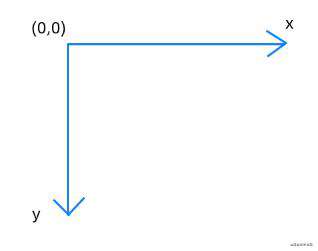
canvas默认的坐标系原点是在canvas元素的左上角,向右为X轴的伸展方向,向下为Y轴的伸展方向。
 在控制坐标上,与CSS相似,可以采用translate、rotate、scale、transform等方式。
- translate(dx,dy):平移坐标系。相当于把原来位于(0,0)位置的坐标原点平移到(dx、dy)点。
- rotate(angle):旋转坐标系。该方法控制坐标系统顺时针旋转angle弧度。
- scale(sx,sy):缩放坐标系。该方法控制坐标系统水平方向上缩放sx,垂直方向上缩放sy。
- transform(a,b,c,d,e,f):允许缩放、旋转、移动并倾斜当前的环境坐标系,其中a:水平缩放绘图、b:水平倾斜绘图、c:垂直倾斜绘图、d:垂直缩放绘图、e:水平移动绘图、f:垂直移动绘图。
- setTransform(a,b,c,d,e,f): 该方法把当前的变换矩阵重置为单位矩阵,然后以相同的参数运行transform。
常用绘图API
- 圆弧
arc(x, y, r,startAngle, endAngle, anticlosewise)
// 以(x,y)为圆心 r为半径的圆  绘制startAngle弧度 到endAngle弧度的圆弧 anticlosewise默认为false 即顺时针方向 true为逆时针方向。
arcTo( x1 , y1 , x2 , y2 , radius ) //根据 两个控制点 (x1,y1) 和 (x2, y2)以及半径绘制弧线 同时连接两个控制点。
- 路径
beginPath() 新建一条路径
moveTo( x, y ) 移动画笔到(x , y)的位置
closePath() 关闭该路径
stroke() 将绘制的路径进行描边
fill() 将绘制的封闭区域进行填充
- 矩形
fillRect( x , y , width , height)  //填充以(x,y)为起点宽高分别为width、height的矩形 默认为黑色
stokeRect( x , y , width , height) //绘制一个空心以(x,y)为起点宽高分别为width、height的矩形
clearRect( x, y , width , height ) // 清除以(x,y)为起点宽高分别为width、height的矩形 为透明
- 贝塞尔曲线
canvas绘制各种图形就是由圆弧、路径、矩形、贝塞尔曲线组成。
quadraticCurveTo( cp1x, cp1y , x ,y ) // (cp1x,cp1y) 控制点    (x,y)结束点
bezierCurveTo(cp1x, cp1y ,cp2x , cp2y ,x , y )//(cp1x,cp1y)控制点1   (cp2x,cp2y) 控制点2  (x,y)结束点
- 渐变色
let gradient = ctx.createLinearGradient( x1 ,y1 ,x2 ,y2); //线性渐变
let gradient = ctx.createRadialGradient(x1 ,y1 ,r1 ,x2 ,y2 ,r2);//径向渐变
gradient.addColorStop( position , color )// position:介于0~1    color:position所处颜色
- 文本
fillText(text, x, y, maxWidth) 在(x,y)位置绘制text文本
strokeText(text,x, y, maxWidth]) 在(x,y)位置绘制text文本边框
状态保存&恢复
由于上述提到的移动坐标系的方法translate和填充颜色fill等有记录效果,可能会对下一次绘图有影响,所以canvas给出save、restore方法在隔离每次绘图可能产生的影响。
save()
// 平移或者绘图
restore()
表情包案例
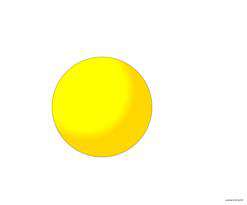
圆脸轮廓
function face(ctx, options) {
    const { x, y, r } = this.options
    ctx.save()
    ctx.translate(x, y)
    ctx.arc(0,0, r, 0, Math.PI * 2);
    ctx.strokeStyle = this.options.color;
    const radialGradient = ctx.createRadialGradient( -1 * r / 3,  - 1 * r / 3, 4 * r / 5 ,  -1 * r / 3,  -1 * r / 3 , r)
    radialGradient.addColorStop(0, 'rgb(255,255,0)')
    radialGradient.addColorStop(1, 'rgb(255,215,0)')
    ctx.fillStyle = radialGradient
    ctx.fill()
    ctx.stroke();
    ctx.restore();
}

face(ctx, {
  x: 100,
  y: 100,
  r: 50
})

眼睛
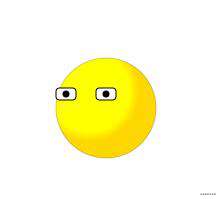
眼睛的实现分成2个步骤, 先画眼白,利用二次贝塞尔曲线来实现边角的曲线,常见的canvas2d库也是利用这个技巧来实现带圆角的图形。 最后在中心位置点上一个黑点,就完成了眼睛的绘制
function eye(ctx, options) {
  const radius = options.radius || 4
  const width = options.width || 20
  const height = options.height || 12
  const x = options.x || 0
  const y = options.y || 0
  ctx.save()
  ctx.translate(this.options.x ,this.options.y)
  ctx.strokeStyle = this.options.color
  ctx.fillStyle = '#fff'
  ctx.beginPath();
  ctx.moveTo(0 + radius, 0)
  ctx.lineTo(width - radius, 0)
  ctx.quadraticCurveTo(width ,0, width,  0 + radius)
  ctx.lineTo(width, height -radius)
  ctx.quadraticCurveTo(width, height, width - radius, height)
  ctx.lineTo(0 + radius, height)
  ctx.quadraticCurveTo(0, height, 0, height -radius)
  ctx.lineTo(0, 0 + radius)
  ctx.quadraticCurveTo(0, 0, 0 + radius, 0)
  ctx.closePath()
  ctx.fill()
  ctx.stroke();
  ctx.restore()

  ctx.save()
  ctx.fillStyle = 'black'
  ctx.translate(x, y)
  ctx.beginPath()
  ctx.arc(width / 2, height / 2, 3, 0, Math.PI * 2)
  ctx.stroke()
  ctx.fill()
  ctx.restore()
 }

eye(ctx, { // 左眼
  x: 50,
  y: 80
})
eye(ctx, { //右眼
 x: 90,
 y: 80
})

嘴巴
function mouth(ctx, options) {
  const width = options.size || 40
  const height = options.height || 10
  const x = options.x || 40
  const y = options.y || 10
  ctx.save()
  ctx.translate(x, y)
  ctx.beginPath()
  ctx.moveTo(0, 0)
  ctx.quadraticCurveTo(width / 2, height, size, 0)
  ctx.stroke()
  ctx.restore()
}
mouth(ctx, {
  x: 60,
  y: 118
})

眼泪
function tear(ctx, options) {
  const width = options.width || 6
  const height = options.height || 20
  const radius = options.radius || 4
  const x = options.x || 0
  const y = options.y || 0
  ctx.save()
  const gradient = ctx.createLinearGradient(0, 0 , width, height)
  gradient.addColorStop(0, 'rgba(0,191,255,1)')
  gradient.addColorStop(1, 'rgba(135,206,250,1)')
  ctx.fillStyle = gradient
  ctx.translate(this.options.x, this.options.y)
  ctx.beginPath()
  ctx.moveTo(0, 0)
  ctx.lineTo(width, 0)
  ctx.lineTo(width, height - radius)
  ctx.quadraticCurveTo(width, height, width - radius, height)
  ctx.lineTo(0 + radius, height)
  ctx.quadraticCurveTo(0, height, 0, height -radius)
  ctx.lineTo(0, 0)
  ctx.closePath()
  ctx.fill()
  ctx.stroke()
  ctx.restore()
}

eye(ctx, { // 左眼泪
 x: 90,
 y: 80
})
eye(ctx, { // 右眼泪
 x: 90,
 y: 80
})
 至此,一个简单的表情就实现了。
简单进阶 - 抽象一下代码
在常见的canvas库中如pixi.js、create.js,通常图形都会有一个display的基类,用来控制图形的显示隐藏、缩放移动或者图形事件等功能。每个图形都有draw方法,在主类中会依次渲染每个图形 这里简单抽象一下上面的业务代码。
Display
// 写点伪代码, 不具体扩展
class Display {
 options = {}
 constructor(options) {
   Object.assign(this.options, options)
 }
 // 控制隐藏显示
 show(isShow) {
   this.options.show = isShow
 }
 //  图形事件
 on(eventType, callBack) {
 }
}
Face类
class Face extends Display {
  constructor(options) {
    super(options)
  }
  draw() {
    const { x, y, r } = this.options
    ctx.save()
    ctx.translate(this.options.x ,this.options.y)
    ctx.arc(x, y, r, 0, Math.PI * 2);
    ctx.strokeStyle = this.options.color;
    const radialGradient = ctx.createRadialGradient(x -1 * r / 3, y - 1 * r / 3, 40, x -1 * r / 3, y -1 * r / 3 , r)
    radialGradient.addColorStop(0, 'rgb(255,255,0)')
    radialGradient.addColorStop(1, 'rgb(255,215,0)')
    ctx.fillStyle = radialGradient
    ctx.fill()
    ctx.stroke();
    ctx.restore();
  }
 }
Eye类
class Eye extends Display {
  constructor(options) {
    super(options)
  }

  draw() {
    const radius = 4
    const width = 20
    const height = 12
    ctx.save()
    ctx.translate(this.options.x ,this.options.y)
    ctx.strokeStyle = this.options.color
    ctx.fillStyle = '#fff'
    ctx.beginPath();
    ctx.moveTo(0 + radius, 0)
    ctx.lineTo(width - radius, 0)
    ctx.quadraticCurveTo(width ,0, width,  0 + radius)
    ctx.lineTo(width, height -radius)
    ctx.quadraticCurveTo(width, height, width - radius, height)
    ctx.lineTo(0 + radius, height)
    ctx.quadraticCurveTo(0, height, 0, height -radius)
    ctx.lineTo(0, 0 + radius)
    ctx.quadraticCurveTo(0, 0, 0 + radius, 0)
    ctx.closePath()
    ctx.fill()
    ctx.stroke();
    ctx.restore()

    ctx.save()
    ctx.fillStyle = 'black'
    ctx.translate(this.options.x ,this.options.y)
    ctx.beginPath()
    ctx.arc(width / 2, height / 2, 3, 0, Math.PI * 2)
    ctx.stroke()
    ctx.fill()
    ctx.restore()
  }
}
Mouth
class Mouth extends Display {
  constructor(options) {
    super(options)
  }
  draw() {
    const size = 40
    const height = 10
    ctx.save()
    ctx.translate(this.options.x, this.options.y)
    ctx.beginPath()
    ctx.moveTo(0, 0)
    ctx.quadraticCurveTo(size / 2, height, size, 0)
    ctx.stroke()
    ctx.restore()
  }
}
Tear类
class Tear extends Display{
  constructor(options) {
    super(options)
  }

  draw() {
    const { width , height, radius } = this.options
    ctx.save()
    const gradient = ctx.createLinearGradient(0, 0 , width, height)
    gradient.addColorStop(0, 'rgba(0,191,255,1)')
    gradient.addColorStop(1, 'rgba(135,206,250,1)')
    ctx.fillStyle = gradient
    ctx.translate(this.options.x, this.options.y)
    ctx.beginPath()
    ctx.moveTo(0, 0)
    ctx.lineTo(width, 0)
    ctx.lineTo(width, height - radius)
    ctx.quadraticCurveTo(width, height, width - radius, height)
    ctx.lineTo(0 + radius, height)
    ctx.quadraticCurveTo(0, height, 0, height -radius)
    ctx.lineTo(0, 0)
    ctx.closePath()
    ctx.fill()
    ctx.stroke()
    ctx.restore()
  }
}
主渲染代码
let face = new Face({
    x: 100,
    y: 100,
    r: 50,
    color: 'rgba(0,0,0,0.2)'
  })

  const eye1 = new Eye({
    x: 50,
    y: 80,
    color: 'rgba(0,0,0,1)'
  })

  const eye2 = new Eye({
    x: 90,
    y: 80,
    color: 'rgba(0,0,0,1)'
  })

  const tearDefault = {
    width: 6,
    height: 20,
    radius: 4
  }
  const tear1 = new Tear({
    x: 57,
    y: 92,
    ...tearDefault
  })

  const tear2 = new Tear({
    x: 98,
    y: 92,
    ...tearDefault
  })

  const mouth = new Mouse({
    x: 60,
    y: 118,
    color: 'rgba(0,0,0,1)'
  })
  const graphics = []
  graphics.push(face)
  graphics.push(eye1)
  graphics.push(eye2)
  graphics.push(mouth)
  graphics.push(tear1)
  graphics.push(tear2)
  function render() {
    graphics.forEach(graphic => {
      graphic.draw()
    })
  }
  render()
最后
本期分享了一个简单的canvas案例, 想控制一下篇幅长度,没有加上动画,这里补充一下,用tween.js可以轻易的实现让上面表情流眼泪的效果噢,感兴趣的朋友可以自己实践一下。 代码地址
下期更新 从英雄联盟来学pixi.js
常见问题FAQ
- 免费下载或者VIP会员专享资源能否直接商用?
- 本站所有资源版权均属于原作者所有,这里所提供资源均只能用于参考学习用,请勿直接商用。若由于商用引起版权纠纷,一切责任均由使用者承担。更多说明请参考 VIP介绍。
- 提示下载完但解压或打开不了?
- 找不到素材资源介绍文章里的示例图片?
- 模板不会安装或需要功能定制以及二次开发?


发表评论
还没有评论,快来抢沙发吧!