前言
在 《编写你的第一个 Babel Plugin》 我们已经了解了 babel 插件的理论基础。接下来我们将带来更多的实战,本篇文章会实现下面两个插件:
babel-plugin-remove-console- 移除 js 代码中的 console;babal-plugin-import- 参照 antd 和 element 实现一个在编译过程中将 import 的写法自动转换成按需引入的方式.
准备工作
在前面一片文章中,我们只是简单开发了一个 babel 插件,我们日常开发还需要借助各种辅助函数、方法等。接下来我们简单回顾下需要准备的知识点。
再来熟悉下 Babel 转换流程

如果你对语法树 和 babel 认识还是有点模糊,推荐你看完以下文章
- Babel系列 第二篇 - Babel进阶使用指南
- AST in Modern JavaScript
- JavaScript抽象语法树AST - 语法树节点的介绍很详细,甚至可以当文档用
- babel插件入门-AST(抽象语法树 - 偏实战
- Babel 插件手册 - 参与了 babel 开源,文档很清晰,支持各种语言类型
- babel 部分概念中文解析
@babel/helper-xxxx-xxxx
- @babel/helper-plugin-utils 辅助插件开发,但只是做了一层 wrapper
@babel/plugin-xxxx-xxxx
为什么会有 plugin-syntax-xxxx-xxxx 和 plugin-transform-xxxx-xxxx 插件? —— Transform plugin vs Syntax plugin in Babel
简单说 plugin-syntax-xxxx-xxxx 是 plugin-transform-xxxx-xxxx 的基类,用来设定语法的解析方式和对应的语法,才能被 @babel/parser 正确地处理.
本次会用到
- @babel/plugin-syntax-jsx
@babel/types
包含很多功能,特别是很多定义,你刚看到一个 ast 肯定有点不清晰,所以下面的概念一定要有个影响
- definitions —— 定义 (包括一些节点名的别名)
- builders —— 节点生成工具
- validators —— 节点判断工具
- asserts —— 节点断言工具,就是 validators 的包装,如果判断不通过,会报错
- ...
下面列举一下常用节点的定义
FunctionDeclaration(函数声明)
function a() {}
FunctionExpression(函数表达式)
var a = function() {}
ArrowFunctionExpression(箭头函数表达式)
()=>{}
CallExpression(调用表达式)
a()
Identifier(变量标识符)
var a(这里a是一个Identifier)
...就不一一例举了,感兴趣可以去官网,或者去我的 github
Declaration、 Statement、Expression 有什么区别呢?
大部分编程语言都同时提供表达式和语句。表达式总是能够返回一个值;而语句则只干活,并不返回。一个语句由1个或多个表达式组成
- Declaration: 声明和定义。主要有:FunctionDeclaration、VariableDeclaration
- Expression: 表达式。主要有FunctionExpression、ObjectExpression、ArrayExpression、ThisExpression等等
- Statement:就是我们代码语句,负责干活,不返回,可以有多个表达式
比如 1 + 2 等于 3,那么1+2
expression, 3 就是 expression 的 value
接下来进入本章的实战环节,会带来babel-plugin-remove-console 和 babel-plugin-import 实战解析
Demo1 - babel-plugin-remove-console
先安装依赖
我们首先当然是初始化一个项目,安装必要的依赖,因为这里用 rollup 打包的插件,所以需要安装下
npm i --save @babel/cli @babel/core @babel/preset-env @babel/types rollup
然后配置 .babelrc.js
const removePlugin = require('./lib/remove')
const presets = ['@babel/preset-env']
const plugins = [
  [
    removePlugin,
    {
      ignore: ['warn'],
    },
  ],
]

module.exports = { presets, plugins }
测试源码
console.log('dfsafasdf22')
console.warn('dddd')
let a = 'sdfasdfsdf'
编译结果
"use strict";

console.warn('dddd');
var a = 'sdfasdfsdf';
插件核心代码
const removePlugin = function ({ types: t, template }) {
  return {
    name: 'transform-remove-console',
    visitor: {
      //需要访问的节点名
      //访问器默认会被注入两个参数 path(类比成dom),state
      ExpressionStatement(path, { opts }) {
        // 拿到object与property, 比如console.log语句的object name为console, property name为log
        const { object, property } = path.node.expression.callee
        // 如果表达式语句的object name不为console, 不作处理
        if (object.name !== 'console') return
        // 如果不是, 删除此条语句
        if (
          !opts.ignore ||
          !opts.ignore.length ||
          !opts.ignore.includes(property.name)
        )
          path.remove()
      },
    },
  }
}
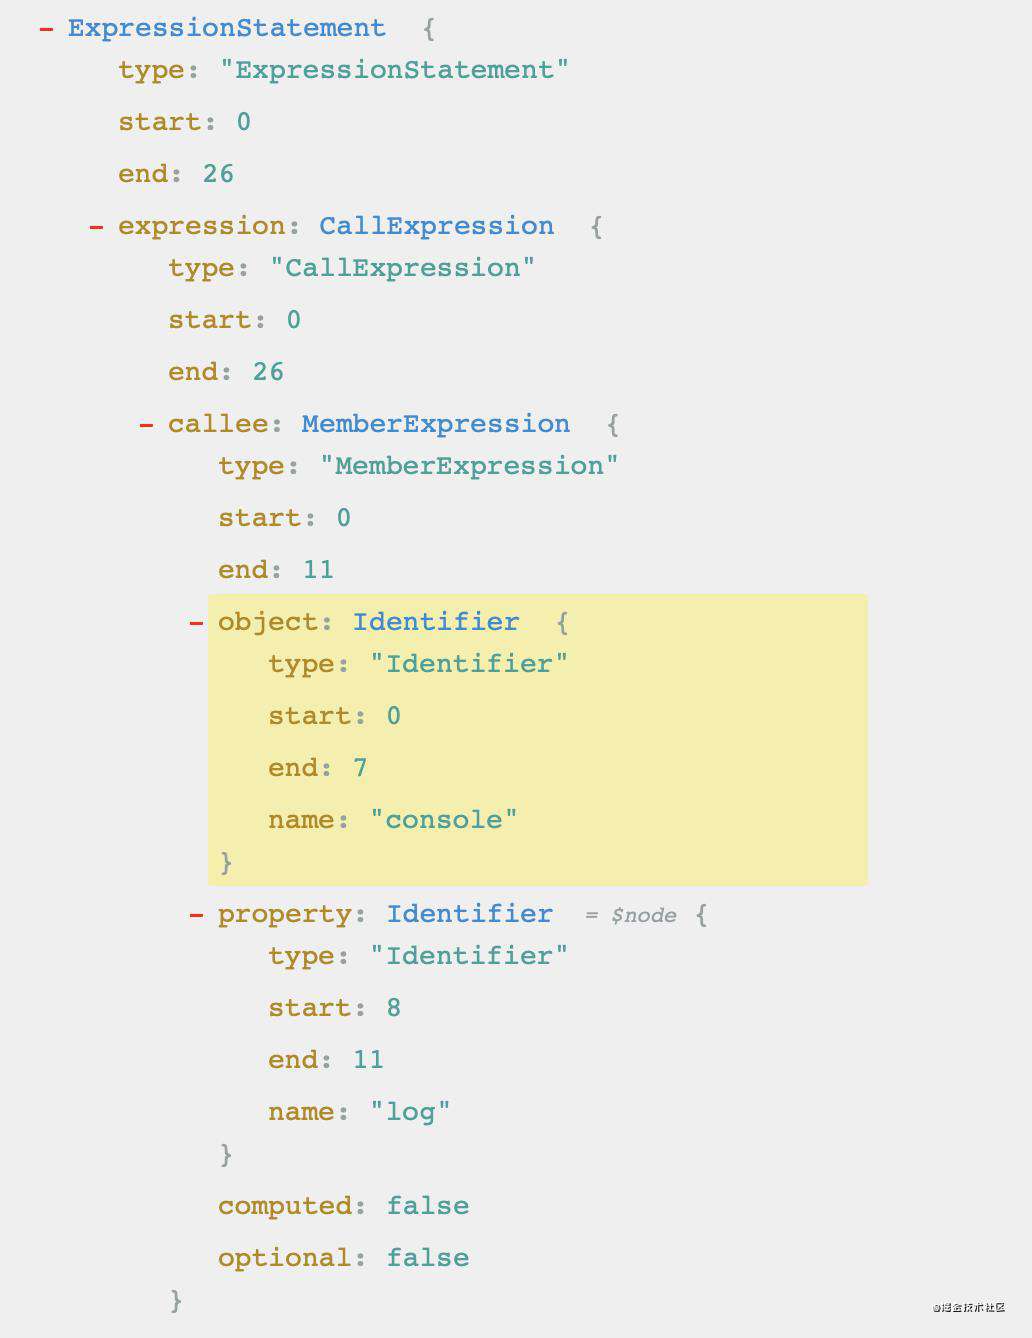
ExpressionStatement 关键节点解析

- 具体语法树查看
- 具体请看 源码
也可以去babael 运行这段代码
Demo2 - babel-plugin-import
这块一共有两种实现,都差不多
- element ui中的实现 - babel-plugin-component
- antd 中的实现 - babel-plugin-import
推荐看 antd 中的实现,本文也是仿造 antd
这个插件有什么用
babel-plugin-import 实现了按需加载和自动引入样式。
我们日常使用 antd 样式时,只需如下:
import { Button } from 'antd';
那 Button 的样式就是通过这个插件引入的,编译之后变成:
var _button = require('antd/lib/button');
require('antd/lib/button/style');
它是怎么进行解析的呢?
日常看 AST 来了,AST 链接
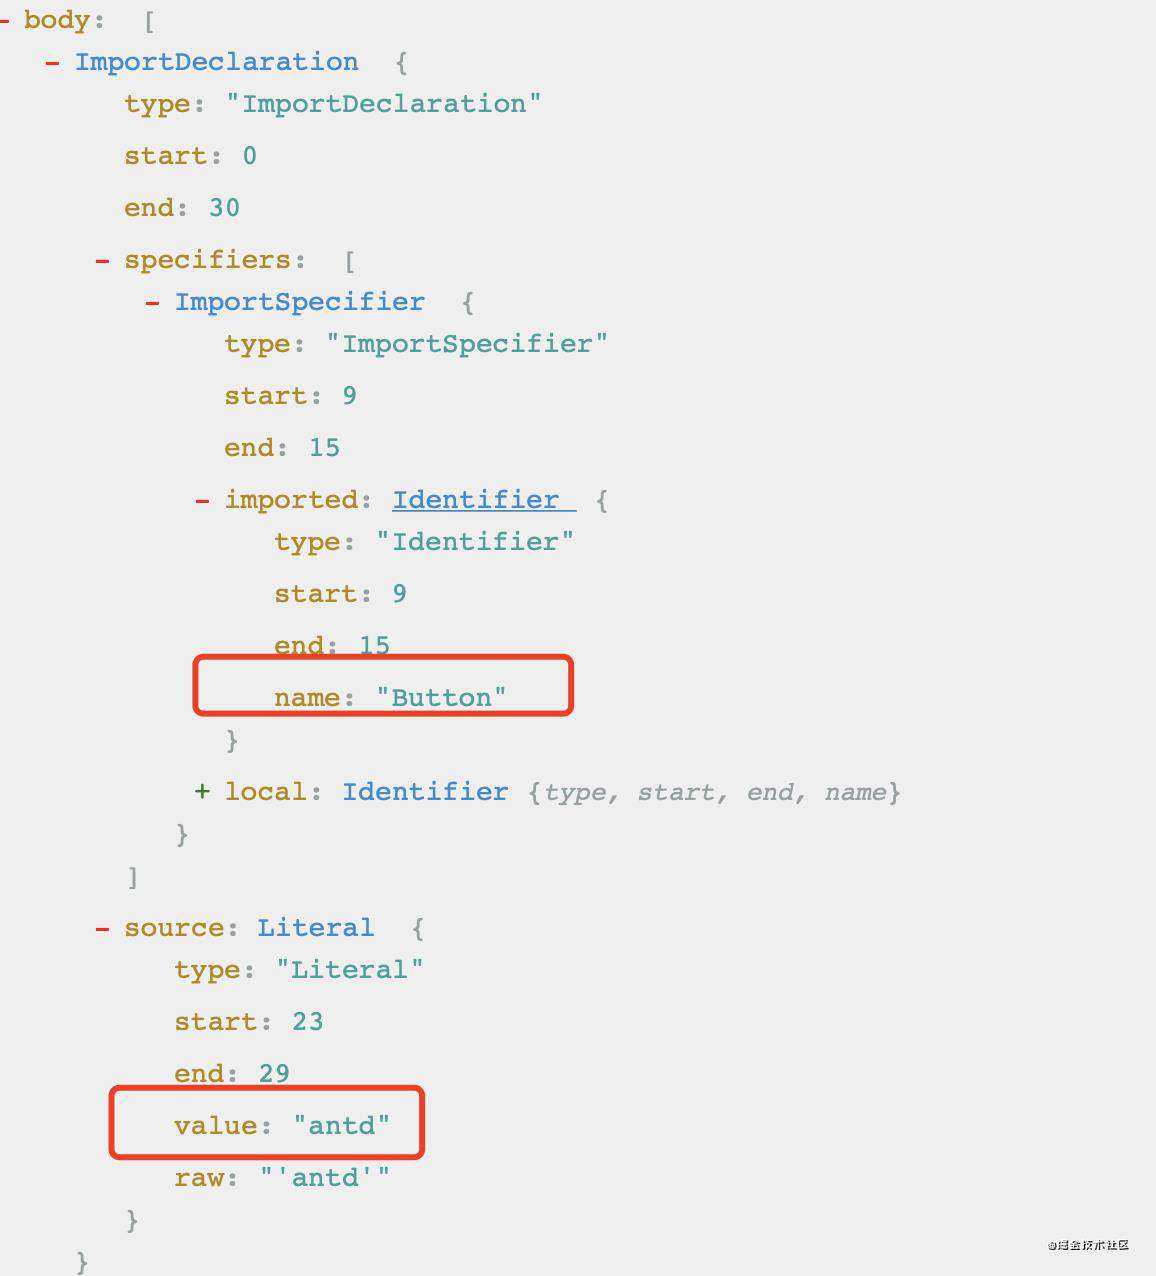
我们可以看到几个关键节点如下:

我们要在 vivsitor 中监听的是 ImportDeclaration类型节点,收集所有相关的依赖。
babel-plugin-import 解析
1.初始化 plugin 相关参数
const Program = {
    // ast 入口
    enter(path, { opts = defaultOption }) {
      const { libraryName, libraryDirectory, style } = opts

      // 初始化插件实例
      if (!plugins) {
        plugins = [new ImportPlugin(libraryName, libraryDirectory, style, t)]
      }
      applyInstance('ProgramEnter', arguments, this)
    },
    // ast 出口
    exit() {
      applyInstance('ProgramExit', arguments, this)
    },
  }
2. 只监听 ImportDeclaration| CallExpression
['ImportDeclaration', 'CallExpression'].forEach((method) => {
    result.visitor[method] = function () {
      applyInstance(method, arguments, result.visitor)
    }
  })
3.监听 ImportDeclaration
ImportDeclaration(path, state) {
  const { node } = path;
  if (!node) return;
  // 代码里 import 的包名
  const { value } = node.source;
  // 配在插件 options 的包名
  const { libraryName } = this;
  // babel-type 工具函数
  const { types } = this;
  // 内部状态
  const pluginState = this.getPluginState(state);
  // 判断是不是需要使用该插件的包
  if (value === libraryName) {
    // node.specifiers 表示 import 了什么
    node.specifiers.forEach(spec => {
      // 判断是不是 ImportSpecifier 类型的节点,也就是是否是大括号的
      if (types.isImportSpecifier(spec)) {
        // 收集依赖
        // 也就是 pluginState.specified.Button = Button
        // local.name 是导入进来的别名,比如 import { Button as MyButton } from 'antd' 的 MyButton
        // imported.name 是真实导出的变量名
        pluginState.specified[spec.local.name] = spec.imported.name;
      } else {
        // ImportDefaultSpecifier 和 ImportNamespaceSpecifier
        pluginState.libraryObjs[spec.local.name] = true;
      }
    });
    pluginState.pathsToRemove.push(path);
  }
}
4.判断是否有使用
CallExpression(path, state) {
  const { node } = path;
  const file = (path && path.hub && path.hub.file) || (state && state.file);
  // 方法调用者的 name
  const { name } = node.callee;
  // 内部状态
  const pluginState = this.getPluginState(state);

  // 如果方法调用者是 Identifier 类型
  if (this.t.isIdentifier(node.callee)) {
    if (pluginState.specified[name]) {
      node.callee = this.importMethod(pluginState.specified[name], file, pluginState);
    }
  }

  // 遍历 arguments 找我们要的 specifier
  node.arguments = node.arguments.map(arg => {
    const { name: argName } = arg;
    if (
      pluginState.specified[argName] &&
      path.scope.hasBinding(argName) &&
      path.scope.getBinding(argName).path.type === 'ImportSpecifier'
    ) {
      // 找到 specifier,调用 importMethod 方法
      return this.importMethod(pluginState.specified[argName], file, pluginState);
    }
    return arg;
  });
}
5. 内容替换
内容替换这块,先介绍babel-helper-module-imports 中两个工具函数addSideEffect、addDefault
addSideEffect 创建 import 方法
import "source"
import { addSideEffect } from "@babel/helper-module-imports";
addSideEffect(path, 'source');
addDefault
import hintedName from "source"
import { addDefault } from "@babel/helper-module-imports";
// 如果没有设置 nameHint,函数将生成一个uuid 作为name 本身,就像 `_named`
addDefault(path, 'source', { nameHint: "hintedName" })
核心代码在于 importMethod 代码实现
antd-desgin import源码地址
1先来看组件名的转换
 //  是否使用了下划线'_'或者 短横线'-' 作为连接符,优先下划线
 const transformedMethodName = this.camel2UnderlineComponentName
      ? transCamel(methodName, '_')
      : this.camel2DashComponentName
      ? transCamel(methodName, '-')
      : methodName;
2. 转换import
   // 1 this.transformToDefaultImport 在插件初始化时赋值,默认为true
   // 2 也就是说默认使用默认的名称
   	  pluginState.selectedMethods[methodName] = this.transformToDefaultImport // eslint-disable-line
        ? addDefault(file.path, path, { nameHint: methodName })
        : addNamed(file.path, methodName, path);
       // 需要自定义 import 样式
      if (this.customStyleName) {
        const stylePath = winPath(this.customStyleName(transformedMethodName));
        addSideEffect(file.path, `${stylePath}`);
      } else if (this.styleLibraryDirectory) {
        const stylePath = winPath(
          join(this.libraryName, this.styleLibraryDirectory, transformedMethodName, this.fileName),
        );
        addSideEffect(file.path, `${stylePath}`);
      } else if (style === true) {
        addSideEffect(file.path, `${path}/style`);
      } else if (style === 'css') {
        addSideEffect(file.path, `${path}/style/css`);
      } else if (typeof style === 'function') {
        const stylePath = style(path, file);
        if (stylePath) {
          addSideEffect(file.path, stylePath);
        }
      }
- 例如
customStyleName这块实现
是为了支持下列参数
{
    libraryName: 'antd',
    libraryDirectory: 'lib',
    style: true,
    customName: (name: string) => {
      if (name === 'Button') {
        return 'antd/lib/custom-button';
      }
      return `antd/lib/${name}`;
    }
}
自己来简单实现来代码如下
源码地址
总结
看了前面的代码,一步一步去解析 babel-plugin-import, 赶紧自己动起手来, 实现一下上面两个 babel 插件。
如果觉得前面两个很简单,就可以考虑下将 React 转成小程序或者vue 代码, 参考jsx-compiler 、@tarojs/transformer-wx、React转微信小程序:从React类定义到Component调用等。
最后希望大家看完这篇文章,能清楚了解一些简单插件的运行逻辑,
常见问题FAQ
- 免费下载或者VIP会员专享资源能否直接商用?
- 本站所有资源版权均属于原作者所有,这里所提供资源均只能用于参考学习用,请勿直接商用。若由于商用引起版权纠纷,一切责任均由使用者承担。更多说明请参考 VIP介绍。
- 提示下载完但解压或打开不了?
- 找不到素材资源介绍文章里的示例图片?
- 模板不会安装或需要功能定制以及二次开发?


发表评论
还没有评论,快来抢沙发吧!