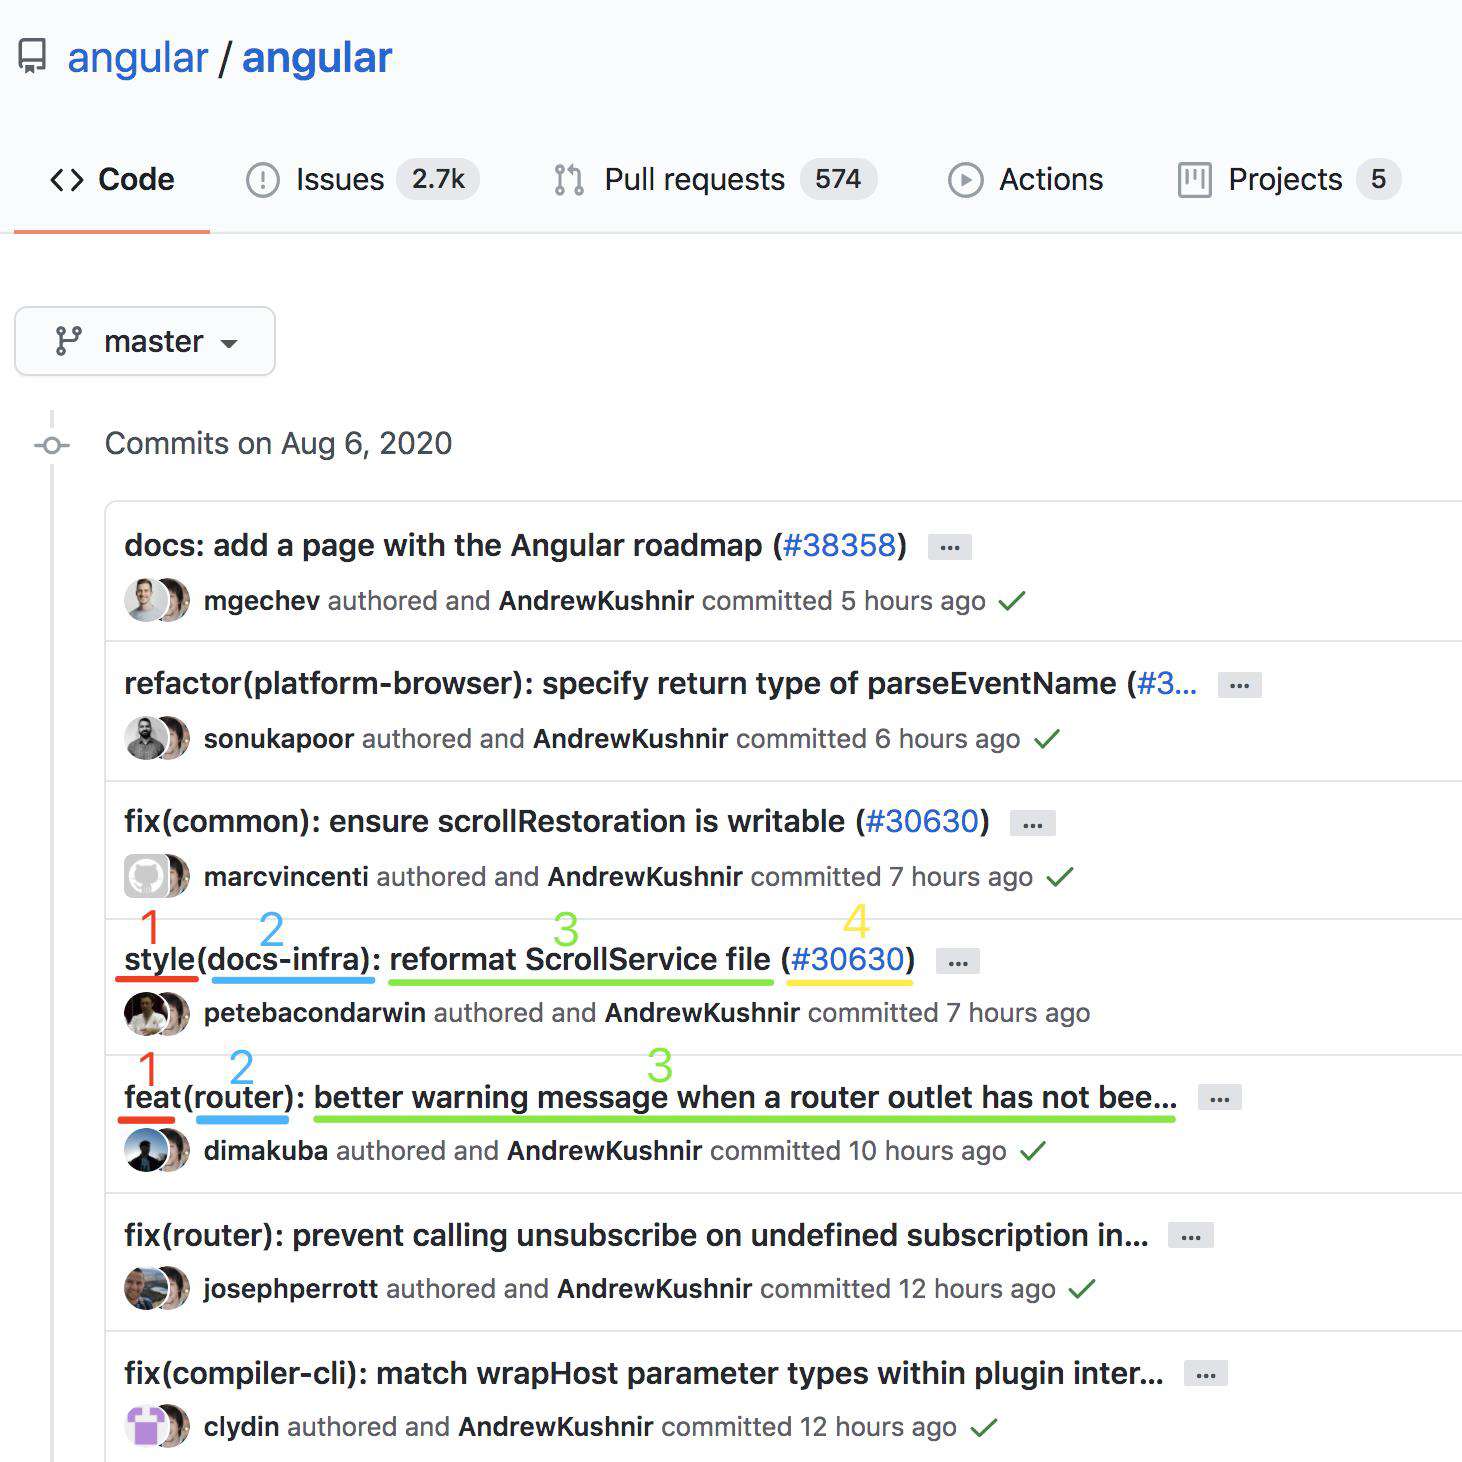
git commit检查
1. 规范 commit 信息

我们可以利用 commitizen 和 husky 来规范代码库的 commit。
安装以下依赖:
npm install @commitlint/cli @commitlint/config-conventional husky  -D
复制代码
如果你还没有安装过 commitizen,那么先全局安装:
npm install commitizen -g
复制代码
Next, initialize your project to use the cz-conventional-changelog adapter by typing:
接下来,初始化项目的依赖json以便添加cz-conventional-changelog,使用npm
commitizen init cz-conventional-changelog --save-dev --save-exact
使用yarn
commitizen init cz-conventional-changelog --yarn --dev --exact
如果不想用规范化commit,可以直接在 git commit -m --force,如果需要更多帮助,输入commitizen help
以上的操作是为了
- 安装 cz-conventional-changelog
- 将其作为依赖保存到package.json's
- 将
config.commitizen作为key保存到package.json
...
  "config": {
    "commitizen": {
      "path": "cz-conventional-changelog"
    }
  }
在 package.json 中增加 husky 字段。
{
    "husky": {
        "hooks": {
            "commit-msg": "commitlint -E HUSKY_GIT_PARAMS"
        }
    },
}
复制代码
husky 是 git hook 工具,使用 husky,我们可以方便的在 package.json 中配置 git hook 脚本,例如: pre-commit、 pre-push、 commit-msg 等的。
创建 commitlint.config.js 文件
module.exports = {
    extends: ["@commitlint/config-conventional"],
};
复制代码
此刻开始,请使用 git cz 来替代 git commit 提交信息,我们来看看,假设我们随便写一个 git commit -m 'fixbug' 会提示什么?

使用 git cz 来进行填写 commit 的内容。

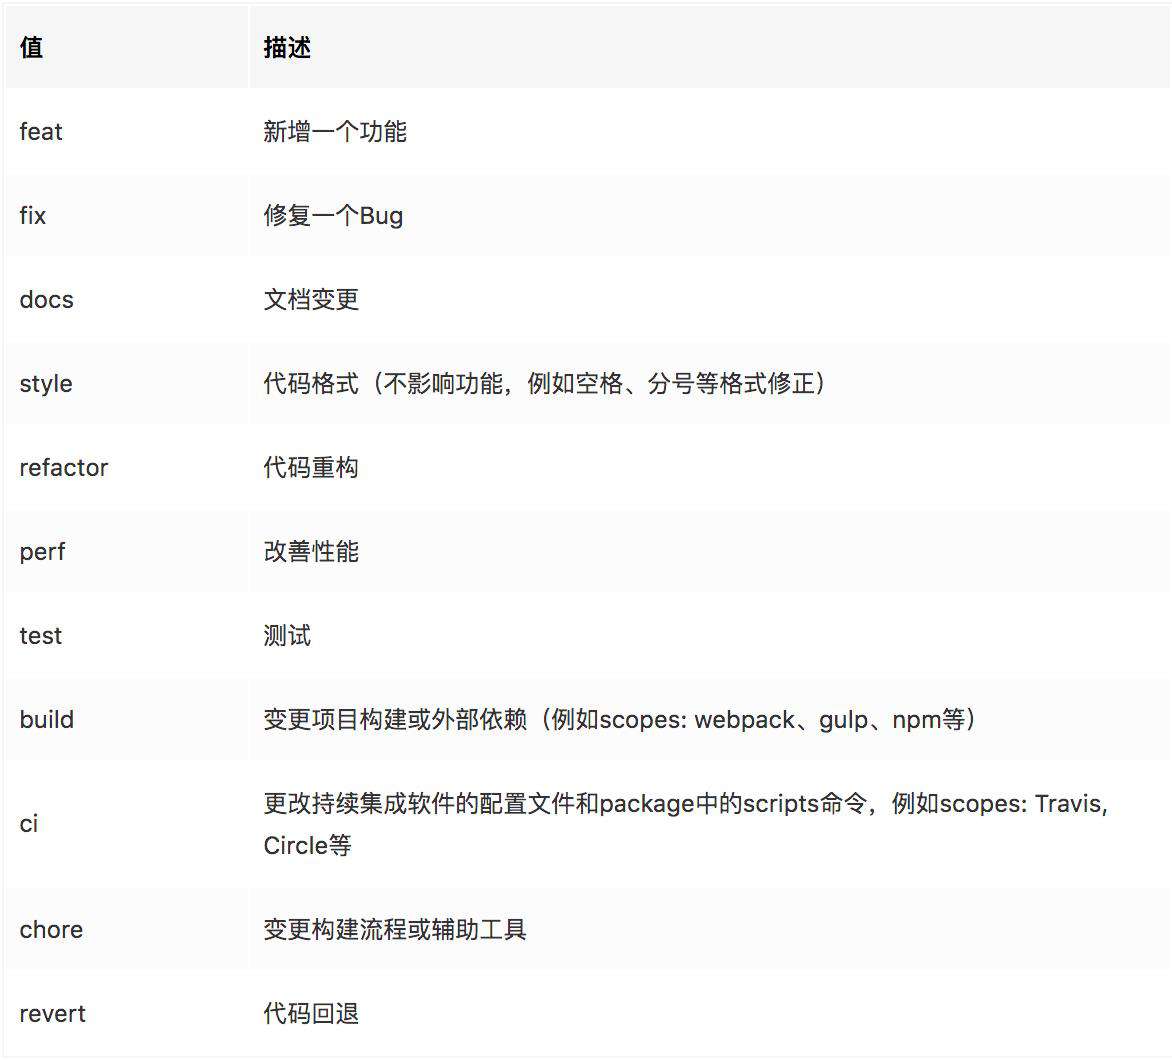
git cz 的 type 说明:

虽然,我们现在已经可以规范提交信息了,但是我们可能不喜欢默认的交互,例如,一个精简的描述就可以了,不希望再提示我去写详细的描述,那么就可以使用 cz-customizable 来进行定制。
自定义提交说明
安装 cz-customizable
npm install cz-customizable -D
复制代码
cz-customizable 是可自定义的 Commitizen 插件,可帮助实现一致的 commit message。
cz-customizable 适合大型团队去自定义 scope,和 commit type。
新建 .cz-config.js
在项目根目录下创建 .cz-config.js 文件:
官方提供了一份配置信息,可以去这个地址查看:github.com/leoforfree/…
//.cz-config.js
module.exports = {
  types: [
    { value: 'feat', name: 'feat:     A new feature' },
    { value: 'fix', name: 'fix:      A bug fix' },
    { value: 'docs', name: 'docs:     Documentation only changes' },
    {
      value: 'style',
      name:
        'style:    Changes that do not affect the meaning of the code\n            (white-space, formatting, missing semi-colons, etc)',
    },
    {
      value: 'refactor',
      name: 'refactor: A code change that neither fixes a bug nor adds a feature',
    },
    {
      value: 'perf',
      name: 'perf:     A code change that improves performance',
    },
    { value: 'test', name: 'test:     Adding missing tests' },
    {
      value: 'chore',
      name:
        'chore:    Changes to the build process or auxiliary tools\n            and libraries such as documentation generation',
    },
    { value: 'revert', name: 'revert:   Revert to a commit' },
    { value: 'WIP', name: 'WIP:      Work in progress' },
  ],

  scopes: [{ name: 'accounts' }, { name: 'admin' }, { name: 'exampleScope' }, { name: 'changeMe' }],

  allowTicketNumber: false,
  isTicketNumberRequired: false,
  ticketNumberPrefix: 'TICKET-',
  ticketNumberRegExp: '\\d{1,5}',

  // it needs to match the value for field type. Eg.: 'fix'
  /*
  scopeOverrides: {
    fix: [
      {name: 'merge'},
      {name: 'style'},
      {name: 'e2eTest'},
      {name: 'unitTest'}
    ]
  },
  */
  // override the messages, defaults are as follows
  messages: {
    type: "Select the type of change that you're committing:",
    scope: '\nDenote the SCOPE of this change (optional):',
    // used if allowCustomScopes is true
    customScope: 'Denote the SCOPE of this change:',
    subject: 'Write a SHORT, IMPERATIVE tense description of the change:\n',
    body: 'Provide a LONGER description of the change (optional). Use "|" to break new line:\n',
    breaking: 'List any BREAKING CHANGES (optional):\n',
    footer: 'List any ISSUES CLOSED by this change (optional). E.g.: #31, #34:\n',
    confirmCommit: 'Are you sure you want to proceed with the commit above?',
  },

  allowCustomScopes: true,
  allowBreakingChanges: ['feat', 'fix'],
  // skip any questions you want
  skipQuestions: ['body'],

  // limit subject length
  subjectLimit: 100,
};
复制代码
- types: 描述修改的性质是什么,是bugfix还是feat,在这里进行定义。
- scopes: 定义之后,我们就可以通过上下键去选择
scope - scopeOverrides: 针对每一个type去定义scope
- allowBreakingChanges: 如上设置为
['feat', 'fix'],只有我们type选择了feat或者是fix,才会询问我们 breaking message. - allowCustomScopes: 设置为 true,在 scope 选择的时候,会有
empty和custom可以选择,顾名思义,选择empty表示scope缺省,如果选择custom,则可以自己输入信息 - skipQuestions: 指定跳过哪些步骤,例如跳过我们刚刚说的详细描述,设置其为
scope: ['body'],假设我们的项目也不会涉及到关联 issue,我们可以设置其为scope: ['body', 'footer'] - subjectLimit: 描述的长度限制
这里我就不一一演示每个字段修改之后的情况了,根据字段的说明,建议如果想自定义提交规则,在本地进行修改验证,公司内部的代码库不需要管理 issue,另外,我不喜欢写长描述,所以我把 body 和 footer 给 skip 掉了。
cz-customizable 会首先在项目根目录下寻找: .cz-config.js 或 .config/cz-config.js,如果找不到,会去主目录寻找。我们也可以在 package.json 中手动去指定配置文件的路径。
"config": {
    "commitizen": {
        "path": "node_modules/cz-customizable"
    },
    "cz-customizable": {
        "config": "config/path/to/my/config.js"
    }
}
复制代码
现在,我们已经规范了 commit 信息,但是没有对提交的代码进行规范,在一个代码库中,经常出现2个空格/4个空格混用,有些地方写 ;,有些不写 ;,风格不统一。例如,我们希望提交到git库的代码,都能够通过 eslint 检查或者是通过测试。我们可以借助于 pre-commit 这个钩子来做这些事情。
常见问题FAQ
- 免费下载或者VIP会员专享资源能否直接商用?
- 本站所有资源版权均属于原作者所有,这里所提供资源均只能用于参考学习用,请勿直接商用。若由于商用引起版权纠纷,一切责任均由使用者承担。更多说明请参考 VIP介绍。
- 提示下载完但解压或打开不了?
- 找不到素材资源介绍文章里的示例图片?
- 模板不会安装或需要功能定制以及二次开发?


发表评论
还没有评论,快来抢沙发吧!