一、前言
上一篇文章初略的介绍了一下swagger.json.这一篇文章主要是介绍怎么通过swagger.json文件直接生成前端代码,解放生产力!
二、准备工作
首先下载需要用的npm包,axios:用于接口请求获取json文件数据,colors:用于在node.js端着色,inquirer:Node.js交互式命令行工具。
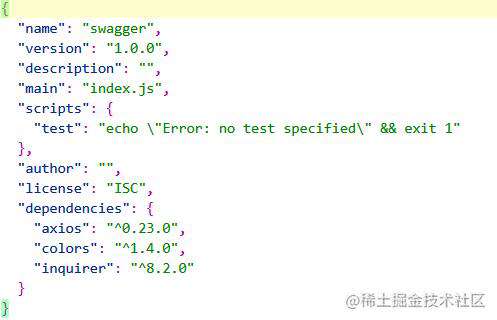
先在D盘创建一个叫做swagger的文件夹,cd 进入该文件夹。在该文件夹下执行npm init 命令,填写相关信息就会自动创建一个package.json文件。然后使用yarn 安装依赖。执行yarn add axios colors inquirer。然后所有依赖安装成功,生成如下的package.json。

三、开始编码
准备工作完成后就可以开始编写代码了,在swagger文件夹下创建一个index.js,然后在里面开始写代码。
1、获取需要生成的Tags
//引入依赖var fs = require("fs");var path = require("path");
var colors = require('colors');
var axios = require('axios');
var inquirer = require('inquirer');
//启动函数async function run() {
console.log(`读取json数据......`.yellow)
const url = 'https://petstore.swagger.io/v2/swagger.json';//请求json地址
const apiPath = "src\\api\\";//存放api文件地址
const choices = [];//存储所有重复性文件
const res = await getData(url)
const { definitions, paths, tags, basePath } = res.data
console.log(`获取tag分类数据成功......`.yellow)  console.log(tags);
}
//获取swagger.json数据
async function getData(url) {
return await axios({    url: url,    method: 'get',  })
}
run();
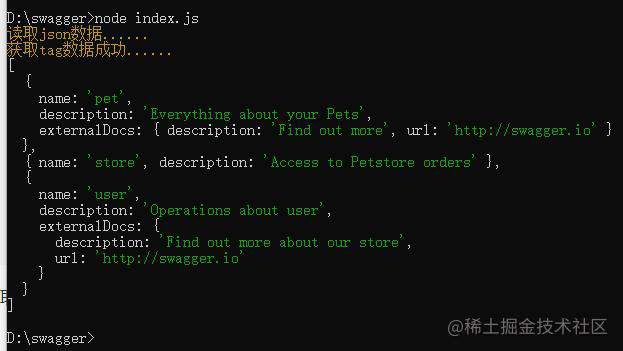
在命令行中。在swagger文件夹下。执行node index.js 可以获取如下结果:

2.选择要生成的Tag对象
//选取需要生成的Tag对象
async function getTags(tags) {  //选择要生成的Tag对象
const question = {
type: 'checkbox',
name: 'tags',
message: `请选择要生成的tag对象`.yellow,
choices: tags
}
let answers = await inquirer.prompt(question)
return answers.tags;
}
3、找到单个tag对应的所有paths;
function tagPaths(paths, tag) {
let tagPaths = [];
Object.keys(paths).forEach(e => {
    Object.keys(paths[e]).forEach(j => {
        if (paths[e][j] && paths[e][j].tags[0] == tag) {
            paths[e][j].url = '${basePath}' + e.replace(/{/, "${");
            tagPaths.push(paths[e]);
         }
    })
})
return tagPaths;
}
4、把单个tag对应的urls生成api tpl模板
function tagTemp(urls, basePath) {
let template =
`import request from '@/utils/request'const basePath='${basePath}'`;
urls.forEach(e => {
Object.keys(e).forEach(j => {
var obj = e[j]
var body = j == 'get' ? 'params' : 'data'
var path = [];
obj.parameters.forEach(e => {
   if (e.in == 'path') {
       path.push(e.name)
    }
})
if (path.length) {
    var url = obj.url.replace(/[${}]/g, "");
    var name = url.substring(url.lastIndexOf("/") + 1);
 } else {
    var name = obj.url.substring(obj.url.lastIndexOf("/") + 1);
 }
if (j == 'get') {
    if (path.length) {
        var query = `${path.toString()},params`
    } else {
        var query = `params`
     }
} else {
    var query = "data"
}
template +=
`// ${obj.summary}
export function ${name}(${query}) {
return request({
    url:\`${obj.url}\`,
    method:'${j}',
    ${body}
})}`
})
})
return template;
}
4、创建需要生成的目录
//创建目标目录
function mkdirsSync(dirpath, mode) {
try {
if (!fs.existsSync(dirpath)) {
let pathtmp
dirpath.split(/[/\\]/).forEach(function (dirname) {
//这里指用/ 或\ 都可以分隔目录  如  linux的/usr/local/services   和windows的 d:\temp\aaaa
if (pathtmp) {
pathtmp = path.join(pathtmp, dirname)
} else {
pathtmp = dirname
}
if (!fs.existsSync(pathtmp)) {
if (!fs.mkdirSync(pathtmp, mode)) {
return false
}
}
})
}
return true
} catch (e) {
log.error("create director fail! path=" + dirpath + " errorMsg:" + e)
return false
}}
5、把单个tag tpl模板生成文件
//把单个tag tpl模板生成文件
async function tagFiles(apiPath, tpl, fileName, choices) {
var fPath = process.cwd() + '\\' + apiPath;  //生成目录
if (!fs.existsSync(fPath)) {
mkdirsSync(fPath)
console.log(`创建api目录成功:${fPath}`.green)
}
// 要生成的文件完整路径
fPath += '\\' + fileName + '.js'
const ex = fs.existsSync(fPath)
if (ex) {
choices.push({ name: fPath, value: { tpl: tpl, path: fPath } })
} else {
fs.writeFileSync(fPath, tpl)
console.log(`代码生成成功^_^`.red, `${fPath}`.green)
}}
6、文件重复性判断
//多个文件
confirmfunction repeatConfirm(choices) {
if (choices.length > 0) {
const question = {
type: 'checkbox',
name: 'cover',
message: `以下文件已存在,请勾选要覆盖的文件`.yellow,
choices: choices
}
inquirer.prompt(question).then((answers) => {
answers.cover.forEach(e => {
fs.writeFileSync(e.path, e.tpl)
console.log('代码生成成功^_^'.red,`${e.path}`.green,'已覆盖'.blue)
})
})
}}
7、最后run函数代码
//启动函数
async function run() {
console.log(`读取json数据......`.yellow)
const url = 'https://petstore.swagger.io/v2/swagger.json';//请求json地址
const apiPath = "src\\api\\";//存放api文件地址
const choices = [];//存储所有重复性文件
const res = await getData(url)
const { definitions, paths, tags, basePath } = res.data
console.log(`获取tag分类数据成功......`.yellow)
console.log(tags);  //选择要生成的Tag对象
const answers = await getTags(tags);
console.log(answers)
answers.forEach(e => {
const urls = tagPaths(paths, e);
const tpl = tagTemp(urls, basePath)
tagFiles(apiPath, tpl, e, choices)
})
repeatConfirm(choices);
}
总结
这样一整个从swagger.json文件生成前端所需要的api接口文件就完成了!
常见问题FAQ
- 免费下载或者VIP会员专享资源能否直接商用?
- 本站所有资源版权均属于原作者所有,这里所提供资源均只能用于参考学习用,请勿直接商用。若由于商用引起版权纠纷,一切责任均由使用者承担。更多说明请参考 VIP介绍。
- 提示下载完但解压或打开不了?
- 找不到素材资源介绍文章里的示例图片?
- 模板不会安装或需要功能定制以及二次开发?


发表评论
还没有评论,快来抢沙发吧!