前言
前段时间有在学习webpack的基础知识,但是无论是文档还是入门小视频,都没有直接在实践中学的好一点。
下面我会从我在这个完成Markdown转HTML的plugin插件中学到的一些知识点(相当于巩固自己之前的webpack入门吧),逐一理一理。(b站前端小野森森的视频,有兴趣可以看下) 包括但不限于:
- webpack的一些基础配置
- 一些正则表达式的书写
- 如何构建一颗DOM树
- ......
整个的代码在这-> md-to-html-plugin
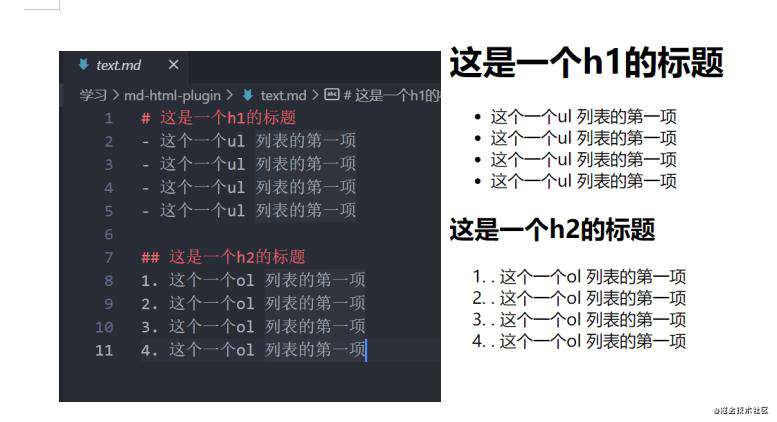
实现的效果时这样的:左边的markdowm渲染成右边的html

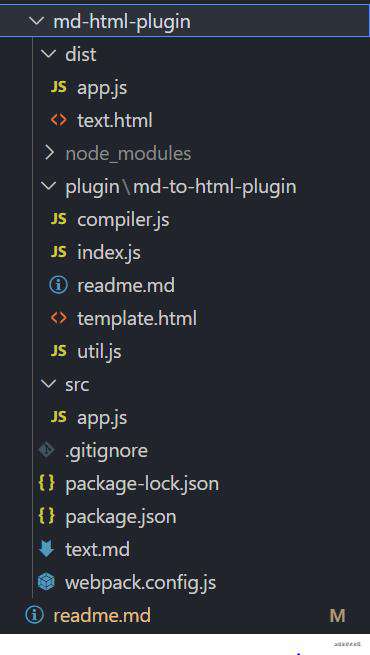
暂时先不去想具体怎么实现Markdown转HTML,首先来看看我们要怎么开始,先放出目录:

- 首先你得用webpack搭个项目吧(入门的webpack有了用武之地)
- 创建一个plugin文件夹,里面是我们的这个插件的灵魂
- 既然是md转html 那我们的有个 md文档吧, 我md文档要先转成像
<h1>**</h1>类似的包裹了内容的字符串, 再插入到template.html模板中 再输出一个html文件
1. 使用webpack搭建项目 (回顾篇)
- 创建一个md-to-html-plugin 的文件夹
使用如下命令
- npm init -y
- npm install webpack webpack-cli webpack-dev-server -D
在根目录下创建
- webpack.config.js
- src/app.js
- plugin/md-to-html-plugin/ index.js
- plugin/md-to-html-plugin/ compier.js
(md文档要先转成像<h1>**</h1>类似的包裹了内容的字符串)
- plugin/md-to-html-plugin/template.html
下面依次介绍一下:
2.webpack.config.js 配置
包含:
- 打包入口 entry
- 出口 output
- 模式 mode
- plugin MdToHtmlPlugin (我们自己写的)
const { resolve } = require('path')
const MdToHtmlPlugin = require('./plugin/md-to-html-plugin')

module.exports = {
    mode: 'development',
    entry: resolve(__dirname, 'src/app.js'),
    output: {
        path: resolve(__dirname, 'dist'),
        filename:'app.js'
    },
    plugins: [
        new MdToHtmlPlugin({
            template: resolve(__dirname, 'text.md'),
            filename: 'text.html'
        }),
    ]
}
3. md-to-html-plugin/ index.js 有关plugin
3.1 插件的定义:
3.2 MdToHtmlPlugin基础结构
const { readFileSync } = require('fs') 1. 需要读取文件 md和模板
const { resolve } = require('path')
const INNER_MARK = '<!-- inner -->' 2. template.html 中用来承载转换后的html标签
const {compileHTML} = require('./compiler') 3. md-html的转换
class MdToHtmlPlugin { 4. 在webpack配置中我们使用的是new的方式创建 这边,我们设置一个class类,它接受两个参数,md文档的文件名,和输出的文件名
    constructor({ template, filename }) {
    5. 如果md文件找不到,直接保错
        if (!template) {
            throw new Error('template 找不到')
        }
        this.template = template
    6. 设置输出文件名,如果有文件名就配置,如果没有,就设置成'md.html'
        this.filename = filename ? filename : 'md.html'
    }
    7. apply()方法
    apply(compiler) {
        compiler.hooks.emit.tap('md-to-html-plugin', (compilation) => {
        // 我把整个apply方法的内容放到下面去分析了
           8. 在这个方法里面,我们会将md文档读取处理,生成一颗dom树,再放回template.html里面
        })
    }
}
module.exports =  MdToHtmlPlugin
3.3 apply()方法
- compiler
- compiler.hooks.emit.tap
- emit: 生成资源到 output 目录之前
- 参数:
compilation
- compilation
 apply(compiler) {
        compiler.hooks.emit.tap('md-to-html-plugin', (compilation) => {
            const _assets = compilation.assets;
            const _mdContent = readFileSync(this.template, 'utf8');
            const _templateHtml = readFileSync(resolve(__dirname, 'template.html'), 'utf8')
            // 将md文档 分行转换成数组 _mdContentArray
            const _mdContentArray = _mdContent.split('\n')
            // 通过compileHTML方法将这个数组构建成dom树 _htmlStr
            const _htmlStr = compileHTML(_mdContentArray)
            // 将dom插入到template.html中
            const _finalHTML = _templateHtml.replace(INNER_MARK,_htmlStr)
            _assets[this.filename] = {
                source() {
                    return _finalHTML
                },
                size() {
                    return _finalHTML.length
                }
            }

        })
    }
官网:
- 一个具名 JavaScript 函数。
MdToHtmlPlugin - 在它的原型上定义
apply方法。apply(compiler) - 指定一个触及到 webpack 本身的 事件钩子。
compiler.hooks.emit.tap - 操作 webpack 内部的实例特定数据。
- 在实现功能后调用 webpack 提供的 callback
4. md-to-html 字符串转换
4.1 使用js对象创建树
4.1.1 创建一颗怎样的树:
{
    'h1-1626856207419': { type: 'single', tags: [ '<h1>这是一个h1的标题\r</h1>' ] },
    'ul-1626856207993': {
      type: 'wrap',
      tags: [
        '<li>这个一个ul 列表的第一项\r</li>',
        '<li>这个一个ul 列表的第一项\r</li>',
        '<li>这个一个ul 列表的第一项\r</li>',
        '<li>这个一个ul 列表的第一项\r</li>'
      ]
    },
    'h2-1626856207560': { type: 'single', tag: [ '<h2>这是一个h2的标题\r</h2>' ] },
    'ol-1626856207336': {
      type: 'wrap',
      tags: [
        '<li>. 这个一个ol 列表的第一项\r</li>',
        '<li>. 这个一个ol 列表的第一项\r</li>',
        '<li>. 这个一个ol 列表的第一项\r</li>',
        '<li>. 这个一个ol 列表的第一项</li>'
      ]
    }
  }
4.1.2 详细步骤:
首先之前在index.js里面有个compileHTML(_mdContentArray),我们将一行行形成的数组作为参数传递给了 compileHTML,希望compileHTML这个函数可以先将md数组,再转换成一个dom树,再将这棵树插入到模板里面。
- md数组转换成dom树
里面分成三种 分别是
# ##标题类 我们需要转换成h1 h2-无序列表 我们需要转换成 ul li1. 2.有序列表 我们需要转换成 ol li
当然每个标签里面还有我们需要的内容。 input = matched.input
- 使用正则将这集中情况区分
const reg_mark = /^(.+?)\s/
// 匹配 # 开头
const reg_sharp = /^\#/
// 匹配 无序列表 -
const reg_crossbar = /^\-/
// 匹配 有序列表 1. 2.
const reg_number = /^\d/
- 还有一个需要注意的
ul里面的li,和ol里面的li,他们都是一起放到ul或者是ol里面的,因此需要做判断上一次的开通标签和这次的是否是相同的
_lastMark === mark
4.1.3 具体代码:
function createTreel(_mdArr) {
    let _htmlPool = {}
    let _lastMark = '' // 用于判断,是不是像li标签一样,需要一起放到ol或者ul里面
    let _key = 0

        _mdArr.forEach(mdFragment => {
            // console.log(mdFragment)
            const matched = mdFragment.match(reg_mark);
            if (matched) {
                const mark = matched[1]
                const input = matched.input
                console.log(matched,'matched') // 我们可以看一下这里的matched 打印出的东西是什么
                // md-to-html 三种操作 标题 无序列表 有序列表
            }
        });
    return _htmlPool

}
下面是matched 打印出来的东西
const mark = matched[1]   md匹配的 # ##  - 1.等
const input = matched.input  内容
[ '# ', '#', index: 0, input: '# 这是一个h1的标题\r', groups: undefined ] matched
[ '- ', '-', index: 0, input: '- 这个一个ul 列表的第一项\r', groups: undefined ] matched
[ '- ', '-', index: 0, input: '- 这个一个ul 列表的第一项\r', groups: undefined ] matched
[ '- ', '-', index: 0, input: '- 这个一个ul 列表的第一项\r', groups: undefined ] matched
[ '- ', '-', index: 0, input: '- 这个一个ul 列表的第一项\r', groups: undefined ] matched
[ '## ', '##', index: 0, input: '## 这是一个h2的标题\r', groups: undefined ] matched
['1. ','1.',index: 0,input: '1. 这个一个ol 列表的第一项\r',groups: undefined] matched
['2. ','2.',index: 0,input: '2. 这个一个ol 列表的第一项\r',groups: undefined] matched
['3. ','3.',index: 0,input: '3. 这个一个ol 列表的第一项\r',groups: undefined] matched
[ '4. ', '4.', index: 0, input: '4. 这个一个ol 列表的第一项', groups: undefined ] matched
4.3 md-to-html字符串详细处理
4.3.1 key 唯一值处理
function randomNum() {
    return new Date().getTime() + parseInt(Math.random() * 1000);
}

module.exports = {
    randomNum
}
4.3.2 对标题的处理 h1 h2
- 首先匹配这个标题 h1.h2...
if (reg_sharp.test(mark)) { // 匹配#开头的
      const tag = `h${mark.length}`; // 转换成h1 h2等
      const tagContent = input.replace(reg_mark, '')
     if (_lastMark === mark) {
     // 如果前一次的标签和这次的标签是一样的,之前拼接
         _htmlPool[`${tag}-${_key}`].tags = [..._htmlPool[`${tag}-${_key}`].tags,`<${tag}>${tagContent}</${tag}>`]
    } else {
     // 否则 创建一个新的标题标签
         _lastMark = mark
          _key = randomNum();
          _htmlPool[`${tag}-${_key}`] = {
              type: 'single', // 单个标识
               tags: [`<${tag}>${tagContent}</${tag}>`]
           }
   }
}
4.3.3 对无序列表的处理
 if (reg_crossbar.test(mark)) {
     // console.log(matched)
       const tagContent = input.replace(reg_mark, '');
       const tag = 'li';

       if (reg_crossbar.test(_lastMark)) {
           _htmlPool[`ul-${_key}`].tags = [..._htmlPool[`ul-${_key}`].tags ,`<${tag}>${tagContent}</${tag}>`]
          } else {
            _lastMark = mark
            _key = randomNum();
             _htmlPool[`ul-${_key}`] = {
            type: 'wrap',// 多个标识
            tags: [`<${tag}>${tagContent}</${tag}>`]
          }
       }
}
4.3.4 对有序列表的处理
if (reg_number.test(mark)) {
    const tagContent = input.replace(reg_number, '')
    const tag = 'li'

    if (reg_number.test(_lastMark)) {
       _htmlPool[`ol-${_key}`].tags = [..._htmlPool[`ol-${_key}`].tags ,`<${tag}>${tagContent}</${tag}>`]
      } else {
           _lastMark = mark;
           _key = randomNum();

            _htmlPool[`ol-${_key}`] = {
                type: 'wrap',
                tags: [`<${tag}>${tagContent}</${tag}>`]
            }
       }
 }
4.4 模板编译
function compileHTML(_mdContentArray) {
    const _htmlPool = createTreel(_mdContentArray)
    // sconsole.log(_htmlPool)
    let _htmlStr = ''
    let item

    for (let k in _htmlPool) {
        // console.log(k, _htmlPool[k])
        item = _htmlPool[k]
        if (item.type === 'single') {
        // 单个标题标签
            item.tags.forEach((tag) => {
                _htmlStr += tag;
            })
        } else if (item.type === 'wrap') {
        // 多个标签 列表
            console.log(item.tags,'2')
            let _list = `<${k.split('-')[0]}>`

            item.tags.forEach((tag) => {
                _list += tag;
            })

            _list += `</${k.split('-')[0]}>`
            _htmlStr += _list
        }
    }
    return _htmlStr

}

module.exports = {
    compileHTML
}
5. 放入模板编译
再body里面有个注释<!-- inner --> 之后我们可以将处理好的html放到这里
<!DOCTYPE html>
<html lang="en">
<head>
    <meta charset="UTF-8">
    <meta http-equiv="X-UA-Compatible" content="IE=edge">
    <meta name="viewport" content="width=device-width, initial-scale=1.0">
    <title>Document</title>
</head>
<body>
    <!-- inner -->
</body>
</html>
参考文档:
1.webpack compiler 钩子
2.视频
还有很多不会不懂的地方,继续学习中。。。

常见问题FAQ
- 免费下载或者VIP会员专享资源能否直接商用?
- 本站所有资源版权均属于原作者所有,这里所提供资源均只能用于参考学习用,请勿直接商用。若由于商用引起版权纠纷,一切责任均由使用者承担。更多说明请参考 VIP介绍。
- 提示下载完但解压或打开不了?
- 找不到素材资源介绍文章里的示例图片?
- 模板不会安装或需要功能定制以及二次开发?


发表评论
还没有评论,快来抢沙发吧!