先把罪魁祸首挂在这里给大家群殴 ?
Promise.resolve().then(() => {
    console.log(0);
    return Promise.resolve(4);
}).then((res) => {
    console.log(res)
})

Promise.resolve().then(() => {
    console.log(1);
}).then(() => {
    console.log(2);
}).then(() => {
    console.log(3);
}).then(() => {
    console.log(5);
}).then(() =>{
    console.log(6);
})

// 大家先思考一下
这道面试题是无意间在微信群里看到的,据说是某厂的面试题。一般关于 Promise 的面试题无非是考察宏微任务、EventLoop 之类的,当我认真去分析这道题的时候,越看越不对劲,感觉有诈!这是要考察啥?
不管了,先在浏览器输出一下看看 ?
打印结果:0、1、2、3、4、5、6 ?
这里4怎么跑到3后面去了,不讲武德? Why......
在我看来,这道题有两个 Promise.resolve(),相当于创建两个状态为 fulfilled 的 Promise。
紧随他们后面的第一个 then 方法会交替将其执行函数送入微任务队列排队执行,所以这里的0和1,大家都可以理解,但是接下来执行的不是 console.log(res) 而是 console.log(2)。
如果说需要等待 return Promise.resolve(4) 执行完并将其结果和状态同步给外部的 Promise,那么这里只需要创建一个微任务去处理就应该可以了,也就是 4 会在 2 后面才对,为啥需要创建两个微任务呢? ?
想了很久,也找很多朋友讨论这个问题,都没有得到有说服力的结论,真是百思不得其解!这样死抠细节,感觉有点浪费时间,毕竟这种面试题在生产中并不会出现,谁会去写这么奇葩的 Promise 代码, 放弃了,不去想了。
然而?,当天晚上夜黑风高夜深人静的时候,脑海里面依然轮播这道面试题,真的很想知道 Promise 内部到底是个什么逻辑,越想越睡不着~越睡不着越想~

无奈之下,决定参考 Promise A+ 规范手写一版 Promise,看看能不能从实现细节中找到蛛丝马迹。为了方便大家理解,下面我会利用不同 ? 来介绍手写的细节和思路。文章最后会依据实现细节来探讨这道面试题,有手写经验的可以直接跳过手写 Promise 实现过程,看最后的结论。
手写前需要先了解这些
如果感觉对 Promise 还不太熟悉的就先移步 Promise 入门,稍微做一下知识预习,了解一下 Promise 的常规用法。
什么是宏任务与微任务?
我们都知道 Js 是单线程都,但是一些高耗时操作就带来了进程阻塞问题。为了解决这个问题,Js 有两种任务的执行模式:同步模式(Synchronous)和异步模式(Asynchronous)。
在异步模式下,创建异步任务主要分为宏任务与微任务两种。ES6 规范中,宏任务(Macrotask) 称为 Task, 微任务(Microtask) 称为 Jobs。宏任务是由宿主(浏览器、Node)发起的,而微任务由 JS 自身发起。
宏任务与微任务的几种创建方式 ?
| 宏任务(Macrotask) | 微任务(Microtask) | setTimeout | requestAnimationFrame(有争议) | setInterval | MutationObserver(浏览器环境) | MessageChannel | Promise.[ then/catch/finally ] | I/O,事件队列 | process.nextTick(Node环境) | setImmediate(Node环境) | queueMicrotask | script(整体代码块) |
|---|
如何理解 script(整体代码块)是个宏任务呢 ?
实际上如果同时存在两个 script 代码块,会首先在执行第一个 script 代码块中的同步代码,如果这个过程中创建了微任务并进入了微任务队列,第一个 script 同步代码执行完之后,会首先去清空微任务队列,再去开启第二个 script 代码块的执行。所以这里应该就可以理解 script(整体代码块)为什么会是宏任务。
什么是 EventLoop ?
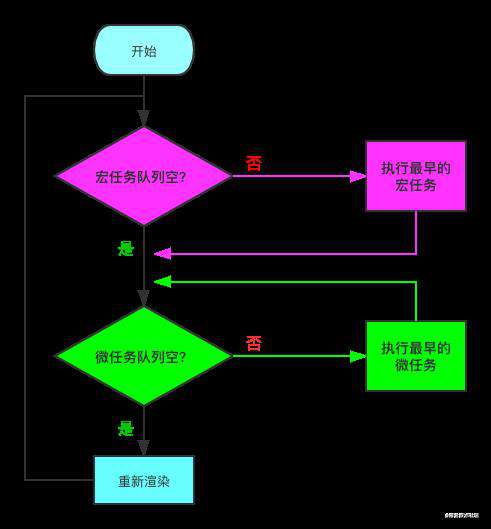
先来看个图

-
判断宏任务队列是否为空
- 不空 --> 执行最早进入队列的任务 --> 执行下一步
- 空 --> 执行下一步
-
判断微任务队列是否为空
- 不空 --> 执行最早进入队列的任务 --> 继续检查微任务队列空不空
- 空 --> 执行下一步
因为首次执行宏队列中会有 script(整体代码块)任务,所以实际上就是 Js 解析完成后,在异步任务中,会先执行完所有的微任务,这里也是很多面试题喜欢考察的。需要注意的是,新创建的微任务会立即进入微任务队列排队执行,不需要等待下一次轮回。
什么是 Promise A+ 规范?
看到 A+ 肯定会想到是不是还有 A,事实上确实有。其实 Promise 有多种规范,除了前面的 Promise A、promise A+ 还有 Promise/B,Promise/D。目前我们使用的 Promise 是基于 Promise A+ 规范实现的,感兴趣的移步 Promise A+规范了解一下,这里不赘述。
检验一份手写 Promise 靠不靠谱,通过 Promise A+ 规范自然是基本要求,这里我们可以借助 promises-aplus-tests 来检测我们的代码是否符合规范,后面我会讲到如何使用它。
手写开始
很多手写版本都是使用 setTimeout 去做异步处理,但是 setTimeout 属于宏任务,这与 Promise 是个微任务相矛盾,所以我打算选择一种创建微任务的方式去实现我们的手写代码。
这里我们有几种选择,一种就是 Promise A+ 规范中也提到的,process.nextTick( Node 端 ) 与MutationObserver( 浏览器端 ),考虑到利用这两种方式需要做环境判断,所以在这里我们就推荐另外一种创建微任务的方式 queueMicrotask,了解更多 --> 在 JavaScript 中通过 queueMicrotask() 使用微任务;
一、Promise 核心逻辑实现
我们先简单实现一下 Promise 的基础功能。先看原生 Promise 实现的 ?,第一步我们要完成相同的功能。
原生? ?
const promise = new Promise((resolve, reject) => {
   resolve('success')
   reject('err')
})

promise.then(value => {
  console.log('resolve', value)
}, reason => {
  console.log('reject', reason)
})

// 输出 resolve success
我们来分析一下基本原理:
下面开始实现:
1. 新建 MyPromise 类,传入执行器 executor
// 新建 MyPromise.js

// 新建 MyPromise 类
class MyPromise {
  constructor(executor){
    // executor 是一个执行器,进入会立即执行
    executor()
  }
}
2. executor 传入 resolve 和 reject 方法
// MyPromise.js

// 新建 MyPromise 类
class MyPromise {
  constructor(executor){
    // executor 是一个执行器,进入会立即执行
    // 并传入resolve和reject方法
    executor(this.resolve, this.reject)
  }
  // resolve和reject为什么要用箭头函数?
  // 如果直接调用的话,普通函数this指向的是window或者undefined
  // 用箭头函数就可以让this指向当前实例对象
  // 更改成功后的状态
  resolve = () => {}
  // 更改失败后的状态
  reject = () => {}
}
3. 状态与结果的管理
// MyPromise.js

// 先定义三个常量表示状态
const PENDING = 'pending';
const FULFILLED = 'fulfilled';
const REJECTED = 'rejected';

// 新建 MyPromise 类
class MyPromise {
  constructor(executor){
    // executor 是一个执行器,进入会立即执行
    // 并传入resolve和reject方法
    executor(this.resolve, this.reject)
  }

  // 储存状态的变量,初始值是 pending
  status = PENDING;

  // resolve和reject为什么要用箭头函数?
  // 如果直接调用的话,普通函数this指向的是window或者undefined
  // 用箭头函数就可以让this指向当前实例对象
  // 成功之后的值
  value = null;
  // 失败之后的原因
  reason = null;

  // 更改成功后的状态
  resolve = (value) => {
    // 只有状态是等待,才执行状态修改
    if (this.status === PENDING) {
      // 状态修改为成功
      this.status = FULFILLED;
      // 保存成功之后的值
      this.value = value;
    }
  }

  // 更改失败后的状态
  reject = (reason) => {
    // 只有状态是等待,才执行状态修改
    if (this.status === PENDING) {
      // 状态成功为失败
      this.status = REJECTED;
      // 保存失败后的原因
      this.reason = reason;
    }
  }
}
4. then 的简单实现
// MyPromise.js

then(onFulfilled, onRejected) {
  // 判断状态
  if (this.status === FULFILLED) {
    // 调用成功回调,并且把值返回
    onFulfilled(this.value);
  } else if (this.status === REJECTED) {
    // 调用失败回调,并且把原因返回
    onRejected(this.reason);
  }
}
5. 使用 module.exports 对外暴露 MyPromise 类
// MyPromise.js
module.exports = MyPromise;
看一下我们目前实现的完整代码?
// MyPromise.js

// 先定义三个常量表示状态
const PENDING = 'pending';
const FULFILLED = 'fulfilled';
const REJECTED = 'rejected';

// 新建 MyPromise 类
class MyPromise {
  constructor(executor){
    // executor 是一个执行器,进入会立即执行
    // 并传入resolve和reject方法
    executor(this.resolve, this.reject)
  }

  // 储存状态的变量,初始值是 pending
  status = PENDING;

  // resolve和reject为什么要用箭头函数?
  // 如果直接调用的话,普通函数this指向的是window或者undefined
  // 用箭头函数就可以让this指向当前实例对象
  // 成功之后的值
  value = null;
  // 失败之后的原因
  reason = null;

  // 更改成功后的状态
  resolve = (value) => {
    // 只有状态是等待,才执行状态修改
    if (this.status === PENDING) {
      // 状态修改为成功
      this.status = FULFILLED;
      // 保存成功之后的值
      this.value = value;
    }
  }

  // 更改失败后的状态
  reject = (reason) => {
    // 只有状态是等待,才执行状态修改
    if (this.status === PENDING) {
      // 状态成功为失败
      this.status = REJECTED;
      // 保存失败后的原因
      this.reason = reason;
    }
  }

  then(onFulfilled, onRejected) {
    // 判断状态
    if (this.status === FULFILLED) {
      // 调用成功回调,并且把值返回
      onFulfilled(this.value);
    } else if (this.status === REJECTED) {
      // 调用失败回调,并且把原因返回
      onRejected(this.reason);
    }
  }
}

module.exports = MyPromise
使用我的手写代码执行一下上面那个?
// 新建 test.js

// 引入我们的 MyPromise.js
const MyPromise = require('./MyPromise')
const promise = new MyPromise((resolve, reject) => {
   resolve('success')
   reject('err')
})

promise.then(value => {
  console.log('resolve', value)
}, reason => {
  console.log('reject', reason)
})

// 执行结果:resolve success
执行结果符合我们的预期,第一步完成了???
二、在 Promise 类中加入异步逻辑
上面还没有经过异步处理,如果有异步逻辑加如来会带来一些问题,例如:
// test.js

const MyPromise = require('./MyPromise')
const promise = new MyPromise((resolve, reject) => {
  setTimeout(() => {
    resolve('success')
  }, 2000);
})

promise.then(value => {
  console.log('resolve', value)
}, reason => {
  console.log('reject', reason)
})

// 没有打印信息!!!
分析原因:
这里就需要我们处理一下 Pending 状态,我们改造一下之前的代码 ?
1. 缓存成功与失败回调
// MyPromise.js

// MyPromise 类中新增
// 存储成功回调函数
onFulfilledCallback = null;
// 存储失败回调函数
onRejectedCallback = null;
2. then 方法中的 Pending 的处理
// MyPromise.js

then(onFulfilled, onRejected) {
  // 判断状态
  if (this.status === FULFILLED) {
    // 调用成功回调,并且把值返回
    onFulfilled(this.value);
  } else if (this.status === REJECTED) {
    // 调用失败回调,并且把原因返回
    onRejected(this.reason);
  } else if (this.status === PENDING) {
    // ==== 新增 ====
    // 因为不知道后面状态的变化情况,所以将成功回调和失败回调存储起来
    // 等到执行成功失败函数的时候再传递
    this.onFulfilledCallback = onFulfilled;
    this.onRejectedCallback = onRejected;
  }
}
3. resolve 与 reject 中调用回调函数
// MyPromise.js

// 更改成功后的状态
resolve = (value) => {
  // 只有状态是等待,才执行状态修改
  if (this.status === PENDING) {
    // 状态修改为成功
    this.status = FULFILLED;
    // 保存成功之后的值
    this.value = value;
    // ==== 新增 ====
    // 判断成功回调是否存在,如果存在就调用
    this.onFulfilledCallback && this.onFulfilledCallback(value);
  }
}
// MyPromise.js
// 更改失败后的状态
reject = (reason) => {
  // 只有状态是等待,才执行状态修改
  if (this.status === PENDING) {
    // 状态成功为失败
    this.status = REJECTED;
    // 保存失败后的原因
    this.reason = reason;
    // ==== 新增 ====
    // 判断失败回调是否存在,如果存在就调用
    this.onRejectedCallback && this.onRejectedCallback(reason)
  }
}
我们再执行一下上面的?
// test.js

const MyPromise = require('./MyPromise')
const promise = new MyPromise((resolve, reject) => {
  setTimeout(() => {
    resolve('success')
  }, 2000);
})

promise.then(value => {
  console.log('resolve', value)
}, reason => {
  console.log('reject', reason)
})

// 等待 2s 输出 resolve success
目前已经可以简单处理异步问题了✌️
三、实现 then 方法多次调用添加多个处理函数
同样的先看一个?
// test.js

const MyPromise = require('./MyPromise')
const promise = new MyPromise((resolve, reject) => {
  setTimeout(() => {
    resolve('success')
  }, 2000);
})

promise.then(value => {
  console.log(1)
  console.log('resolve', value)
})

promise.then(value => {
  console.log(2)
  console.log('resolve', value)
})

promise.then(value => {
  console.log(3)
  console.log('resolve', value)
})

// 3
// resolve success
目前的代码只能输出:3 resolve success,怎么可以把 1、2 弄丢呢!
我们应该一视同仁,保证所有 then 中的回调函数都可以执行 ? 继续改造
1. MyPromise 类中新增两个数组
// MyPromise.js

// 存储成功回调函数
// onFulfilledCallback = null;
onFulfilledCallbacks = [];
// 存储失败回调函数
// onRejectedCallback = null;
onRejectedCallbacks = [];
2. 回调函数存入数组中
// MyPromise.js

then(onFulfilled, onRejected) {
  // 判断状态
  if (this.status === FULFILLED) {
    // 调用成功回调,并且把值返回
    onFulfilled(this.value);
  } else if (this.status === REJECTED) {
    // 调用失败回调,并且把原因返回
    onRejected(this.reason);
  } else if (this.status === PENDING) {
    // ==== 新增 ====
    // 因为不知道后面状态的变化,这里先将成功回调和失败回调存储起来
    // 等待后续调用
    this.onFulfilledCallbacks.push(onFulfilled);
    this.onRejectedCallbacks.push(onRejected);
  }
}
3. 循环调用成功和失败回调
// MyPromise.js

// 更改成功后的状态
resolve = (value) => {
  // 只有状态是等待,才执行状态修改
  if (this.status === PENDING) {
    // 状态修改为成功
    this.status = FULFILLED;
    // 保存成功之后的值
    this.value = value;
    // ==== 新增 ====
    // resolve里面将所有成功的回调拿出来执行
    while (this.onFulfilledCallbacks.length) {
      // Array.shift() 取出数组第一个元素,然后()调用,shift不是纯函数,取出后,数组将失去该元素,直到数组为空
      this.onFulfilledCallbacks.shift()(value)
    }
  }
}
// MyPromise.js

// 更改失败后的状态
reject = (reason) => {
  // 只有状态是等待,才执行状态修改
  if (this.status === PENDING) {
    // 状态成功为失败
    this.status = REJECTED;
    // 保存失败后的原因
    this.reason = reason;
    // ==== 新增 ====
    // resolve里面将所有失败的回调拿出来执行
    while (this.onRejectedCallbacks.length) {
      this.onRejectedCallbacks.shift()(reason)
    }
  }
}
再来运行一下,看看结果?
1
resolve success
2
resolve success
3
resolve success
??? 完美,继续
四、实现 then 方法的链式调用
举个栗子 ?
// test.js

const MyPromise = require('./MyPromise')
const promise = new MyPromise((resolve, reject) => {
  // 目前这里只处理同步的问题
  resolve('success')
})

function other () {
  return new MyPromise((resolve, reject) =>{
    resolve('other')
  })
}
promise.then(value => {
  console.log(1)
  console.log('resolve', value)
  return other()
}).then(value => {
  console.log(2)
  console.log('resolve', value)
})
用目前的手写代码运行的时候会报错 ? 无法链式调用
}).then(value => {
  ^

TypeError: Cannot read property 'then' of undefined
接着改 ?
// MyPromise.js

class MyPromise {
  ......
  then(onFulfilled, onRejected) {
    // ==== 新增 ====
    // 为了链式调用这里直接创建一个 MyPromise,并在后面 return 出去
    const promise2 = new MyPromise((resolve, reject) => {
      // 这里的内容在执行器中,会立即执行
      if (this.status === FULFILLED) {
        // 获取成功回调函数的执行结果
        const x = onFulfilled(this.value);
        // 传入 resolvePromise 集中处理
        resolvePromise(x, resolve, reject);
      } else if (this.status === REJECTED) {
        onRejected(this.reason);
      } else if (this.status === PENDING) {
        this.onFulfilledCallbacks.push(onFulfilled);
        this.onRejectedCallbacks.push(onRejected);
      }
    })

    return promise2;
  }
}

function resolvePromise(x, resolve, reject) {
  // 判断x是不是 MyPromise 实例对象
  if(x instanceof MyPromise) {
    // 执行 x,调用 then 方法,目的是将其状态变为 fulfilled 或者 rejected
    // x.then(value => resolve(value), reason => reject(reason))
    // 简化之后
    x.then(resolve, reject)
  } else{
    // 普通值
    resolve(x)
  }
}
执行一下,结果?
1
resolve success
2
resolve other
em... 符合预期 ?
五、then 方法链式调用识别 Promise 是否返回自己
例如下面这种情况?
// test.js

const promise = new Promise((resolve, reject) => {
  resolve(100)
})
const p1 = promise.then(value => {
  console.log(value)
  return p1
})
使用原生 Promise 执行这个代码,会报类型错误
100
Uncaught (in promise) TypeError: Chaining cycle detected for promise #<Promise>
我们在 MyPromise 实现一下
// MyPromise.js

class MyPromise {
  ......
  then(onFulfilled, onRejected) {
    const promise2 = new MyPromise((resolve, reject) => {
      if (this.status === FULFILLED) {
        const x = onFulfilled(this.value);
        // resolvePromise 集中处理,将 promise2 传入
        resolvePromise(promise2, x, resolve, reject);
      } else if (this.status === REJECTED) {
        onRejected(this.reason);
      } else if (this.status === PENDING) {
        this.onFulfilledCallbacks.push(onFulfilled);
        this.onRejectedCallbacks.push(onRejected);
      }
    })

    return promise2;
  }
}

function resolvePromise(promise2, x, resolve, reject) {
  // 如果相等了,说明return的是自己,抛出类型错误并返回
  if (promise2 === x) {
    return reject(new TypeError('Chaining cycle detected for promise #<Promise>'))
  }
  if(x instanceof MyPromise) {
    x.then(resolve, reject)
  } else{
    resolve(x)
  }
}
执行一下,竟然报错了 ?
        resolvePromise(promise2, x, resolve, reject);
                       ^

ReferenceError: Cannot access 'promise2' before initialization
为啥会报错呢?从错误提示可以看出,我们必须要等 promise2 完成初始化。这个时候我们就要用上宏微任务和事件循环的知识了,这里就需要创建一个异步函数去等待 promise2 完成初始化,前面我们已经确认了创建微任务的技术方案 --> queueMicrotask
// MyPromise.js

class MyPromise {
  ......
  then(onFulfilled, onRejected) {
    const promise2 = new MyPromise((resolve, reject) => {
      if (this.status === FULFILLED) {
        // ==== 新增 ====
        // 创建一个微任务等待 promise2 完成初始化
        queueMicrotask(() => {
          // 获取成功回调函数的执行结果
          const x = onFulfilled(this.value);
          // 传入 resolvePromise 集中处理
          resolvePromise(promise2, x, resolve, reject);
        })
      } else if (this.status === REJECTED) {
      ......
    })

    return promise2;
  }
}
执行一下
// test.js

const MyPromise = require('./MyPromise')
const promise = new MyPromise((resolve, reject) => {
    resolve('success')
})

// 这个时候将promise定义一个p1,然后返回的时候返回p1这个promise
const p1 = promise.then(value => {
   console.log(1)
   console.log('resolve', value)
   return p1
})

// 运行的时候会走reject
p1.then(value => {
  console.log(2)
  console.log('resolve', value)
}, reason => {
  console.log(3)
  console.log(reason.message)
})
这里得到我们的结果 ?
1
resolve success
3
Chaining cycle detected for promise #<Promise>
哈哈,搞定 ? 开始下一步
六、捕获错误及 then 链式调用其他状态代码补充
目前还缺少重要的一个环节,就是我们的错误捕获还没有处理
1. 捕获执行器错误
// MyPromise.js

constructor(executor){
  // ==== 新增 ====
  // executor 是一个执行器,进入会立即执行
  // 并传入resolve和reject方法
  try {
    executor(this.resolve, this.reject)
  } catch (error) {
    // 如果有错误,就直接执行 reject
    this.reject(error)
  }
}
验证一下:
// test.js

const MyPromise = require('./MyPromise')
const promise = new MyPromise((resolve, reject) => {
    // resolve('success')
    throw new Error('执行器错误')
})

promise.then(value => {
  console.log(1)
  console.log('resolve', value)
}, reason => {
  console.log(2)
  console.log(reason.message)
})
执行结果 ?
2
执行器错误
OK,通过 ?
2. then 执行的时错误捕获
// MyPromise.js

then(onFulfilled, onRejected) {
  // 为了链式调用这里直接创建一个 MyPromise,并在后面 return 出去
  const promise2 = new MyPromise((resolve, reject) => {
    // 判断状态
    if (this.status === FULFILLED) {
      // 创建一个微任务等待 promise2 完成初始化
      queueMicrotask(() => {
        // ==== 新增 ====
        try {
          // 获取成功回调函数的执行结果
          const x = onFulfilled(this.value);
          // 传入 resolvePromise 集中处理
          resolvePromise(promise2, x, resolve, reject);
        } catch (error) {
          reject(error)
        }
      })
    } else if (this.status === REJECTED) {
      // 调用失败回调,并且把原因返回
      onRejected(this.reason);
    } else if (this.status === PENDING) {
      // 等待
      // 因为不知道后面状态的变化情况,所以将成功回调和失败回调存储起来
      // 等到执行成功失败函数的时候再传递
      this.onFulfilledCallbacks.push(onFulfilled);
      this.onRejectedCallbacks.push(onRejected);
    }
  })

  return promise2;
}
验证一下:
// test.js

const MyPromise = require('./MyPromise')
const promise = new MyPromise((resolve, reject) => {
    resolve('success')
    // throw new Error('执行器错误')
 })

// 第一个then方法中的错误要在第二个then方法中捕获到
promise.then(value => {
  console.log(1)
  console.log('resolve', value)
  throw new Error('then error')
}, reason => {
  console.log(2)
  console.log(reason.message)
}).then(value => {
  console.log(3)
  console.log(value);
}, reason => {
  console.log(4)
  console.log(reason.message)
})
执行结果 ?
1
resolve success
4
then error
这里成功打印了1中抛出的错误 then error
七、参考 fulfilled 状态下的处理方式,对 rejected 和 pending 状态进行改造
改造内容包括:
// MyPromise.js

then(onFulfilled, onRejected) {
  // 为了链式调用这里直接创建一个 MyPromise,并在后面 return 出去
  const promise2 = new MyPromise((resolve, reject) => {
    // 判断状态
    if (this.status === FULFILLED) {
      // 创建一个微任务等待 promise2 完成初始化
      queueMicrotask(() => {
        try {
          // 获取成功回调函数的执行结果
          const x = onFulfilled(this.value);
          // 传入 resolvePromise 集中处理
          resolvePromise(promise2, x, resolve, reject);
        } catch (error) {
          reject(error)
        }
      })
    } else if (this.status === REJECTED) {
      // ==== 新增 ====
      // 创建一个微任务等待 promise2 完成初始化
      queueMicrotask(() => {
        try {
          // 调用失败回调,并且把原因返回
          const x = onRejected(this.reason);
          // 传入 resolvePromise 集中处理
          resolvePromise(promise2, x, resolve, reject);
        } catch (error) {
          reject(error)
        }
      })
    } else if (this.status === PENDING) {
      // 等待
      // 因为不知道后面状态的变化情况,所以将成功回调和失败回调存储起来
      // 等到执行成功失败函数的时候再传递
      this.onFulfilledCallbacks.push(() => {
        // ==== 新增 ====
        queueMicrotask(() => {
          try {
            // 获取成功回调函数的执行结果
            const x = onFulfilled(this.value);
            // 传入 resolvePromise 集中处理
            resolvePromise(promise2, x, resolve, reject);
          } catch (error) {
            reject(error)
          }
        })
      });
      this.onRejectedCallbacks.push(() => {
        // ==== 新增 ====
        queueMicrotask(() => {
          try {
            // 调用失败回调,并且把原因返回
            const x = onRejected(this.reason);
            // 传入 resolvePromise 集中处理
            resolvePromise(promise2, x, resolve, reject);
          } catch (error) {
            reject(error)
          }
        })
      });
    }
  })

  return promise2;
}
八、then 中的参数变为可选
上面我们处理 then 方法的时候都是默认传入 onFulfilled、onRejected 两个回调函数,但是实际上原生 Promise 是可以选择参数的单传或者不传,都不会影响执行。
例如下面这种 ?
// test.js

const promise = new Promise((resolve, reject) => {
  resolve(100)
})

promise
  .then()
  .then()
  .then()
  .then(value => console.log(value))

// 输出 100
所以我们需要对 then 方法做一点小小的调整
// MyPromise.js

then(onFulfilled, onRejected) {
  // 如果不传,就使用默认函数
  onFulfilled = typeof onFulfilled === 'function' ? onFulfilled : value => value;
  onRejected = typeof onRejected === 'function' ? onRejected : reason => {throw reason};

  // 为了链式调用这里直接创建一个 MyPromise,并在后面 return 出去
  const promise2 = new MyPromise((resolve, reject) => {
  ......
}
改造完自然是需要验证一下的
先看情况一:resolve 之后
// test.js

const MyPromise = require('./MyPromise')
const promise = new MyPromise((resolve, reject) => {
  resolve('succ')
})

promise.then().then().then(value => console.log(value))

// 打印 succ
先看情况一:reject 之后
// test.js

const MyPromise = require('./MyPromise')
const promise = new MyPromise((resolve, reject) => {
  reject('err')
})

promise.then().then().then(value => console.log(value), reason => console.log(reason))

// 打印 err
写到这里,麻雀版的 Promise 基本完成了,鼓掌 ???
九、实现 resolve 与 reject 的静态调用
就像开头挂的那道面试题使用 return Promise.resolve 来返回一个 Promise 对象,我们用现在的手写代码尝试一下
const MyPromise = require('./MyPromise')

MyPromise.resolve().then(() => {
    console.log(0);
    return MyPromise.resolve(4);
}).then((res) => {
    console.log(res)
})
结果它报错了 ?
MyPromise.resolve().then(() => {
          ^

TypeError: MyPromise.resolve is not a function
除了 Promise.resolve 还有 Promise.reject 的用法,我们都要去支持,接下来我们来实现一下
// MyPromise.js

MyPromise {
  ......
  // resolve 静态方法
  static resolve (parameter) {
    // 如果传入 MyPromise 就直接返回
    if (parameter instanceof MyPromise) {
      return parameter;
    }

    // 转成常规方式
    return new MyPromise(resolve =>  {
      resolve(parameter);
    });
  }

  // reject 静态方法
  static reject (reason) {
    return new MyPromise((resolve, reject) => {
      reject(reason);
    });
  }
}
这样我们再测试上面的 ? 就不会有问题啦
执行结果 ?
0
4
到这里手写工作就基本完成了,前面主要为了方便理解,所以有一些冗余代码,我规整一下
// MyPromise.js

// 先定义三个常量表示状态
const PENDING = 'pending';
const FULFILLED = 'fulfilled';
const REJECTED = 'rejected';

// 新建 MyPromise 类
class MyPromise {
  constructor(executor){
    // executor 是一个执行器,进入会立即执行
    // 并传入resolve和reject方法
    try {
      executor(this.resolve, this.reject)
    } catch (error) {
      this.reject(error)
    }
  }

  // 储存状态的变量,初始值是 pending
  status = PENDING;
  // 成功之后的值
  value = null;
  // 失败之后的原因
  reason = null;

  // 存储成功回调函数
  onFulfilledCallbacks = [];
  // 存储失败回调函数
  onRejectedCallbacks = [];

  // 更改成功后的状态
  resolve = (value) => {
    // 只有状态是等待,才执行状态修改
    if (this.status === PENDING) {
      // 状态修改为成功
      this.status = FULFILLED;
      // 保存成功之后的值
      this.value = value;
      // resolve里面将所有成功的回调拿出来执行
      while (this.onFulfilledCallbacks.length) {
        // Array.shift() 取出数组第一个元素,然后()调用,shift不是纯函数,取出后,数组将失去该元素,直到数组为空
        this.onFulfilledCallbacks.shift()(value)
      }
    }
  }

  // 更改失败后的状态
  reject = (reason) => {
    // 只有状态是等待,才执行状态修改
    if (this.status === PENDING) {
      // 状态成功为失败
      this.status = REJECTED;
      // 保存失败后的原因
      this.reason = reason;
      // resolve里面将所有失败的回调拿出来执行
      while (this.onRejectedCallbacks.length) {
        this.onRejectedCallbacks.shift()(reason)
      }
    }
  }

  then(onFulfilled, onRejected) {
    const realOnFulfilled = typeof onFulfilled === 'function' ? onFulfilled : value => value;
    const realOnRejected = typeof onRejected === 'function' ? onRejected : reason => {throw reason};

    // 为了链式调用这里直接创建一个 MyPromise,并在后面 return 出去
    const promise2 = new MyPromise((resolve, reject) => {
      const fulfilledMicrotask = () =>  {
        // 创建一个微任务等待 promise2 完成初始化
        queueMicrotask(() => {
          try {
            // 获取成功回调函数的执行结果
            const x = realOnFulfilled(this.value);
            // 传入 resolvePromise 集中处理
            resolvePromise(promise2, x, resolve, reject);
          } catch (error) {
            reject(error)
          }
        })
      }

      const rejectedMicrotask = () => {
        // 创建一个微任务等待 promise2 完成初始化
        queueMicrotask(() => {
          try {
            // 调用失败回调,并且把原因返回
            const x = realOnRejected(this.reason);
            // 传入 resolvePromise 集中处理
            resolvePromise(promise2, x, resolve, reject);
          } catch (error) {
            reject(error)
          }
        })
      }
      // 判断状态
      if (this.status === FULFILLED) {
        fulfilledMicrotask()
      } else if (this.status === REJECTED) {
        rejectedMicrotask()
      } else if (this.status === PENDING) {
        // 等待
        // 因为不知道后面状态的变化情况,所以将成功回调和失败回调存储起来
        // 等到执行成功失败函数的时候再传递
        this.onFulfilledCallbacks.push(fulfilledMicrotask);
        this.onRejectedCallbacks.push(rejectedMicrotask);
      }
    })

    return promise2;
  }

  // resolve 静态方法
  static resolve (parameter) {
    // 如果传入 MyPromise 就直接返回
    if (parameter instanceof MyPromise) {
      return parameter;
    }

    // 转成常规方式
    return new MyPromise(resolve =>  {
      resolve(parameter);
    });
  }

  // reject 静态方法
  static reject (reason) {
    return new MyPromise((resolve, reject) => {
      reject(reason);
    });
  }
}

function resolvePromise(promise2, x, resolve, reject) {
  // 如果相等了,说明return的是自己,抛出类型错误并返回
  if (promise2 === x) {
    return reject(new TypeError('Chaining cycle detected for promise #<Promise>'))
  }
  // 判断x是不是 MyPromise 实例对象
  if(x instanceof MyPromise) {
    // 执行 x,调用 then 方法,目的是将其状态变为 fulfilled 或者 rejected
    // x.then(value => resolve(value), reason => reject(reason))
    // 简化之后
    x.then(resolve, reject)
  } else{
    // 普通值
    resolve(x)
  }
}

module.exports = MyPromise;
到这一步手写部分基本大功告成 ???
Promise A+ 测试
上面介绍了 Promise A+ 规范,当然我们手写的版本也得符合了这个规范才有资格叫 Promise, 不然就只能是伪 Promise 了。
上文讲到了 promises-aplus-tests,现在我们正式开箱使用
1. 安装一下
npm install promises-aplus-tests -D
2. 手写代码中加入 deferred
// MyPromise.js

MyPromise {
  ......
}

MyPromise.deferred = function () {
  var result = {};
  result.promise = new MyPromise(function (resolve, reject) {
    result.resolve = resolve;
    result.reject = reject;
  });

  return result;
}
module.exports = MyPromise;
3. 配置启动命令
{
  "name": "promise",
  "version": "1.0.0",
  "description": "my promise",
  "main": "MyPromise.js",
  "scripts": {
    "test": "promises-aplus-tests MyPromise"
  },
  "author": "ITEM",
  "license": "ISC",
  "devDependencies": {
    "promises-aplus-tests": "^2.1.2"
  }
}
开启测试
npm run test
迫不及待了吧 ? 看看我们的结果如何,走起 ??

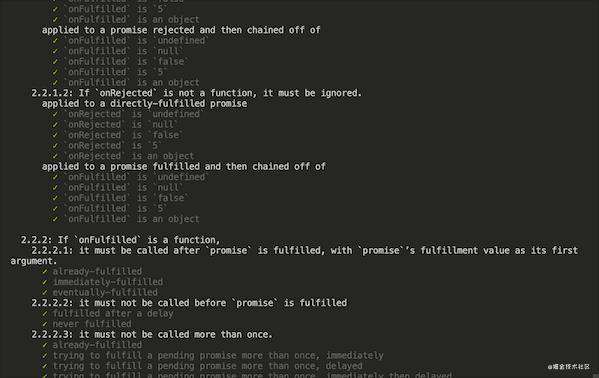
虽然功能上没啥问题,但是测试却失败了 ?
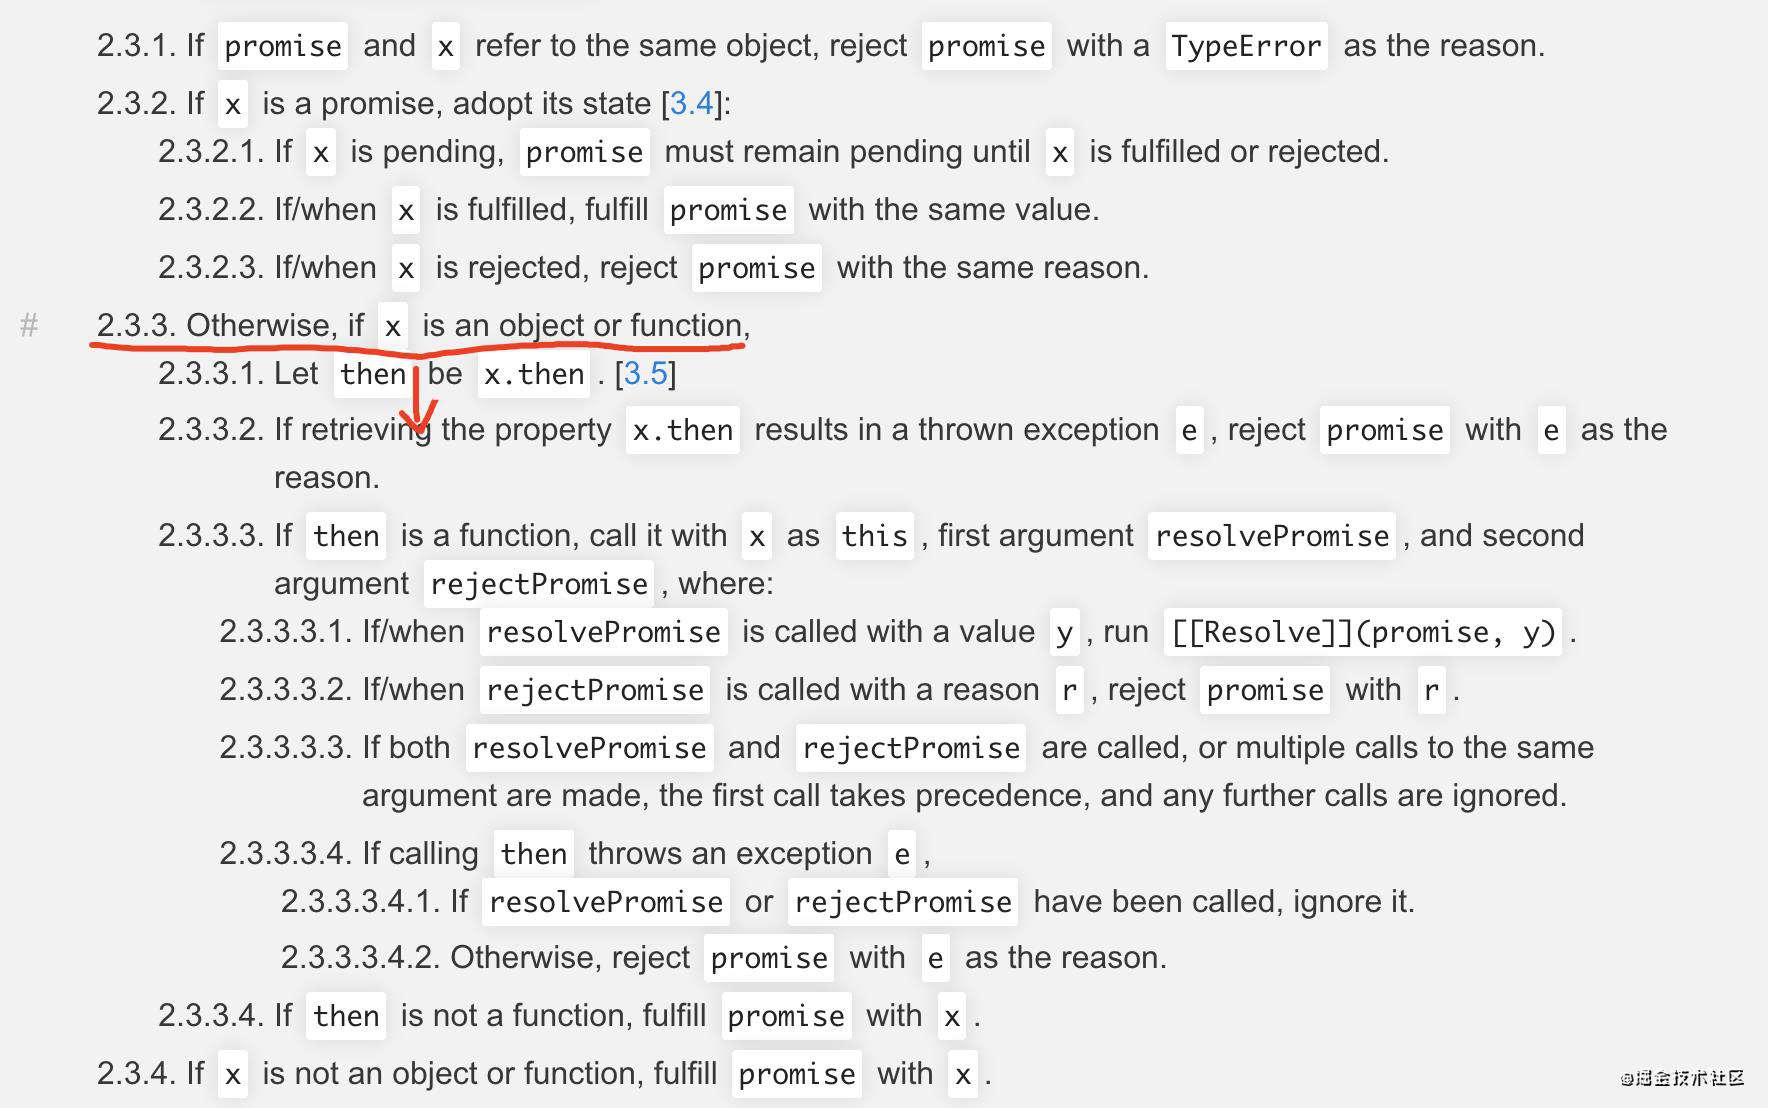
针对提示信息,我翻看了一下 Promise A+ 规范,发现我们应该是在 2.3.x 上出现了问题,这里规范使用了不同的方式进行了 then 的返回值判断。

自红线向下的细节,我们都没有处理,这里要求判断 x 是否为 object 或者 function,满足则接着判断 x.then 是否存在,这里可以理解为判断 x 是否为 promise,这里都功能实际与我们手写版本中 x instanceof MyPromise 功能相似。
我们还是按照规范改造一下 resolvePromise 方法吧
// MyPromise.js

function resolvePromise(promise, x, resolve, reject) {
  // 如果相等了,说明return的是自己,抛出类型错误并返回
  if (promise === x) {
    return reject(new TypeError('The promise and the return value are the same'));
  }

  if (typeof x === 'object' || typeof x === 'function') {
    // x 为 null 直接返回,走后面的逻辑会报错
    if (x === null) {
      return resolve(x);
    }

    let then;
    try {
      // 把 x.then 赋值给 then
      then = x.then;
    } catch (error) {
      // 如果取 x.then 的值时抛出错误 error ,则以 error 为据因拒绝 promise
      return reject(error);
    }

    // 如果 then 是函数
    if (typeof then === 'function') {
      let called = false;
      try {
        then.call(
          x, // this 指向 x
          // 如果 resolvePromise 以值 y 为参数被调用,则运行 [[Resolve]](promise, y)
          y => {
            // 如果 resolvePromise 和 rejectPromise 均被调用,
            // 或者被同一参数调用了多次,则优先采用首次调用并忽略剩下的调用
            // 实现这条需要前面加一个变量 called
            if (called) return;
            called = true;
            resolvePromise(promise, y, resolve, reject);
          },
          // 如果 rejectPromise 以据因 r 为参数被调用,则以据因 r 拒绝 promise
          r => {
            if (called) return;
            called = true;
            reject(r);
          });
      } catch (error) {
        // 如果调用 then 方法抛出了异常 error:
        // 如果 resolvePromise 或 rejectPromise 已经被调用,直接返回
        if (called) return;

        // 否则以 error 为据因拒绝 promise
        reject(error);
      }
    } else {
      // 如果 then 不是函数,以 x 为参数执行 promise
      resolve(x);
    }
  } else {
    // 如果 x 不为对象或者函数,以 x 为参数执行 promise
    resolve(x);
  }
}
改造后启动测试

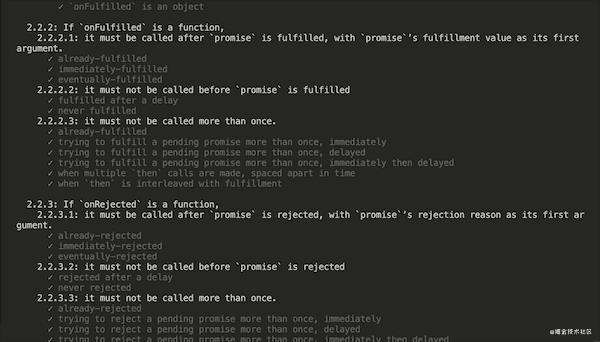
完美通过 ???
最终时刻,如何解释那道面试题的执行结果
先用我们自己的 Promise 运行一下那道面试题 ?
// test.js

const MyPromise = require('./MyPromise.js')

MyPromise.resolve().then(() => {
  console.log(0);
  return MyPromise.resolve(4);
}).then((res) => {
  console.log(res)
})

MyPromise.resolve().then(() => {
  console.log(1);
}).then(() => {
  console.log(2);
}).then(() => {
  console.log(3);
}).then(() => {
  console.log(5);
}).then(() =>{
  console.log(6);
})
执行结果:0、1、2、4、3、5、6 ?
这里我们手写版本的 4 并没有和 原生 Promise 一样在 3 后面,而是在 2 后面
其实从我们的手写代码上看,在判断 then 内部函数执行结果,也就是在这里 ?
// MyPromise.js

// 获取成功回调函数的执行结果
const x = realOnFulfilled(this.value);
// 传入 resolvePromise 集中处理
resolvePromise(promise2, x, resolve, reject);
面试题中 x 为 MyPromise.resolve(4) 的时候,在传入 resolvePromise 方法中会对 x 的类型进行判断时,会发现它是一个 Promise,并让其调用 then 方法完成状态转换。再看 resolvePromis 方法中这一块判断逻辑 ?
if (typeof x === 'object' || typeof x === 'function') {
    // x 为 null 直接返回,走后面的逻辑会报错
    if (x === null) {
      return resolve(x);
    }

    let then;
    try {
      // 把 x.then 赋值给 then
      then = x.then;
    } catch (error) {
      // 如果取 x.then 的值时抛出错误 error ,则以 error 为据因拒绝 promise
      return reject(error);
    }

    // 如果 then 是函数
    if (typeof then === 'function') {
      let called = false;
      try {
        then.call(
          x, // this 指向 x
          // 如果 resolvePromise 以值 y 为参数被调用,则运行 [[Resolve]](promise, y)
          y => {
            // 如果 resolvePromise 和 rejectPromise 均被调用,
            // 或者被同一参数调用了多次,则优先采用首次调用并忽略剩下的调用
            // 实现这条需要前面加一个变量 called
            if (called) return;
            called = true;
            resolvePromise(promise, y, resolve, reject);
          },
          // 如果 rejectPromise 以据因 r 为参数被调用,则以据因 r 拒绝 promise
          r => {
            if (called) return;
            called = true;
            reject(r);
          });
      }
      ......
那么问题来了
- 为什么我们 Promise A+ 测试全部通过的手写代码,执行结果却与原生 Promise 不同?
- 在我们手写代码使用创建一次微任务的方式,会带来什么问题吗?
ES6 中的 Promise 虽然是遵循 Promise A+ 规范实现的,但实际上也 Promise A+ 上做了一些功能扩展,例如:Promise.all、Promise.race 等,所以即使都符合 Promise A+ ,执行结果也是可能存在差异的。我们这里更需要思考的是第二个问题,不这么做会带来什么问题,也就是加一次微任务的必要性。
我尝试过很多例子,都没有找到相关例证,我们手写实现的 Promise 都很好的完成工作,拿到了结果。我不得不去翻看更多的相关文章,我发现有些人会为了让执行结果与原生相同,强行去再多加一次微任务,这种做法是很牵强的。
毕竟实现 Promise 的目的是为了解决异步编程的问题,能够拿到正确的结果才是最重要的,强行为了符合面试题的输出顺序去多加一次微任务,只能让手写代码变的更加复杂,不好理解。
在 stackoverflow 上,有一个类似的问题 What is the difference between returned Promise? 回答中有一个信息就是
这个在掘金中的一篇文章 我以为我很懂Promise,直到我开始实现Promise/A+规范 也有一段关于这道面试题的讨论
实际上我们已经在 static resolve 创建了一个新的 MyPromsie,并调用其 then 方法,创建了一个微任务。
所以,就目前的信息来说,两次微任务依旧不能证明其必要性,目前的 Promise 日常操作,一次微任务都是可以满足。
大家对于这个道面试题有什么想法或者意见,赶紧在留言区告诉我吧,一起探讨一下到底是必然还是巧合?
长文整理不易,记得 点赞 ? 支持一下哦 ?
常见问题FAQ
- 免费下载或者VIP会员专享资源能否直接商用?
- 本站所有资源版权均属于原作者所有,这里所提供资源均只能用于参考学习用,请勿直接商用。若由于商用引起版权纠纷,一切责任均由使用者承担。更多说明请参考 VIP介绍。
- 提示下载完但解压或打开不了?
- 找不到素材资源介绍文章里的示例图片?
- 模板不会安装或需要功能定制以及二次开发?


发表评论
还没有评论,快来抢沙发吧!