因公司需要采用RN开发App,故在一场新的秃头之旅中,总结了些许知识点整理分享一下,希望有能帮到大家的地方。
一、项目配置
1.安装 react-navigation 4.x
1-1.路由的安装配置
-
安装核心组件及用到的组件库
//安装主库 $ yarn add react-navigation //安装核心库 $ yarn add react-native-reanimated react-native-gesture-handler react-native-screens react-native-safe-area-context @react-native-community/masked-view //根据需要引入各导航组件库 $ yarn add react-navigation-stack $ yarn add react-navigation-drawer $ yarn add react-navigation-tabs -
ios 目录下执行
pod install -
为 react-native-screens 添加相关依赖
-
为了在 Android 上完成安装,还需要在
android/app/build.gradle中为react-native-screens添加相关依赖implementation 'androidx.appcompat:appcompat:1.1.0-rc01' implementation 'androidx.swiperefreshlayout:swiperefreshlayout:1.1.0-alpha02'
-
-
配置 react-native-gesture-handler
为了在 Android 上能够使用 react-native-gesture-handler,需要修改 MainActivity.java(加号部分为新增代码)
package com.reactnavigation.example; import com.facebook.react.ReactActivity; + import com.facebook.react.ReactActivityDelegate; + import com.facebook.react.ReactRootView; + import com.swmansion.gesturehandler.react.RNGestureHandlerEnabledRootView; public class MainActivity extends ReactActivity { @Override protected String getMainComponentName() { return "Example"; } + @Override + protected ReactActivityDelegate createReactActivityDelegate() { + return new ReactActivityDelegate(this, getMainComponentName()) { + @Override + protected ReactRootView createRootView() { + return new RNGestureHandlerEnabledRootView(MainActivity.this); + } + }; + } } -
在
index.js中导入react-native-gesture-handler
1-2.获取路由参数的两种方式
this.props.navigation.state.params获取的是整个参数对象this.props.navigation.getParam('参数名')通过 key 获取参数
2.配置 icon 图标库
-
安装
yarn add react-native-vector-icons -
配置 ios
ios 目录下的 info.plist 添加以下代码
<key>UIAppFonts</key> <array> <string>AntDesign.ttf</string> <string>Entypo.ttf</string> <string>EvilIcons.ttf</string> <string>Feather.ttf</string> <string>FontAwesome.ttf</string> <string>FontAwesome5_Brands.ttf</string> <string>FontAwesome5_Regular.ttf</string> <string>FontAwesome5_Solid.ttf</string> <string>Foundation.ttf</string> <string>Ionicons.ttf</string> <string>MaterialIcons.ttf</string> <string>MaterialCommunityIcons.ttf</string> <string>SimpleLineIcons.ttf</string> <string>Octicons.ttf</string> <string>Zocial.ttf</string> <string>Fontisto.ttf</string> </array> -
ios 目录下执行 pod install
-
配置 android
编辑
android/app/build.gradle文件,增加以下代码apply from: "../../node_modules/react-native-vector-icons/fonts.gradle"
3.本地存储 AsyncStorage
原官方 api 已废弃,建议使用以下扩展
AsyncStorage:yarn add @react-native-async-storage/async-storage
4.配置 UI 库
项目中使用的 UI 库为 React Native Elements 文档地址
二、Code Push 热更新
1.项目配置
1-1.服务端配置
-
安装
App Center CLI,用于服务端信息管理$ sudo yarn global add appcenter-cli -
登陆 app center
$ appcenter login -
运行以上命令并在命令行确认后,网页会弹出一个要求登陆的页面,登陆后,会得到一串
Access code,复制粘贴回命令行,成功的话会返回登陆账号。$ appcenter login Opening your browser... ? [Visit]:https://appcenter.ms/cli-login?hostname=assetfundeMacBook-Pro.local and enter the code: ? Access code from browser: 0cd185da****36a****7295b3****c8da9ba766a Logged in as xuechongwei-hotmail.com(登录账号) -
添加
App信息,这里要分别添加Android与iOS(i小写),app名字是 HbH5App,以此为例// -d 后面接的是app显示的名字,为了区分不同平台后面也写上平台命 // -o 表示运行系统(operation) Android/iOS // -p 表示平台(Platform)这里是 react-native $ appcenter apps create -d HbH5App-android -o Android -p React-Native $ appcenter apps create -d HbH5App-ios -o iOS -p React-Native -
接下来运行一下
appcenter apps list检测是否添加成功$ appcenter apps list xuechongwei-hotmail.com/HbH5App-android xuechongwei-hotmail.com/HbH5App-ios -
将已添加的
app部署热更新服务,一般会部署两个用于灰度更新,和正式更新,这里分别叫做Staging与Production。分别给安卓和 iOS 部署,所以一共要运行四行命令// -a 是指应用(application),这里要写上“用户名和程序名” // 部署IOS $ appcenter codepush deployment add -a xuechongwei-hotmail.com/HbH5App-ios Staging $ appcenter codepush deployment add -a xuechongwei-hotmail.com/HbH5App-ios Production // 部署安卓 $ appcenter codepush deployment add -a xuechongwei-hotmail.com/HbH5App-android Staging $ appcenter codepush deployment add -a xuechongwei-hotmail.com/HbH5App-android Production
1-2.IOS、安卓端配置
安装依赖包:yarn add react-native-code-push
ios 配置方法
-
切换到 ios 目录下执行
pod install -
打开
AppDelegate.m文件,添加以下代码#import <CodePush/CodePush.h> -
找到以下代码,进行替换
return [[NSBundle mainBundle] URLForResource:@"main" withExtension:@"jsbundle"]; //替换成 return [CodePush bundleURL]; -
修改
/项目目录/ios/项目名称/Info.plist文件,CodePushDeploymentKey标签的值。(如果没有的话则新增)<key>CodePushDeploymentKey</key> <string>Rbw0ct6cIQS******sKb0laMQNMVju</string> -
修改版本号 versionName(设置成 1.0.0)

android 配置方法
-
在
android/settings.gradle文件中,添加以下代码include ':app', ':react-native-code-push' project(':react-native-code-push').projectDir = new File(rootProject.projectDir, '../node_modules/react-native-code-push/android/app') -
在
android/app/build.gradle文件中,添加以下代码,... apply from: "../../node_modules/react-native/react.gradle" apply from: "../../node_modules/react-native-code-push/android/codepush.gradle" -->新增 ... -
修改
MainApplication.java... // 1. 导入codepush插件类 import com.microsoft.codepush.react.CodePush; public class MainApplication extends Application implements ReactApplication { private final ReactNativeHost mReactNativeHost = new ReactNativeHost(this) { ... // 2. 新增这段代码 @Override protected String getJSBundleFile() { return CodePush.getJSBundleFile(); } }; } -
在
strings.xml文件中新增部署的 key<string moduleConfig="true" name="CodePushDeploymentKey">真实的key</string> <!-- 查看部署的key--> appcenter codepush deployment list -a <ownerName>/<appName> <deploymentName> -k 例:appcenter codepush deployment list -a xuechongwei-hotmail.com/HbH5App-android -k -
修改版本号 versionName
打开
android/app/build.gradle,搜索defaultConfig定位到以下代码,修改versionName为 1.0.0(默认是 1.0,codepush 需要三位数)android{ defaultConfig{ versionName "1.0.0" } }
2.常用命令
旧版 code push 命令
//发布新版本:
$ code-push release-react GithubRN-IOS ios --t 1.0.0 --dev false --d Production --des "1.提交信息" --m true

//查看已发布的包信息:
$ code-push deployment ls GithubRN-Android

//可以看到指定版本更新的时间、描述等等属性:
$ code-push deployment history appName Staging/Production

//查看部署密钥:
$ code-push deployment ls [APP_NAME] -k
新版 appcenter 命令
// 查看创建app列表
$ appcenter apps list

// 查看部署key
$ appcenter codepush deployment list -a <ownerName>/<appName> <deploymentName> -k
例:appcenter codepush deployment list -a xuechongwei-hotmail.com/HbH5App-ios -k

// 发布新版本:在默认情况下,更新会推送到Staging的部署。
// 指定版本: -t 版本号  -d 要部署的环境
$ appcenter codepush release-react -a xuechongwei-hotmail.com/HbH5App-ios -d Production -t 1.0.0 --description '更新内容'

// 设置更新日志,供前端读取
$ appcenter codepush release-react -a xuechongwei-hotmail.com/HbH5App-ios  --description '更新'

// 强制更新
// 多了个-m true 参数,强制更新的默认效果是,用弹窗确认更新时候,只有确认键,并且安装成功后是立即生效,所以app可能会闪一下。
$ appcenter codepush release-react -a xuechongwei-hotmail.com/splashExample-ios -m true  --description '更新'

// 查看更新历史
$ appcenter codepush deployment history -a <ownerName>/<appName> <deploymentName>

// 显示历史
$ appcenter codepush deployment history -a xuechongwei-hotmail.com/HbH5App-ios Staging

// 清空历史
$ appcenter codepush deployment clear Staging -a xuechongwei-hotmail.com/HbH5App-ios
3.配置更新方式
import {AppRegistry} from 'react-native';
import CodePush from 'react-native-code-push';
// 静默方式,app每次启动的时候,都检测一下更新 'ON_APP_RESUME'
const codePushOptions = {checkFrequency: CodePush.CheckFrequency.ON_APP_RESUME};

// 手动方式接收更新的方式
//const codePushOptions = { checkFrequency: CodePush.CheckFrequency.ON_APP_RESUME };
import _App from './App';
const App = CodePush(codePushOptions)(_App);
import {name as appName} from './app.json';
4.部署 code-push-server
微软云服务在中国太慢,并且部分服务被墙,导致无法正常热更新,建议自部署更新服务器。参考文档
三、技术点
1.判断 ios 全面屏
-
官方 DeviceInfo 即将废弃,目前可以使用:
DeviceInfo.isIPhoneX_deprecated进行判断 -
后续可通过安装扩展:
react-native-device-info通过DeviceInfo.hasNotch()判断 -
用屏幕的长宽比判断 长度比宽度的值 大于 1.8 是全面屏
2.导航层级无法跳转问题
-
路由跳转提取到 NavigatorUtil.js
在 HomePage 主入口文件的 render 方法中加入
NavigationUtil.navigation = this.props.navigation;需调用对应页面的 navigation
3.iOS 边框圆角注意事项
请注意下列边框圆角样式目前在 iOS 的图片组件上还不支持:
borderTopLeftRadiusborderTopRightRadiusborderBottomLeftRadiusborderBottomRightRadius
4.图片url注意点
为了使新的图片资源机制正常工作,require 中的图片名字必须是一个静态字符串(不能使用变量!因为 require 是在编译时期执行,而非运行时期执行!)。参考地址
// 正确
<Image source={require("./my-icon.png")} />;

// 错误
const icon = this.props.active ? "my-icon-active" : "my-icon-inactive";
<Image source={require("./" + icon + ".png")} />;

// 正确
const icon = this.props.active
  ? require("./my-icon-active.png")
  : require("./my-icon-inactive.png");
<Image source={icon} />;
5.判断开发环境
通过全局变量__DEV__判断开发环境
6.打包安卓和 ios 安装包
打包安卓:参考地址
打包 iOS:参考地址
-
ios 证书申请 参考地址
-
ios 打包注意事项
通过 Product -> Archive 进行归档打包,打包后通过 Window -> Organizer 打开归档结果页进行导出
7.检测手机系统版本
import {Platform} from 'react-native';

//在 Android 上,Version属性是一个数字,表示 Android 的 api level:
if (Platform.Version === 25) {
  console.log('Running on Nougat!');
}

//在 iOS 上,Version属性是-[UIDevice systemVersion]的返回值,具体形式为一个表示当前系统版本的字符串。比如可能是"10.3"。
const majorVersionIOS = parseInt(Platform.Version, 10);
if (majorVersionIOS <= 9) {
  console.log('Work around a change in behavior');
}
8.屏幕适配
1.简单的单位转换
以 750 宽度的设计稿为例:
如果要让 750 代表 RN 设备的宽度,可以这样设计你的代码:
const viewPortWidth = 750;//这里是设计稿的宽度
const px2dp = (px: number): number => {
    return px * Dimensions.get('window').width / viewPortWidth
}

<View style={{height:200,width:px2dp(750),backgroundColor:'yellow'}}>
	<Text>750</Text>
</View>
2.第三方库 参考地址 1 参考地址 2
建议使用以下库: Github 地址
//安装
yarn add react-native-adaptive-stylesheet

//引入
import StyleSheet from 'react-native-adaptive-stylesheet';
StyleSheet.setGuidelineBaseWidth(750); //设置基准尺寸

//全局配置
StyleSheet.configure({
  width: 375,
  scaleFont: true,
});

//在视图层直接使用
<View style={{ width: StyleSheet.scaleView(60) }}>
  <Text style={{ fontSize: StyleSheet.scaleFont(18) }}>This is am example!</Text>
</View>

//定义样式与原本用法相同
StyleSheet.create({
  container: {
    width: 375,
    borderWidth: StyleSheet.hairlineWidth,
    fontSize: 18,
  },
});
9.将安卓的路由切换效果设置为 ios 模式
react-navigation4.X 参考文档
import { TransitionPresets } from 'react-navigation-stack';
{
  //路由配置
  ...
},
{
    initialRouteName: 'Index',
    defaultNavigationOptions: {
      ...TransitionPresets.SlideFromRightIOS,
    },
}
10.获取元素位置尺寸
<View ref={(filter) => (this.filter = filter)}></View>

this.filter && this.filter.measure((x, y, width, height, left, top) => {
  console.log('===x===', x); //组件相对父布局的X坐标??
  console.log('===y===', y); //组件相对父布局的Y坐标??
  console.log('===width===', width); //组件的宽度
  console.log('===height===', height); //组件的高度
  console.log('===left===', left); //组件在屏幕中的X坐标
  console.log('===top===', top); //组件在屏幕中的Y坐标
});
11.动画教程
官方文档
简书
12.整合Redux Dev Tools
为了兼容redux-thunk,需要使用增强函数进行处理
import { createStore , applyMiddleware ,compose } from 'redux'  //  引入createStore方法
import reducer from './reducer'
import thunk from 'redux-thunk'

const composeEnhancers =   window.__REDUX_DEVTOOLS_EXTENSION_COMPOSE__ ?
    window.__REDUX_DEVTOOLS_EXTENSION_COMPOSE__({}):compose

const enhancer = composeEnhancers(applyMiddleware(thunk))

const store = createStore( reducer, enhancer) // 创建数据存储仓库
export default store   //暴露出去
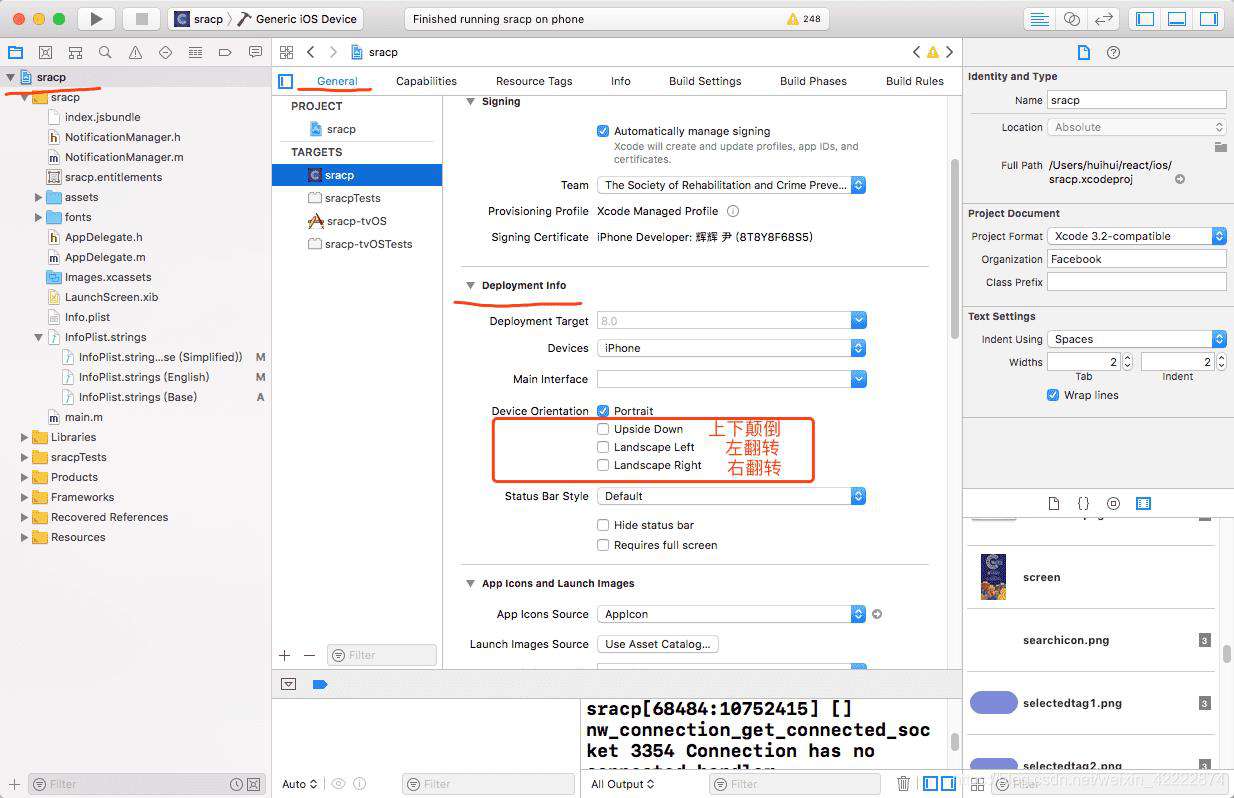
13.禁止横屏
-
Android端
//添加
android:screenOrientation="portrait"
-
IOS端
在Xcode项目中把相对应的勾去掉即可

14.声明全局变量
global.vars = {
   website:'http://www.baidu.com',
   name:'百度',
};

//入口文件index.js中进行调用,然后可全局使用
import './globalVariable.js';
<Text>{global.vars.name}</Text>
15.阴影方案
-
IOS阴影实现方案
//RN在ios系统上支持一系列阴影的样式属性,但这些属性在Andriod上不会生效。 container : { shadowColor: '#000', shadowOffset: { width: 0, height: 2 }, shadowRadius: 2, shadowOpacity: 0.2 } -
Android阴影实现方案
-
<View elevation={2} style={styles.container}>
   <Text>Hello World !</Text>
</View>

container : {
    shadowColor: '#000',
    shadowOffset: { width: 0, height: 2 },
    shadowRadius: 2,
    shadowOpacity: 0.2,
    elevation: 2
}
16.禁止安卓键盘顶起元素
将AndroidManifest.xml文件中找到android:windowSoftInputMode:将其值更改为stateAlwaysHidden|adjustPan(原始值为adjustResize)
17.Touchable 系列组件不能很好的响应
有些时候,如果我们有一项操作与点击事件所带来的透明度改变或者高亮效果发生在同一帧中,那么有可能在onPress函数结束之前我们都看不到这些效果。比如在onPress执行了一个setState的操作,这个操作需要大量计算工作并且导致了掉帧。
handleOnPress() {
  requestAnimationFrame(() => {
    this.doExpensiveAction();
  });
}
18.优化
React 在内部state 或者外部传入的props 发生改变时,会重新渲染组件。如果在短时间内有大量的组件要重新渲染就会造成严重的性能问题。
-
使用
PureComponent让组件自己比较props的变化来控制渲染次数,实践下来这种可控的方式比纯函数组件要靠谱。或者在Component中使用shouldComponentUpdate方法,通过条件判断来控制组件的更新/重新渲染。 -
使用
PureComponent时要注意这个组件内部是浅比较状态,如果props的有大量引用类型对象,则这些对象的内部变化不会被比较出来。所以在编写代码时尽量避免复杂的数据结构 -
细粒度组件,拆分动态/静态组件。需要在项目稳定并有一定规模后来统一规划。
-
学习immutable-js
19.RN与webView交互
//RN通过injectJavaScript和injectedJavaScript注入webViewjs
//通过onMessage监听html页面发来的消息
onMessage(event) {
  console.log(event.nativeEvent.data)
}
<WebView
  ref={(webView) => (this.webView = webView)}
  source={{uri: this.state.url}}
  userAgent={this.state.ua}
  onMessage={this.onMessage.bind(this)}
  injectedJavaScript={//注入代码}
  onLoadEnd={() => {
    // 向webview注入代码
    _getData('userInfo').then((res) => {
      const jsCode = `(
        function() {
        window.newAppUserInfo = ${res};
        })();`;
      this.webView.injectJavaScript(jsCode);
    });
    this.setState({loading: false});
  }}
  />

 //html页面通过调用以下方法向RN发送数据
 window.ReactNativeWebView.postMessage('字符串数据')
20.开启手势返回
ios默认开启,安卓需手动开启
 navigationOptions: {
 	gestureEnabled: false,
 },
21.传递参数修改页面动画
// 搜索页
Search: {
  screen: SearchPage,
    //判断使用哪种切换动画
    navigationOptions: ({navigation}) => ({
      ...TransitionPresets[
        navigation.state.params.参数名
        ? 'DefaultTransition'
        : 'SlideFromRightIOS'
      ],
    }),
},
22.安卓人民币符号显示异常

这是因为全角半角的原因,全角 ¥ 会受系统影响,而半角 ¥ 则基本不受影响
- 全角 ¥,一般是输入法切换至中文输入法
shift + 4得到,而半角 ¥ 在 mac 上可以用option + Y敲出来 - 使用 HTML 特殊符号,¥ 改写为
¥
四、常见问题
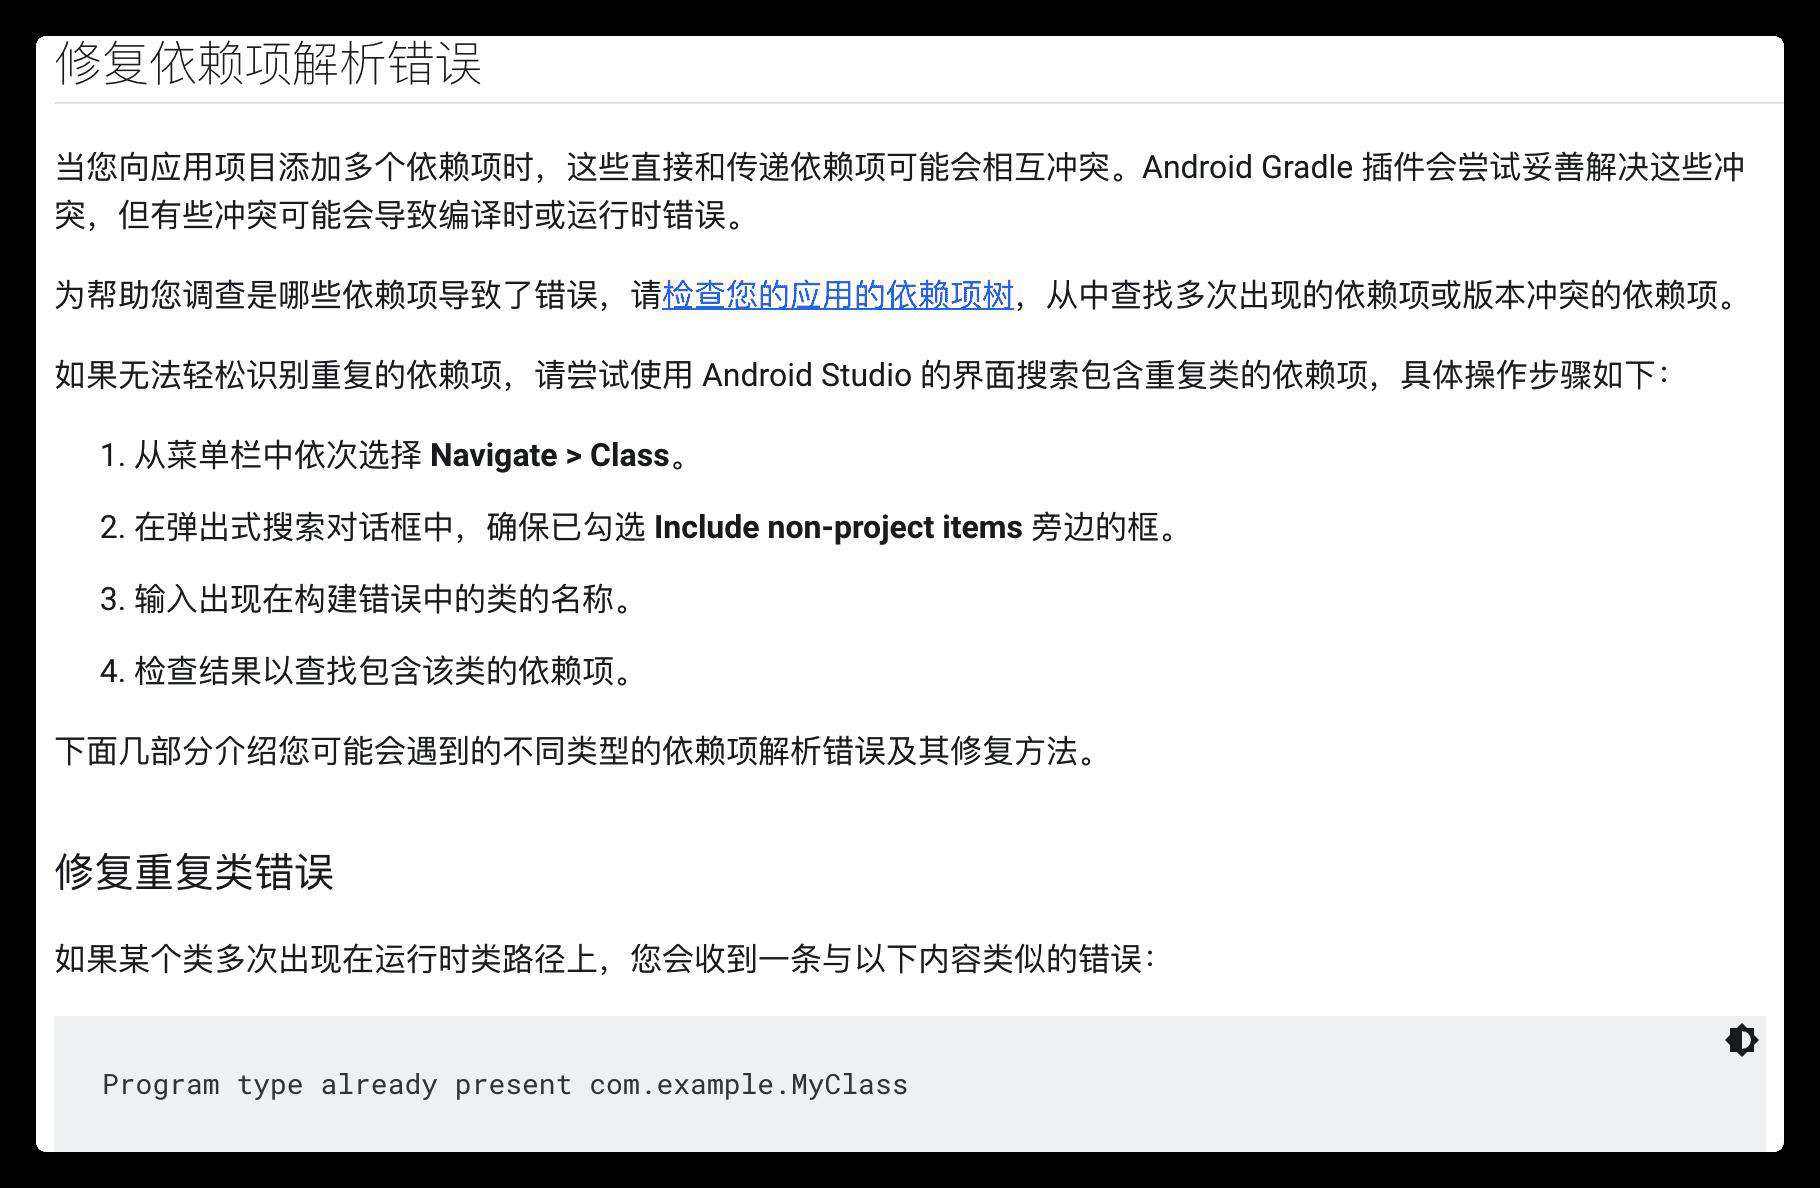
1.多个依赖安卓解析冲突

2.ios 依赖解析错误
尝试切到 ios 目录下执行 pod install
3.模拟器错误弹窗不消失
有时候因代码错误导致模拟器错误弹窗,还原代码后,错误弹窗依旧存在。可尝试以下方法:
- 关闭所有终端窗口
- 项目根目录启动终端,运行
yarn cache clean,然后再启动项目
4.TextInput 文字显示不全
安卓下存在的问题,添加样式 paddingVertical: 0
5.如何调试 http 请求
6.measure返回undefined
如果一个 View 只用于布局它的子组件,则它可能会为了优化而从原生布局树中移除,会导致一些函数在组件上调用产生意料之外的结果。 把collapsable设为 false 可以禁用这个优化,以确保对应视图在原生结构中存在。
7.安卓无法抓包
解决方案
8.webview无法自动播放h5音乐
//给webview添加一下两个属性
mediaPlaybackRequiresUserAction={false}  //不需要用户点击触发
mixedContentMode="compatibility"  //防止音乐资源和域名因协议不同(http、https)导致无法播放的问题
常见问题FAQ
- 免费下载或者VIP会员专享资源能否直接商用?
- 本站所有资源版权均属于原作者所有,这里所提供资源均只能用于参考学习用,请勿直接商用。若由于商用引起版权纠纷,一切责任均由使用者承担。更多说明请参考 VIP介绍。
- 提示下载完但解压或打开不了?
- 找不到素材资源介绍文章里的示例图片?
- 模板不会安装或需要功能定制以及二次开发?


发表评论
还没有评论,快来抢沙发吧!