背景
继上一篇 【KT】vscode插件开发例子系列(一)之后,继续补全一些例子,下面例子都相对复杂且适用,废话不多说,开干 !
例子
6.代码片段
场景
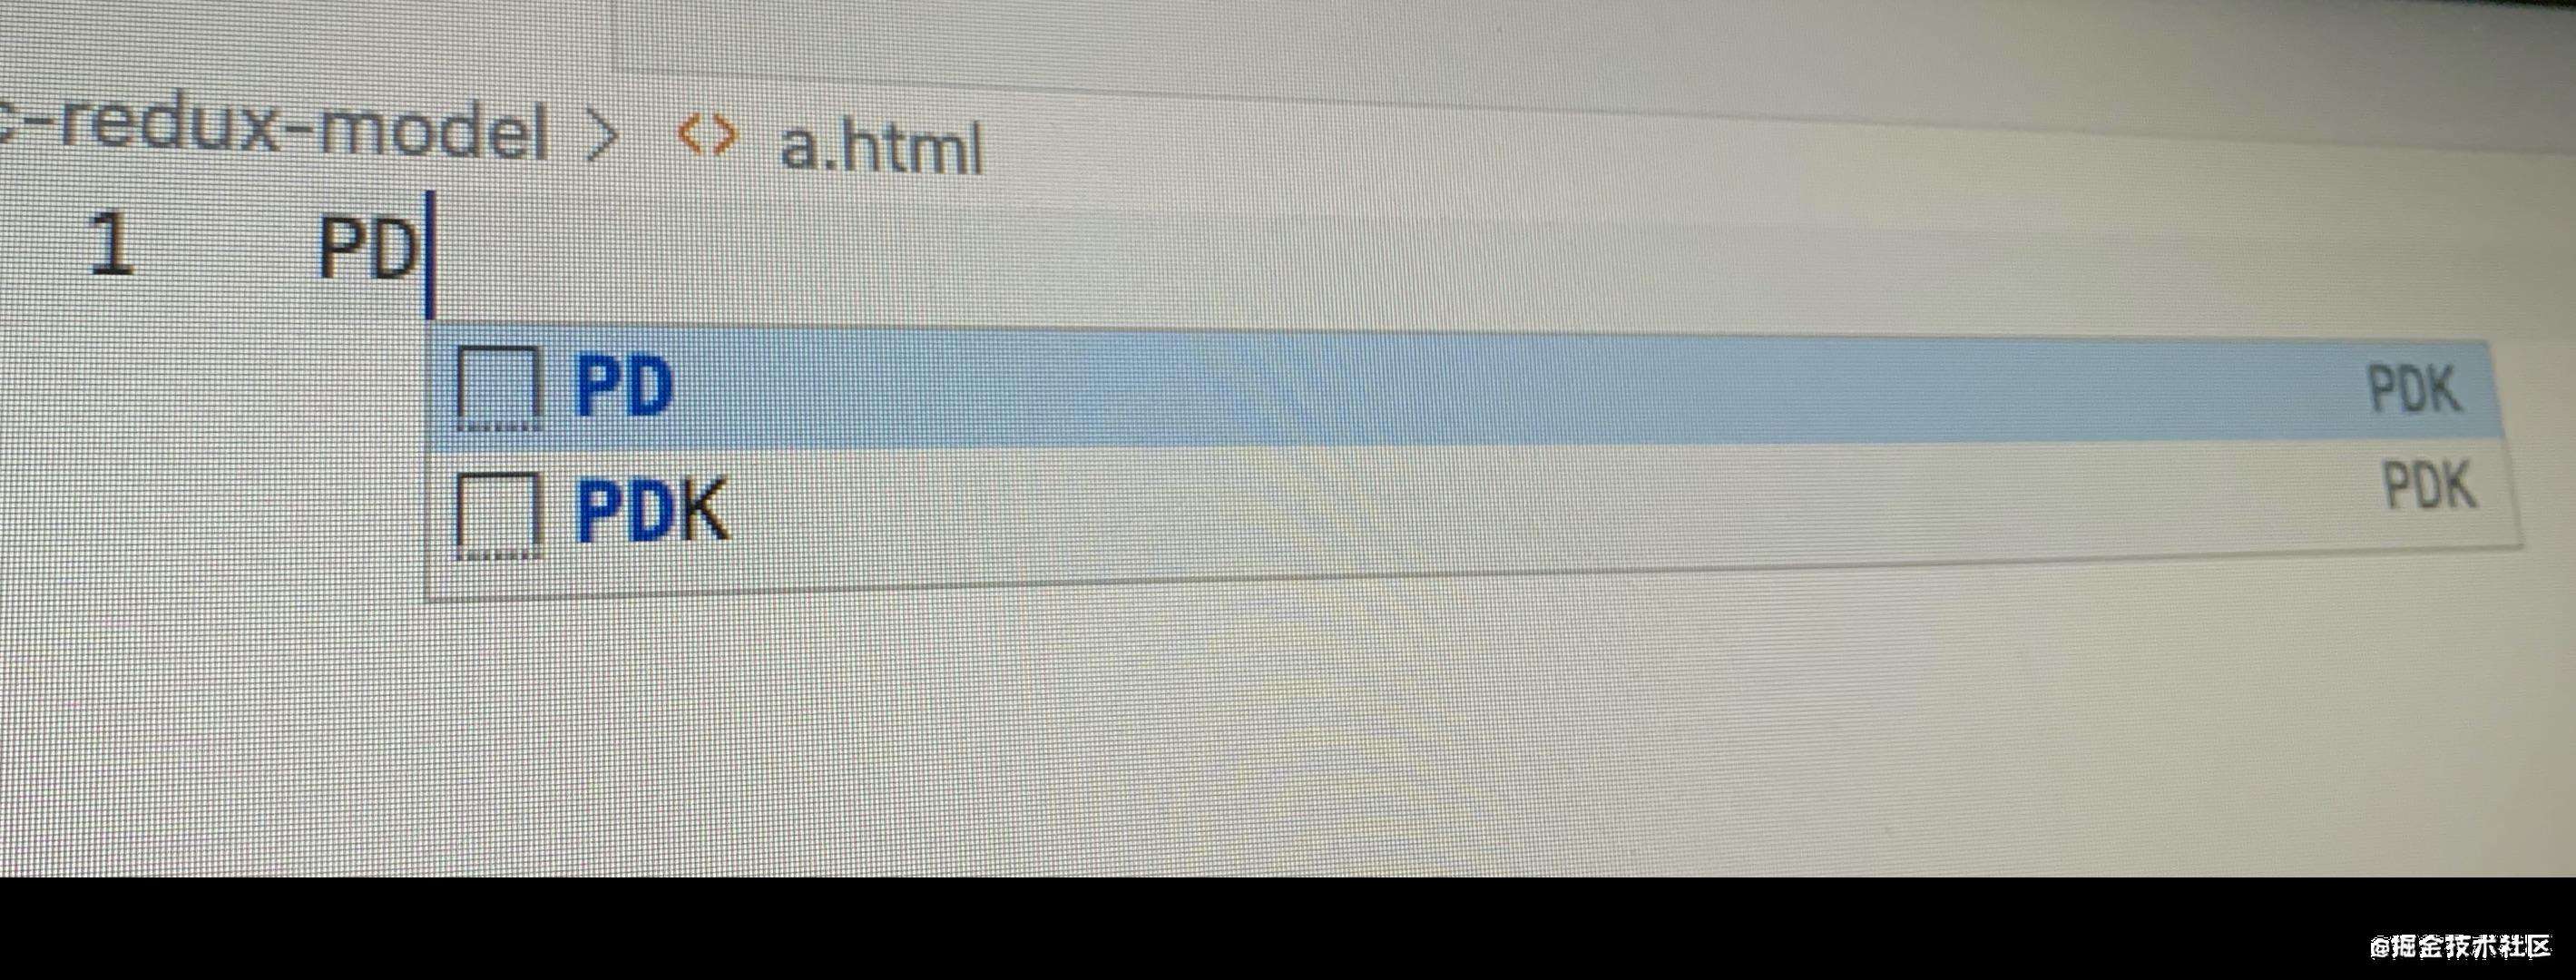
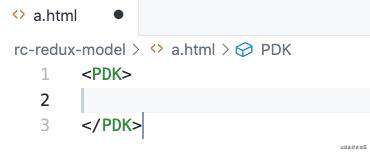
输入一个前缀,会得到一个或多个提示,然后回车带出很多代码。
代码展示
需要修改 package.json 中的 snippets 的配置
// package.json
{
  "contributes": {
    "snippets": [
      {
        "language": "html",
        "path": "./src/snippets/html.json"
      }
    ]
  }
}
然后添加一个 html.json 配置
{
  "PDK": {
    "prefix": ["PDK", "PD", "PK", "DK"],
    "body": ["<PDK>", "${1}", "</PDK>"],
    "description": "彭道宽自定义的snippets"
  }
}
关于每个字段,可以通过官方文档了解:create-your-own-snippets
上面我们是设置语言为 : html,所以在运行插件,并保证插件被激活,在规定的语言 html 中,输入 prefix 相关的关键词,就可以啦
效果展示
源码展示
- snippets 中的 package 配置
7.自定义侧边栏+面板
背景
需要在左侧自定义侧边栏,完成一些交互逻辑操作
代码实现
⚠️ 需要注意:侧边栏按钮(Tree View Container)和面板视图(Tree View)要同时配置,否则不生效
侧边栏的展示
首先,我们先看官方文档,看看如何在左边这个侧边栏添加我们自定义的内容
? contribution-points#contributes.viewsContainers
// package.json
{
  "contributes": {
    "viewsContainers": {
      "activitybar": [
        {
          "id": "sugar",
          "title": "Sugar-BeeHive",
          "icon": "./src/logo/sugar.svg"
        }
      ]
    },
    "views": {
      "sugar": [
        {
          "id": "BeeHive-Command",
          "name": "01.命令集"
        },
        {
          "id": "BeeHive-PackageAnalysis",
          "name": "02.包分析"
        }
      ]
    }
  }
}
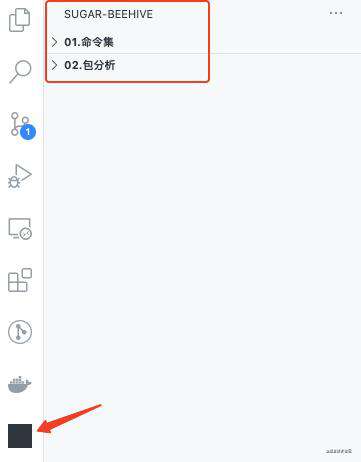
⚠️ 注意点:views 中 key 要和 activitybar 中的属性 id 保持一致,如 sugar 在两者中是一致的
这时候运行我们的插件:Run Extension,就可以看到在左侧有我们自定义的侧边栏啦
上面我们配置完 package.json 之后,我们再回到文档,会看到这么一段话:tree-view#activationEvents
如果需要,你就加上下面这段代码即可
{
  "activationEvents": ["onView:BeeHive-Command"]
}
如何定义面板内容
上面是展示出来了侧边栏,但是我们需要展示内容啊,怎么整?通过官方文档:tree-data-provider 可以实现一个小 demo,下面这段代码也是基于官方文档改的
// beehive-sidebar.ts
// demo7 自定义侧边栏入口和面板
import * as vscode from 'vscode'

const scripts = [
  {
    script: 'webpack:dev',
  },
  {
    script: 'webpack:prod',
  },
  {
    script: 'server:dev',
  },
  {
    script: 'server:test',
  },
  {
    script: 'server:test-1',
  },
  {
    script: 'server:test-2',
  },
]

/**
 * @description 重写每个节点
 */
export class SideBarEntryItem extends vscode.TreeItem {
  constructor(
    private version: string,
    public readonly label: string,
    public readonly collapsibleState: vscode.TreeItemCollapsibleState
  ) {
    super(label, collapsibleState)
    this.tooltip = `${this.label}-${this.version}`
    // this.description = `${this.version}-${Math.ceil(Math.random() * 1000)}`
  }
}

/**
 * @description 入口文件
 */
export class SideBarBeeHiveCommand
  implements vscode.TreeDataProvider<SideBarEntryItem> {
  constructor(private workspaceRoot?: string) {}
  getTreeItem(element: SideBarEntryItem): vscode.TreeItem {
    return element
  }

  getChildren(
    element?: SideBarEntryItem
  ): vscode.ProviderResult<SideBarEntryItem[]> {
    if (element) {
      //子节点
      var childrenList = []
      for (let index = 0; index < scripts.length; index++) {
        var item = new SideBarEntryItem(
          '1.0.0',
          scripts[index].script,
          vscode.TreeItemCollapsibleState.None
        )
        item.command = {
          command: 'BeeHive-Command.openChild', //命令id
          title: scripts[index].script,
          arguments: [scripts[index].script], //命令接收的参数
        }
        childrenList[index] = item
      }
      return childrenList
    } else {
      //根节点
      return [
        new SideBarEntryItem(
          '1.0.0',
          '项目一',
          vscode.TreeItemCollapsibleState.Collapsed
        ),
        new SideBarEntryItem(
          '1.0.0',
          '项目二',
          vscode.TreeItemCollapsibleState.Collapsed
        ),
      ]
    }
  }
}

export class SideBarBeeHivePackageAnalysis
  implements vscode.TreeDataProvider<SideBarEntryItem> {
  constructor(private workspaceRoot?: string) {}
  getTreeItem(element: SideBarEntryItem): vscode.TreeItem {
    return element
  }

  getChildren(
    element?: SideBarEntryItem
  ): vscode.ProviderResult<SideBarEntryItem[]> {
    if (element) {
      //子节点
      var childrenList = []
      for (let index = 0; index < scripts.length; index++) {
        var item = new SideBarEntryItem(
          '1.0.0',
          scripts[index].script,
          vscode.TreeItemCollapsibleState.None
        )
        item.command = {
          command: 'BeeHive-PackageAnalysis.openChild', //命令id
          title: scripts[index].script,
          arguments: [index], //命令接收的参数
        }
        childrenList[index] = item
      }
      return childrenList
    } else {
      //根节点
      return [
        new SideBarEntryItem(
          '1.0.0',
          '按钮组',
          vscode.TreeItemCollapsibleState.Collapsed
        ),
      ]
    }
  }
}

module.exports = function (context: vscode.ExtensionContext) {
  // 注册侧边栏面板
  const sidebarBeeHiveCommand = new SideBarBeeHiveCommand()
  const sidebarBeeHivePackageAnalysis = new SideBarBeeHivePackageAnalysis()
  vscode.window.registerTreeDataProvider(
    'BeeHive-Command',
    sidebarBeeHiveCommand
  )
  vscode.window.registerTreeDataProvider(
    'BeeHive-PackageAnalysis',
    sidebarBeeHivePackageAnalysis
  )

  //注册命令
  vscode.commands.registerCommand('BeeHive-Command.openChild', (args) => {
    console.log('[BeeHive-Command.openChild] 当前选中的是:', args)
    vscode.window.showInformationMessage(args)
  })
  vscode.commands.registerCommand(
    'BeeHive-PackageAnalysis.openChild',
    (args) => {
      console.log('[BeeHive-PackageAnalysis.openChild] 当前选中的是:', args)
      vscode.window.showInformationMessage(args)
    }
  )
}
然后在入口文件 extension.ts 添加该文件
import * as vscode from 'vscode'

export function activate(context: vscode.ExtensionContext) {
  console.log('your extension "sugar-demo-vscode" is now active!')
  require('./beehive-sidebar')(context) // demo7 自定义侧边栏入口和面板
}

export function deactivate() {}
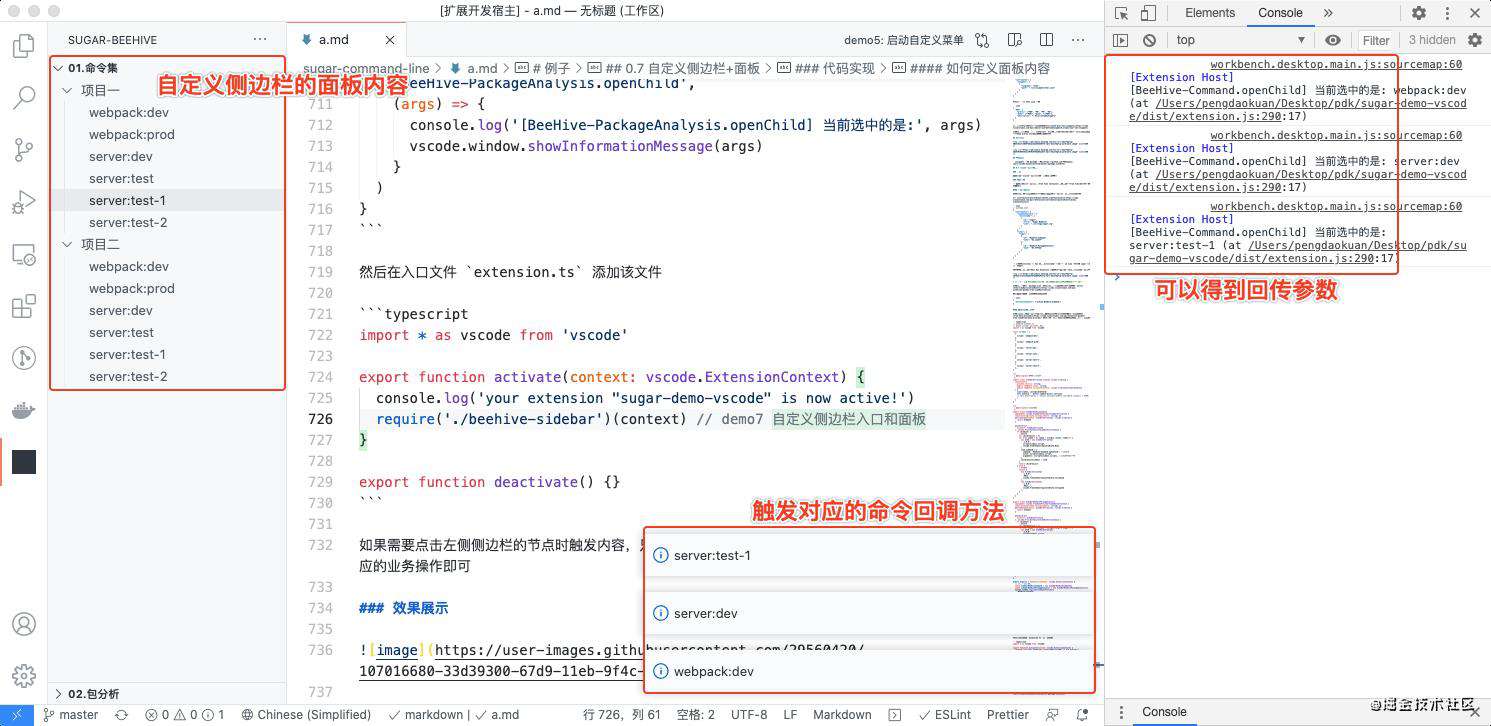
如果需要点击左侧侧边栏的节点时触发内容,只需要在 arguments 里面回传一些内容,然后做对应的业务操作即可
效果展示
源码阅读
- beehive-sidebar.ts
- package.json 中的 viewsContainers
- package.json 中的 views
8.读取文件夹目录+内容复制剪切板
场景
上一个例子: 自定义侧边栏+面板虽然可以实现我们的功能,但是还是有些缺点的,毕竟我们需要根据文件路径来动态生成我们的面板内容。
以下面例子为例:根据 vscode 工作目录,读取目录中 package.json 文件的 scripts 字段,筛选出符合规范的脚本命令,动态生成我们的按钮
首先需要明确的是:vscode有一个 vscode.workspace.rootPath,由于后来vscode支持multipleRoot模式,所以这个字段已经过时作废了。我们只能通过 vscode.workspace.workspaceFolders 获取当前工作区所有根文件夹数组;
注意:是得到的跟文件夹数组路径,也就是说,下面这种情况,得到是路径内容是这样的
├── A_Folder
│   ├── B_Folder
│   │   ├── D_Folder
│   │   └──
│   │
│   ├── C_Folder
│   └──
└──
上面得到的只会是 : A_Folder 的路径,得不到下面的 B、C、D路径。
还需要注意的一点是:很难划分这个文件夹是不是属于一个前端工程或者Node工程,这边我是以该文件夹下有没有 package.json 来划分,也就是如果 A下面存在 package.json ,我就认为它是一个完整的工程项目(不把它当作文件夹)
真想得到 A 下面的所有文件夹?
如果你真的想得,我的想法是:只能通过 Node 的 fs 模块去获取 A 文件夹下的文件目录,然后递归,一路找下去,办法总会有的。
OK,扯远了,来看看大概的一个思路
代码展示
先注册一下侧边栏面板
// extension.ts
import * as vscode from 'vscode'

export function activate(context: vscode.ExtensionContext) {
  console.log('插件已启动,忙去吧~')
  require('./container/commandSet')(context)
}

export function deactivate() {}
不要忘记 package.json 也需要添加
{
  "contributes": {
      "commands": [],
      "viewsWelcome": [
        {
          "view": "BeeHive-Command",
          "contents": "提高你的效率,释放你的双手~"
        }
      ],
      "viewsContainers": {
        "activitybar": [
          {
            "id": "sugar",
            "title": "Sugar-BeeHive",
            "icon": "./assets/logo_default.svg"
          }
        ],
        "panel": [
          {
            "id": "sugar",
            "title": "Package Explorer",
            "icon": "./assets/logo_default.svg"
          }
        ]
      },
      "views": {
        "sugar": [
          {
            "id": "BeeHive-Command",
            "name": "01.命令集"
          },
          {
            "id": "BeeHive-Package",
            "name": "02.包分析"
          }
        ]
      }
    },
}
接下来就是我们的重头戏了,我们看看 require 进来的 commandSet 怎么写的~
// commandSet.ts
import * as vscode from 'vscode'
import SideBarCommand from './SideBarCommand'
import { PREFIX } from '../../constants'
import { ShellType } from '../../type/common'
import { getWorkSpaceFolderList } from '../../utils'

module.exports = function (context: vscode.ExtensionContext) {
  // 1. 得到vscode所有工程项目
  const folderList = getWorkSpaceFolderList()

  // 2. 注册侧边栏面板
  const sideBar = new SideBarCommand(folderList)
  vscode.window.registerTreeDataProvider('BeeHive-Command', sideBar)

  // 3. 注册命令
  vscode.commands.registerCommand(
    'BeeHive-Command.openChild',
    (args: { title: string; shell: ShellType; [key: string]: any }) => {
      const { title, shell = null, path = '' } = args
      const reg = new RegExp(`${PREFIX}`)
      if (reg.test(title)) {
        vscode.window.showInformationMessage(title)
      } else {
        // 4. 复制到剪切板
        vscode.env.clipboard.writeText(`cd ${path} \n npm run ${shell?.key}`)
        vscode.window.showInformationMessage(
          `ok, fine ! shell copied to clipboard ~`
        );
      }
    }
  )
}
接下来的重头戏就是,我们实现的这个 SideBarCommand 了,这里主要重写了 getChildren 方法,通过动态去生成面板内容
// SideBarCommand.ts
/**
 * @description 命令集侧边栏实例
 */
import * as vscode from 'vscode'
import { PREFIX } from '../../constants'
import { FolderType, ShellType } from '../../type/common'
import { isExist, read, getShellFromScripts } from '../../utils/package'
import { SideBarEntryItem, SideBarEntryListImplements,} from '../../factory/SideBar'

function getNode(
  title: string,
  description?: string,
  args?: { [key: string]: any }
) {
  let node = new SideBarEntryItem(title, vscode.TreeItemCollapsibleState.None, description)
  node.command = {
    command: 'BeeHive-Command.openChild', //命令id
    title: title,
    arguments: [{ title, ...args }], //命令接收的参数
  }
  return node
}

export default class SideBarCommand extends SideBarEntryListImplements {
  constructor(private folderPathList: FolderType[] | undefined) {
    super()
  }
  getChildren(
    element: SideBarEntryItem | undefined
  ): vscode.ProviderResult<SideBarEntryItem[]> {
    if (element) {
      var childrenList: any = []
      if (isExist(`${element.path}/package.json`)) {
        const packageValues = read(`${element.path}/package.json`)
        if (packageValues && packageValues.scripts) {
          const eggShell = getShellFromScripts(packageValues.scripts, 'server')
          const webpackShell = getShellFromScripts(packageValues.scripts, 'webpack')
          const shellList = [...webpackShell, ...eggShell]
          if (!!shellList.length) {
            shellList.forEach((shell: ShellType, index: number) => {
              const node = getNode(shell.key, `[${shell.environment}]`, { shell, path: element.path })
              childrenList[index] = node
            })
          } else {
            const noneNode = getNode(`[${PREFIX}]: scripts 脚本命令不符合规则`)
            childrenList = [noneNode]
          }
        } else {
          const noneNode = getNode(`[${PREFIX}]: 不存在 scripts 脚本命令`)
          childrenList = [noneNode]
        }
      } else {
        const noneNode = getNode(`[${PREFIX}]: 工程项目不存在package.json`)
        childrenList = [noneNode]
      }
      return childrenList
    } else {
      const folderNode = this.folderPathList?.map((folder: FolderType) => {
        return new SideBarEntryItem(
          folder.name,
          vscode.TreeItemCollapsibleState.Collapsed,
          '',
          folder.path
        )
      })
      return folderNode
    }
  }
}
上面的例子来自实战: vscode-beehive-extension
源码阅读
- SideBarCommand
- commandSet
9.自定义插件首选项配置,根据配置执行不同逻辑
场景
每一个插件都可以自行添加首选项的配置,当打开 vscode 时,根据首选项选择的配置,执行不同的逻辑,接下来说说如何实现此效果
代码展示
我们现在 package.json 中配置一下我们首选项参数
{
   "contributes": {
      "configuration": {
        "title": "sugar-demo-vscod",
        "properties": {
          "sugar-demo-vscode.matchConfig": {
            "type": "string",
            "description": "sugar-demo-vscod 配置,默认低配版本",
            "enum": [
              "lowMatch",
              "middleMatch",
              "highMatch"
            ],
            "default": "lowMatch",
            "scope": "window"
          }
        }
      }
  }
}
这里需要注意,名称 sugar-demo-vscode 要一致!
上面我们已经实现了首选项配置,看看效果
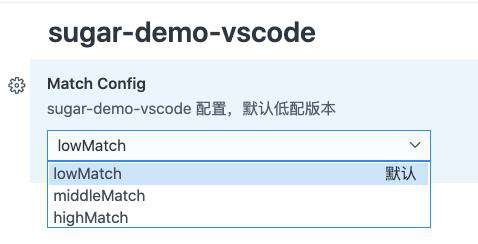
我们再获取配置,然后执行不同逻辑
    // 获取用户配置的版本设置
    const matchConfig = vscode.workspace.getConfiguration().get('vscode-beehive-extension.matchConfig')
    if (matchConfig === MATCH_CONFIG_MAPS.LOW) {
       console.log('低配')
    } else if (matchConfig === MATCH_CONFIG_MAPS.MIDDLE) {
        console.log('中配')
    } else if (matchConfig === MATCH_CONFIG_MAPS.HIGH) {
        console.log('高配')
    } else {
      vscode.window.showErrorMessage(`unknown error`)
    }
如果要通过代码修改 matchConfig 内容,可以通过
// 最后一个参数,为true时表示写入全局配置,为false或不传时则只写入工作区配置
vscode.workspace.getConfiguration().update('vscode-beehive-extension.matchConfig', 'middleMatch, true);
源码展示
- beehive-customUserConfig.ts
打包、发布
这东西就不需要我教了吧?搜一下还是有这方面的文章的,我就不当搬运工了,感兴趣的自行去搜一搜,或者等我后续实战文章出来看看?
唠嗑几句
至此大部分适用的 vscode demo 例子我都放在: learn-vscode-extension中,如果你想看实战源码,请移步这里: ? vscode-beehive-extension
相关链接
- 阿宽的博客
- SugarTurboS
- vscode-gitlens
- 官方文档API
- 小茗同学-vscode插件开发全攻略
- 【KT】vscode插件开发例子系列(一)
常见问题FAQ
- 免费下载或者VIP会员专享资源能否直接商用?
- 本站所有资源版权均属于原作者所有,这里所提供资源均只能用于参考学习用,请勿直接商用。若由于商用引起版权纠纷,一切责任均由使用者承担。更多说明请参考 VIP介绍。
- 提示下载完但解压或打开不了?
- 找不到素材资源介绍文章里的示例图片?
- 模板不会安装或需要功能定制以及二次开发?


发表评论
还没有评论,快来抢沙发吧!